During my curatorship, I was mostly intrigued by Steven Meisel's work and George Hoyningen-Huene's work. These two fashion photographers are from two different eras, Meisel is a much more modern photographer, whereas Huene was most well-known in the 1920s and 1930s. For my practical response, I intend to explore the issues and themes these photographers tended to include in their work. As fashion photography is a very broad topic, during this project, I want to explore different areas of fashion photography. For example, similar to Meisel, I want to first explore ways in which I can communicate social issues through my work. A topic that interests me is fast fashion and the effects it has on the environment.
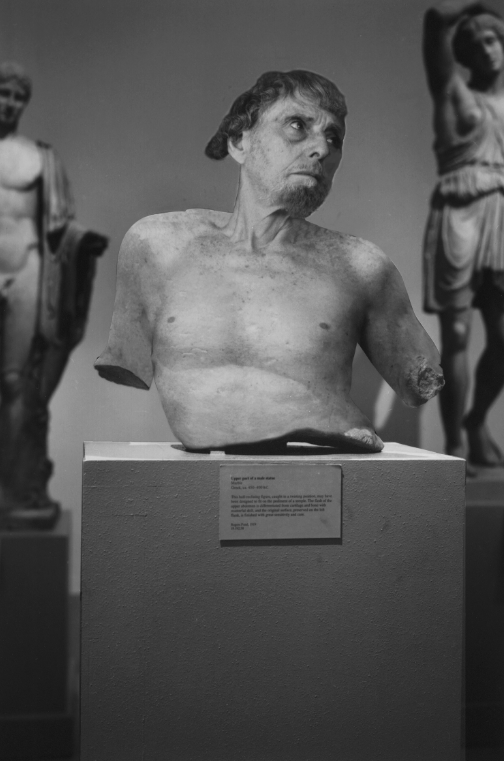
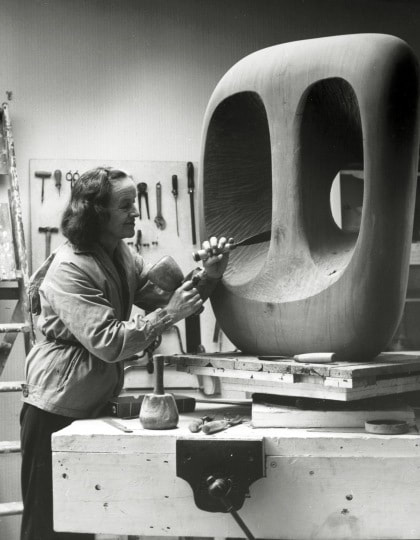
Hoyningen-Huene's work tended to include reoccurring themes of Greek statuary and sculptures. Huene had an admiration for the classical ideal, and this was clearly illustrated through his images, which aligned classical and modern imagery. Lighting played a huge role in Huene's images, but also in Louise Dahl-Wolfe's images. This common motif of Greek sculptures interests me, therefore, during this project I want to also explore ways in which I can photograph and incorporate this theme of sculptures in my work.
Hoyningen-Huene's work tended to include reoccurring themes of Greek statuary and sculptures. Huene had an admiration for the classical ideal, and this was clearly illustrated through his images, which aligned classical and modern imagery. Lighting played a huge role in Huene's images, but also in Louise Dahl-Wolfe's images. This common motif of Greek sculptures interests me, therefore, during this project I want to also explore ways in which I can photograph and incorporate this theme of sculptures in my work.
BRIEF
To explore ways in which I can communicate social issues through my work. A topic that interests me is fast fashion and its negative impact. I therefore intend to create work that reflects fashion fashion and its effects.
Steven Meisel
Firstly, I have decided to start looking at Steven Meisel's work as he is most well-known for his controversial shoots. Meisel’s goal with many of his editorials is to try and send a message to his viewers and get them thinking about the wider issues in society, which fashion photographers often shy away from and ignore due to their sensitive and controversial nature.
Meisel is an American fashion photographer born in 1954. From a young age, photographs in fashion magazines always fascinated Meisel. He had a notebook that was filled with drawings of women from magazines like Vogue. His career had begun as an illustrator for Halston, a fashion designer and whilst working for this designer, he was also teaching illustration part-time at Parsons The New School For Design in New York. Fashion illustration had become his major subject so he also started working as an illustrator at Women’s Wear Daily (WWD). He did not want to work at WWD anymore, so he decided to teach himself how to use a camera. During the weekends he would photograph young models and actresses for their portfolios. These shoots landed him work with magazines such as Seventeen, Mademoiselle and Vogue. In 2001, his work for a Versace advertising campaign was being shown at London’s White Cube Gallery, which was his very first European gallery presentation. Shooting every Italian Vogue cover for the last two decades, Meisel has dominated the Italian fashion industry, whilst also producing some of the most memorable campaigns for Prada, Valentino, Versace and many more.
Meisel is an American fashion photographer born in 1954. From a young age, photographs in fashion magazines always fascinated Meisel. He had a notebook that was filled with drawings of women from magazines like Vogue. His career had begun as an illustrator for Halston, a fashion designer and whilst working for this designer, he was also teaching illustration part-time at Parsons The New School For Design in New York. Fashion illustration had become his major subject so he also started working as an illustrator at Women’s Wear Daily (WWD). He did not want to work at WWD anymore, so he decided to teach himself how to use a camera. During the weekends he would photograph young models and actresses for their portfolios. These shoots landed him work with magazines such as Seventeen, Mademoiselle and Vogue. In 2001, his work for a Versace advertising campaign was being shown at London’s White Cube Gallery, which was his very first European gallery presentation. Shooting every Italian Vogue cover for the last two decades, Meisel has dominated the Italian fashion industry, whilst also producing some of the most memorable campaigns for Prada, Valentino, Versace and many more.
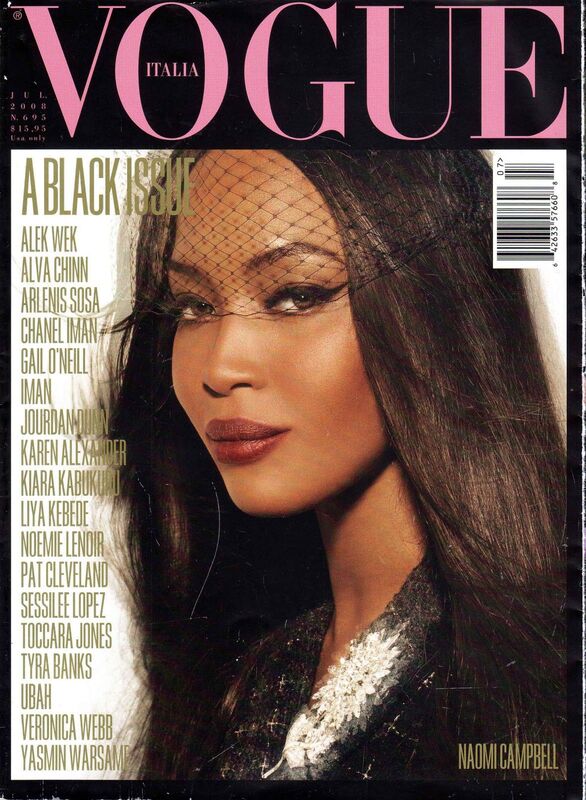
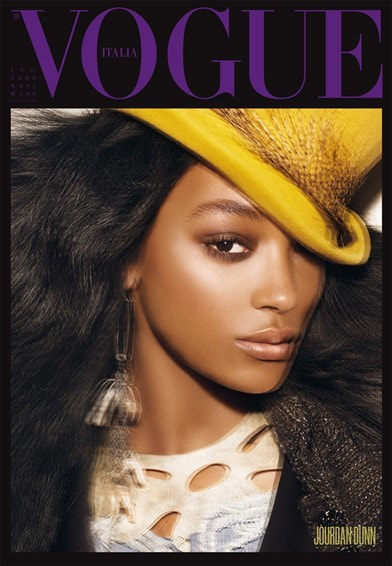
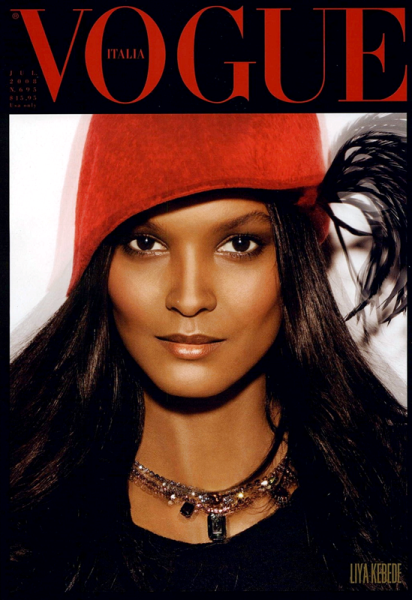
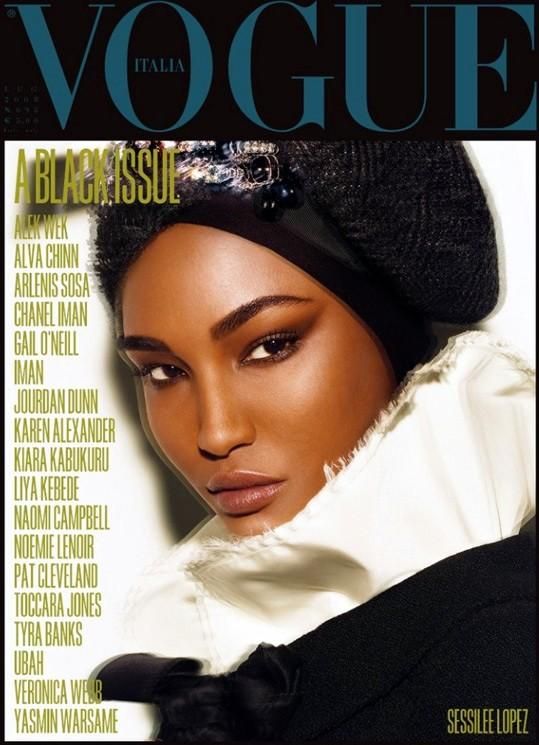
Steven Meisel is known for his controversial shoots, and in 2008, he ‘broke one of the fashion world’s taboos’ by only photographing black models for the July issue of Italian Vogue. The magazine featured one hundred pages of black women. African-American model Donyale Luna appeared on the cover of the British edition of Vogue in 1966, but it would be another decade before black women were truly accepted by the Western fashion industry. It was not until 1974 that a black woman appeared on the cover of American Vogue. The cover featured model Beverly Johnson, and it was that cover that marked a key turning point in fashion for black women. During the 1970s, designers started incorporating influences from different cultures into their collections, so non-white models started appearing on the scene. Meisel told the New York Times: ‘I have asked my advertising clients so many times, “Can we use a black girl?” They say no.’ Meisel wanted to make a stand against this inequality and lack of black models on covers by doing this ‘Black Issue’. This issue was a wake-up call to the fashion industry to stop racial and cultural discrimination. Its release shook the status quo of the industry. The excitement and hype around it meant it had sold out immediately. Condé Nast, the publisher of Vogue, had to reprint tens of thousands more copies for Europe and the United States and this had never happened before. Meisel and Franca Sozzani, the editor-in-chief of Italian Vogue, did not just make this issue to create controversy, they did it to also celebrate women of colour and help advance the career of models from many ethnic groups. There were four separate covers for the issue, each a colourful and vibrant portrait of some of the most popular black supermodels including, Naomi Campbell, Jourdan Dunn, Liya Kebede and Sessilee Lopez.
(documented in my curatorship)
(documented in my curatorship)
|
|
|
|
This controversy that Meisel creates through his images, has made me explore topics in the fashion industry that are often not spoken about as much as they should be. Fast fashion shops are constantly producing clothes, yet their instant appeal makes it easy to forget the damage the fashion industry inflicts on nature. Consumers tend to turn a blind eye to the harsh reality of fast fashion and I think by exploring this topic, I can raise awareness in an artistic manner. To visually represent my ideas surrounding the broader topic of consumerism, creating a mind map and pinterest board will help illustrate my thoughts.
|
One idea that I am particularly interested to photograph and explore is fashion exploitation. As fashion images in magazines, films, the internet and television speed their way around the world, they create a 'global style' across borders and cultures which increases the dependency on massive amounts of cheap labour in poor countries.
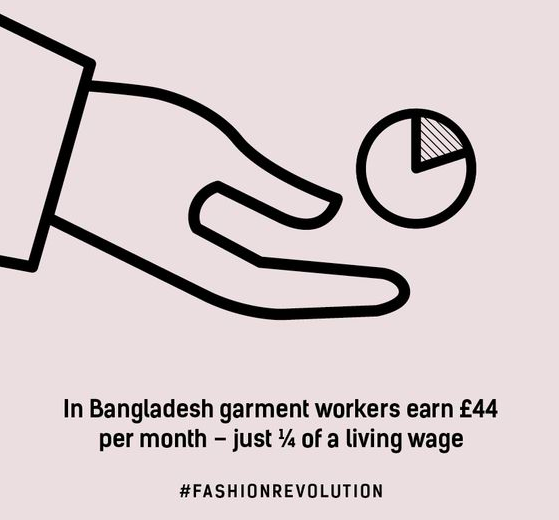
Fashion is present in our lives everyday and new fashion trends are constantly inspiring the creations of designers, however, to adapt to this constant flow of trends and competitiveness, companies do not manufacture their own goods but rather relocate their production to developing countries where workers produce in appalling conditions that amount to modern day slavery and the worst forms of child labour. Child labour is the employment of children in an industry or business that deprives them of their childhood. Children are seen as obedient workers which makes them easy to manage however there is no supervision and there are no unions that can help them to bargain for better working conditions. The hugely complex fashion supply chain makes it harder for companies to control every stage of production which in turn, makes it possible to employ young children without the big brands and consumers ever finding out. An estimated 170 million children are engaged in child labour which is around 11% of the global population of children. Furthermore, forced labour is not only happening in fast fashion brands but also more luxury and exclusive brands have been known to have forced labour in their supply chain. There is a huge contrast between production in sweatshops, where young women workers are subjected to physical and sexual abuse, and consumption in retail chains filled with glamorous images. |
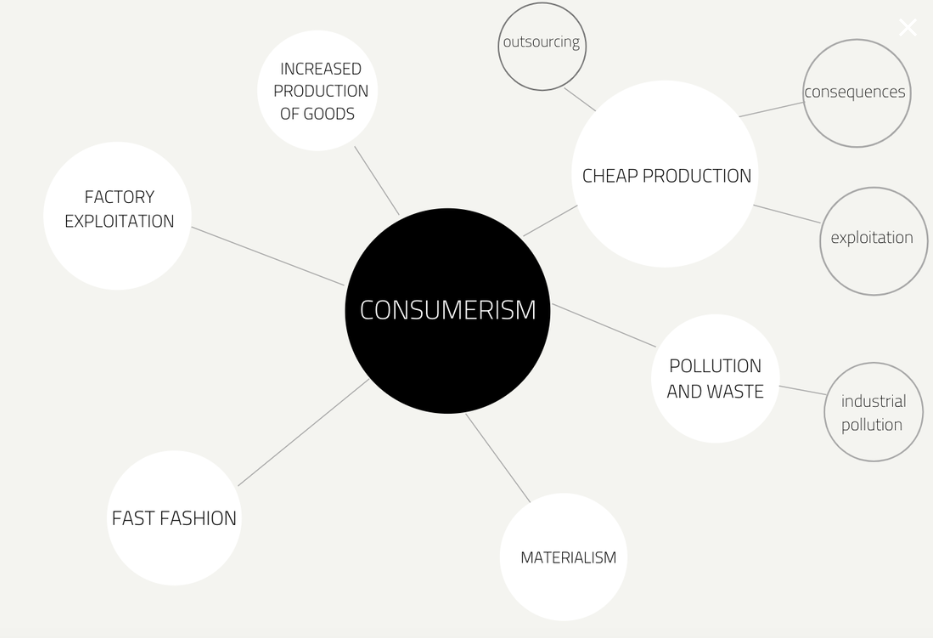
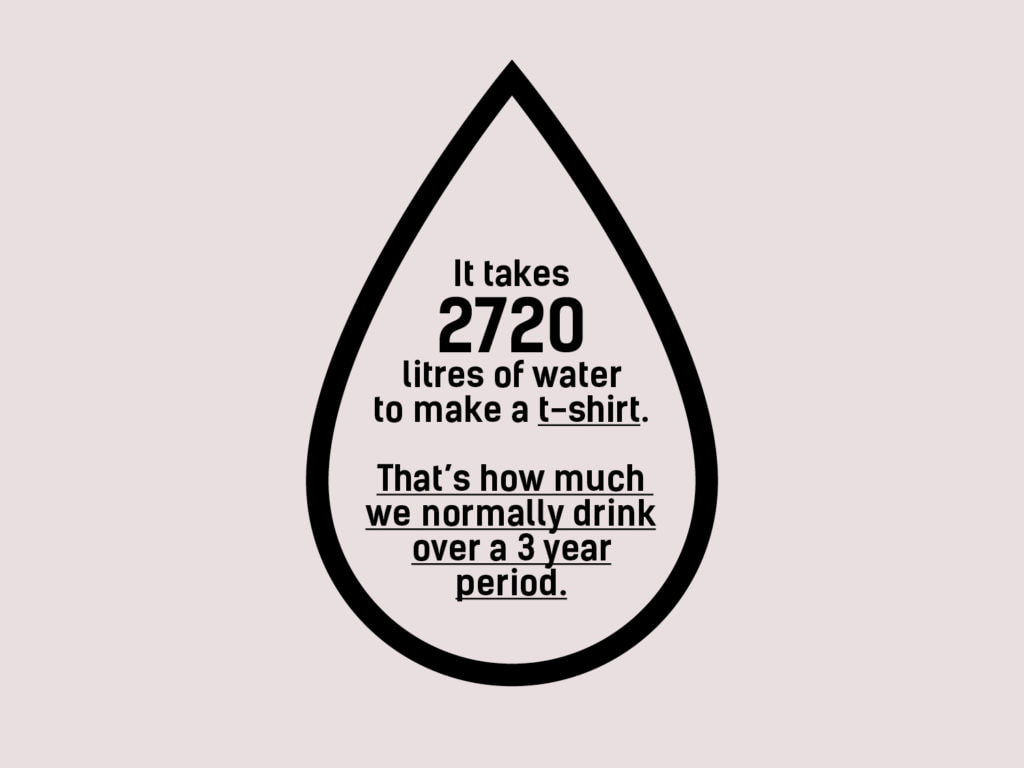
The fashion industry also poses significant environmental consequences. It is one of the most polluting industries on the planet, for example, the amount of pesticides and water used in cotton production have been known to cause drought and have been linked to cancer in India. Additionally, the consumption of fast fashion means the amount of textile waste is increasing at an uncontrollable rate as these clothes are only being worn for a few wears before they are disposed of. |
As I was researching into this subject, I found a documentary that 'exposes the dark reality of fast fashion'. The documentary is called 'Machines' and is directed by Rahul Jain. For his documentary, he travels to a vast textile mill in Gujarat, India and captures the inner-workings in this factory. The men in this factory get paid three US dollars per 12-hour shift and they only take one hour breaks between shifts as they have the financial pressures of providing for their families. When Jain was asked whether the factory produce textiles for companies worldwide, he says, "Yes, very much so, for all the usual suspects – high street chains. I can’t name them because I don’t have definite proof, but from what the workers told me it was a wide net. And remember, it’s just one factory: there are 1300 factories in the space of four kilometres squared, employing more than a million and a half people." This documentary is really effective and really does capture the 'dark reality of fast fashion'. What I thought was particularly effective was the way that Jain lets the viewer into the workers' world by making it very raw and untouched. For example, when there is dialogue, it is only from the workers themselves which really enhances the reality and actuality of it all, which makes the viewer feel as if they are there. Jain deliberately removed his presence from the film to let the audience be involved in what the workers were saying.
Research section:
Rana Plaza collapse
Rana Plaza collapse
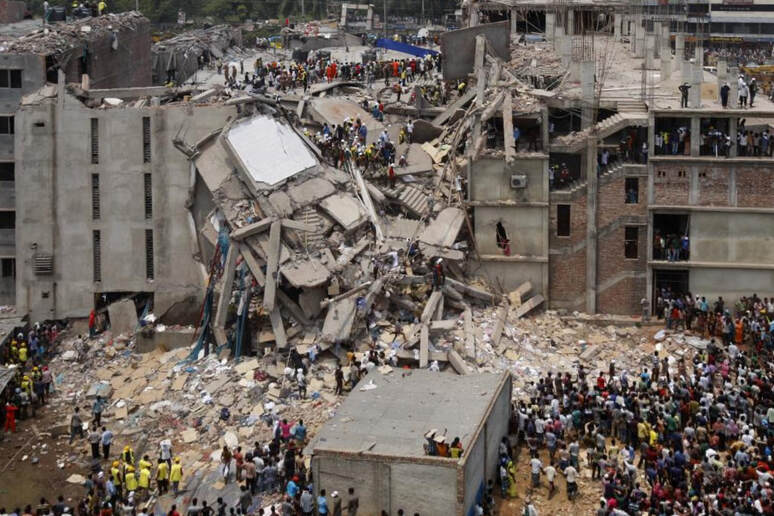
In 2013, the eight-story building called Rana Plaza in Bangladesh collapsed. The day before, deep cracks outside of the building were seen but managers insisted that the workers still entered the factory to work. The workers in this factory who were producing clothes sourced by major international brands, had begged not to be allowed in as the building was visibly very unsafe and the workers felt like they were risking their lives if they entered. However, the managers were not listening to them. The workers had no other choice but to file in. Two thousand people filed in and just before 9am, floors started vanishing and workers started falling. The building took less than ninety seconds to collapse, killing 1,134 people. It is unclear about what exact companies were sourcing clothes from the building, but Primark and Matalan had previously been included. The fact that workers felt unsafe in this building and didn't want to enter, just shows the conditions that people are working in, in order to provide the consumers with cheap clothes. The manager insisting for the workers to carry on working, also shows that there must have been such a high demand for these cheap clothes as consumers are constantly buying them.
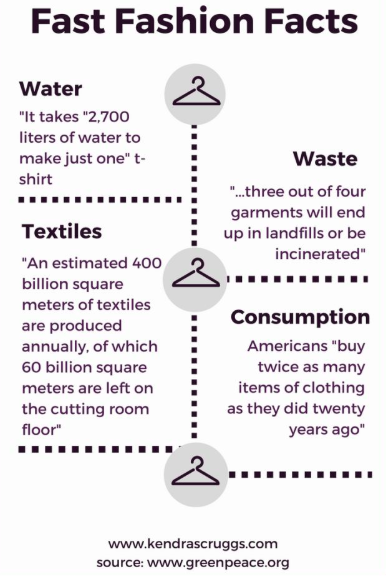
Fast Fashion Facts
|
|
Christian Boltanski
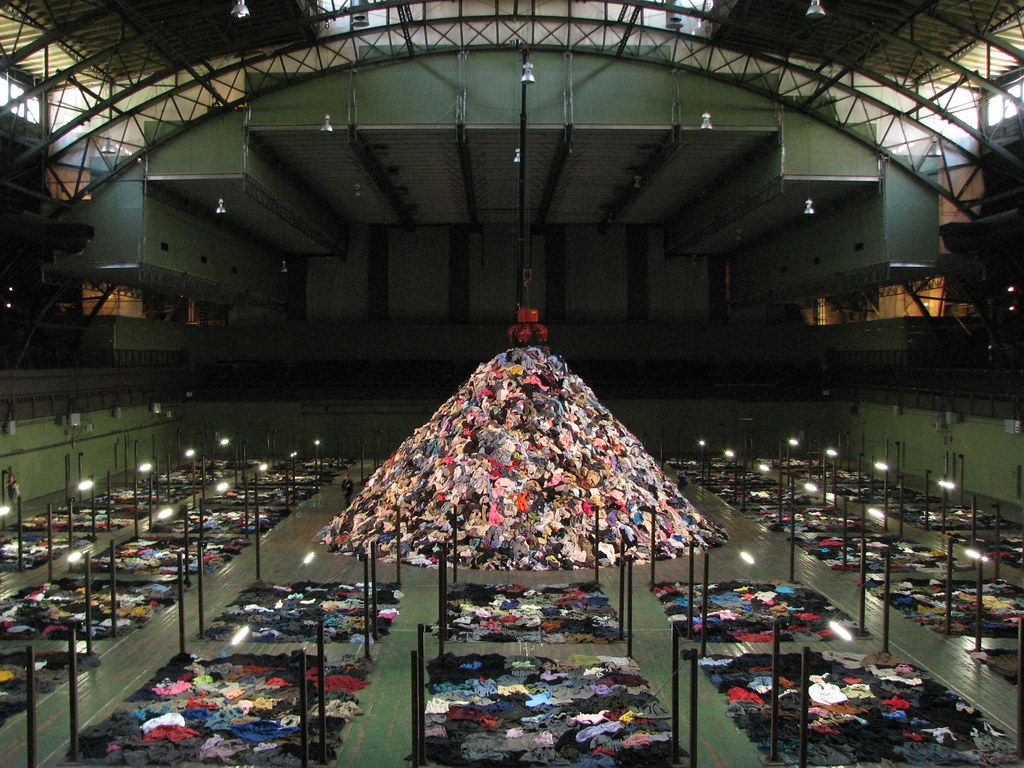
French photographer, sculptor, painter and film maker, Christian Boltanski is well known for his installations, especially the one below. For this particular installation, he filled Paris' Grand Palais with a fifty-tonne mountain of clothes and the sound of fifteen thousand heartbeats. His intention was to illustrate the heaviness of all the hearts now lost. Each piece of clothing symbolised one person. The crane above this pile of clothes was a metaphor for the 'hand of God'. The crane would reach to the clothes that were laying around the warehouse and deposit them on top of the immense pile of clothes. This crane was used as a symbol to represent all the souls that had once inhabited these clothes. Even though I have a different intention to Boltanski, I will be taking inspiration from his work. I like the idea of capturing the vast amount of clothes that are seen in fast fashion shops and how in reality they are being made in such horrific conditions in order to fulfil the consumers 'needs'.
My Response
First Shoot
First Shoot
|
|
|
|
|
|
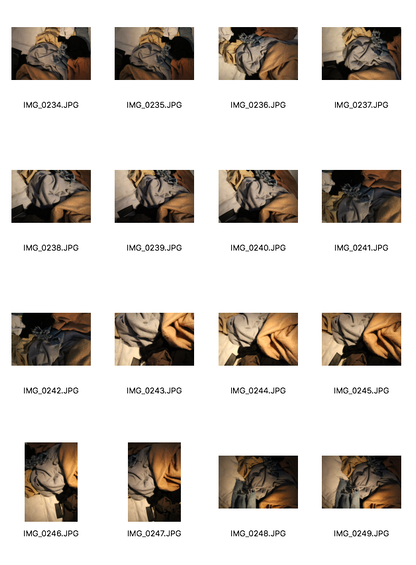
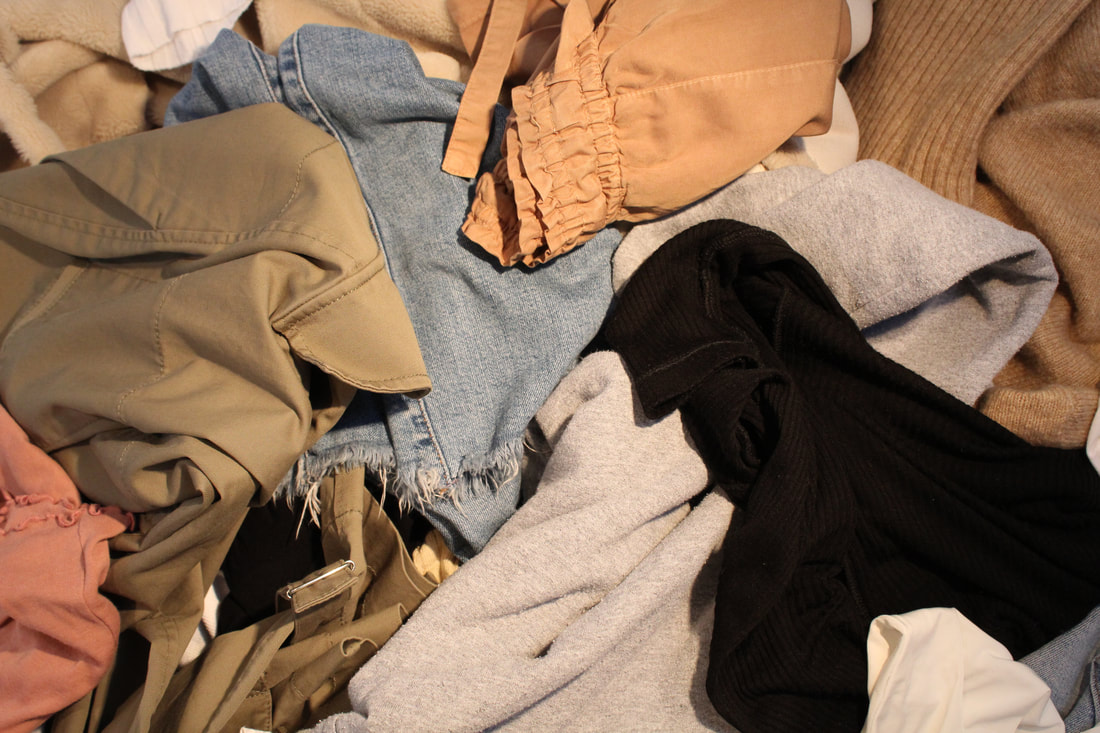
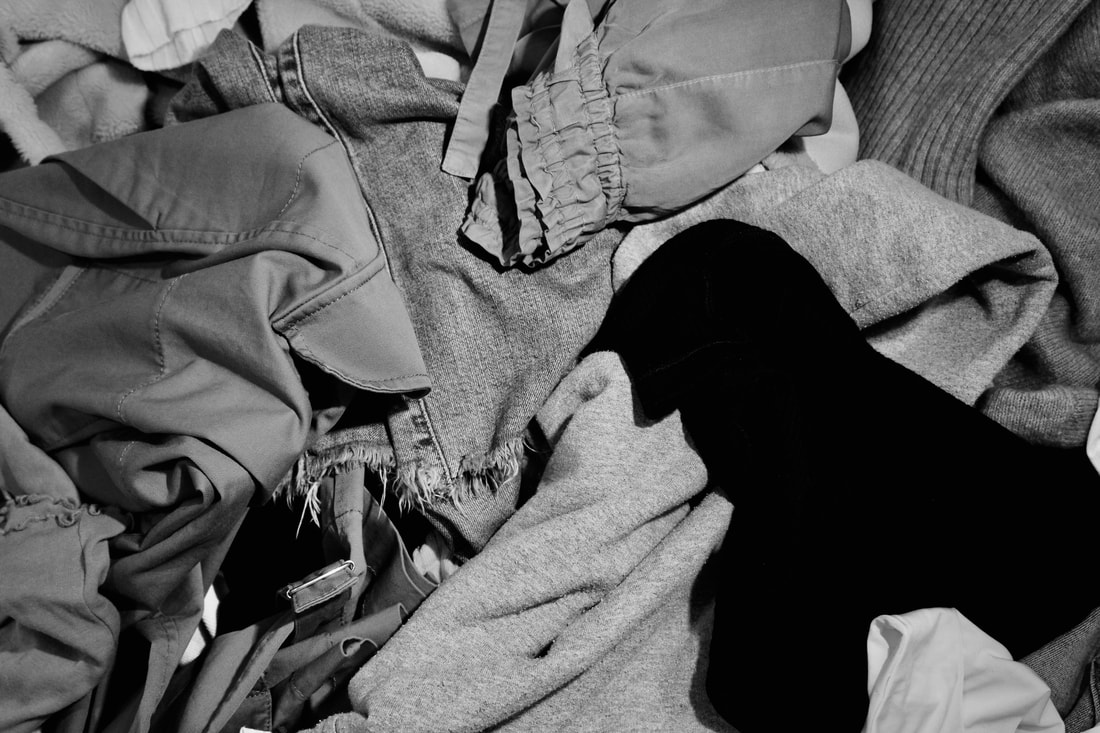
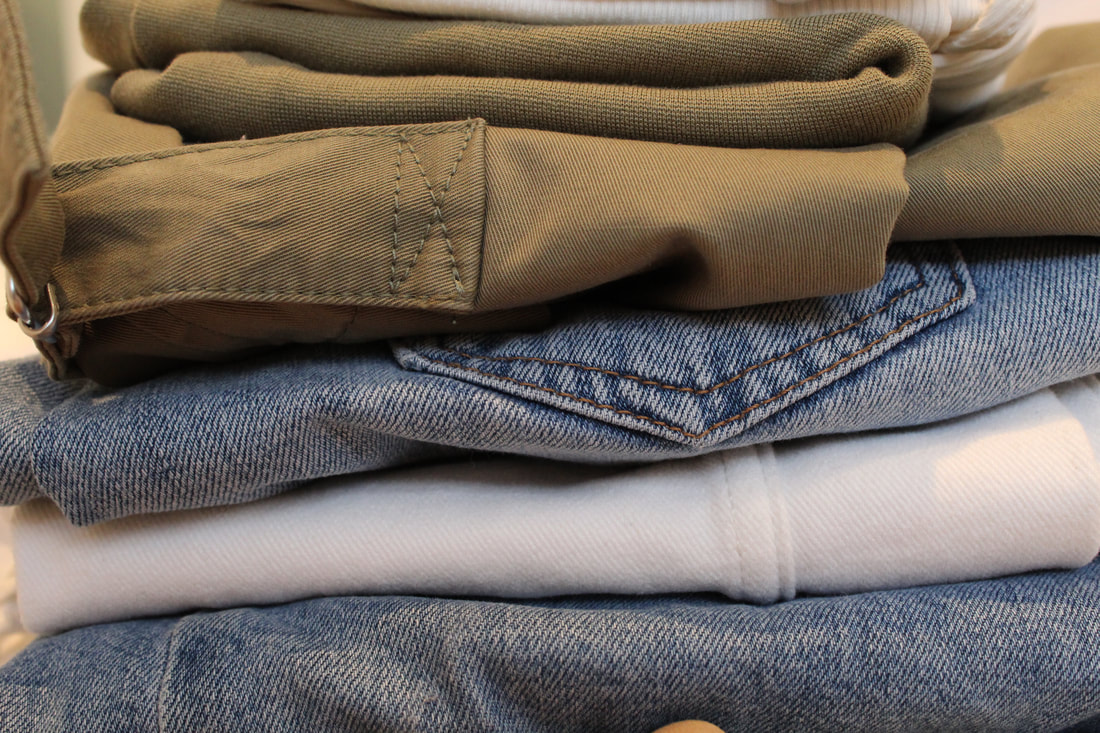
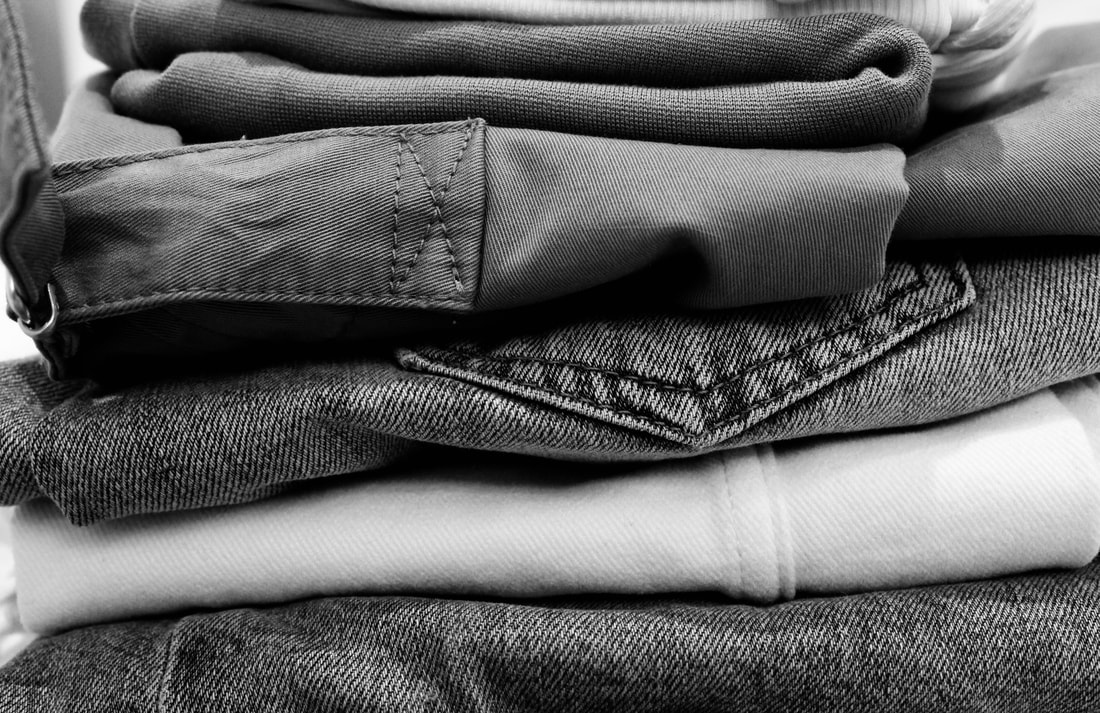
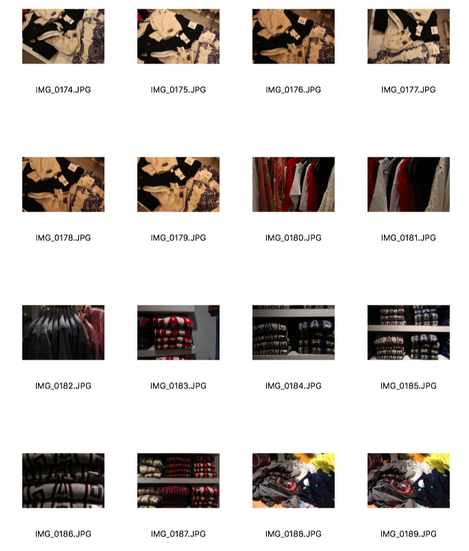
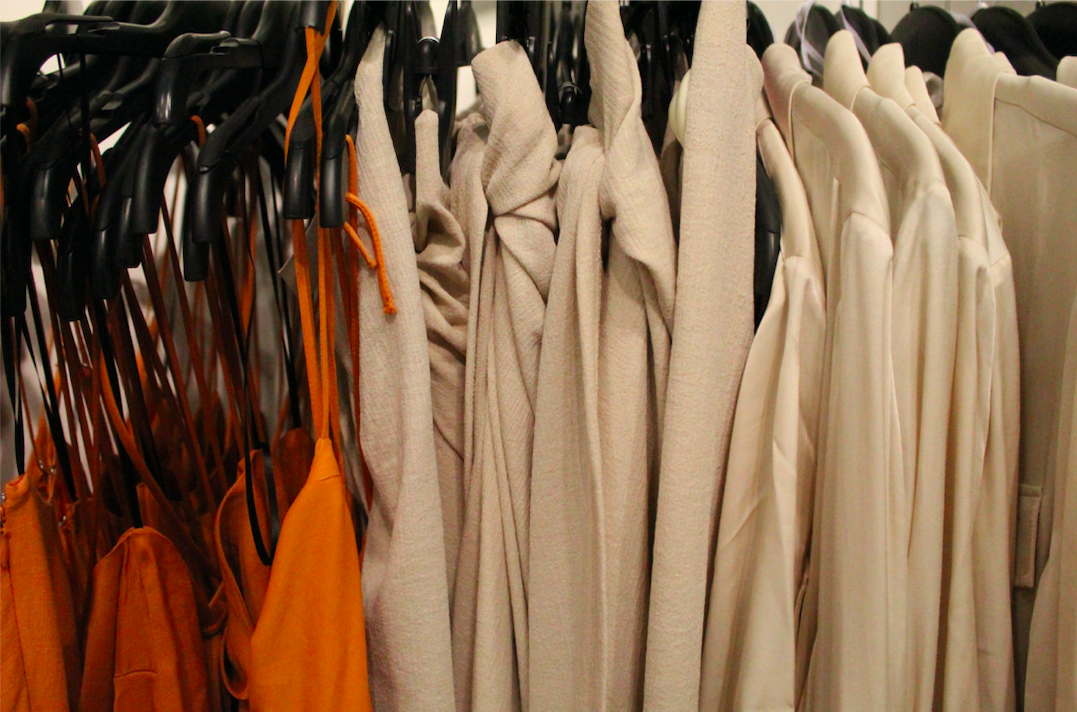
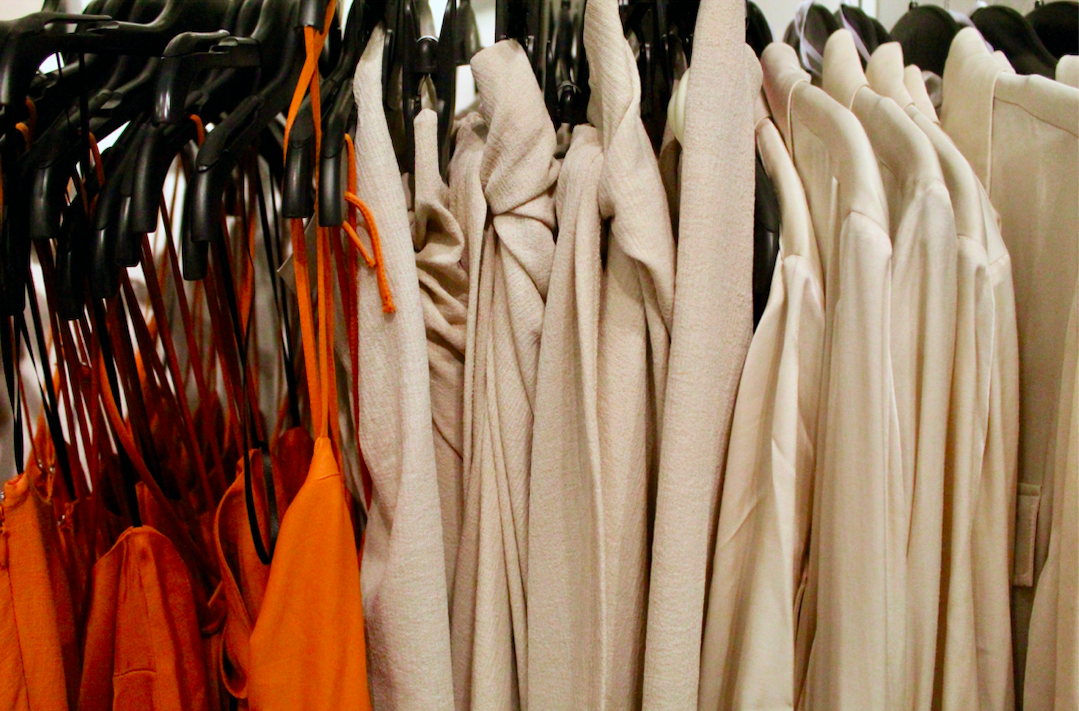
For my first shoot, I wanted to first try and experiment photographing clothes that I owned which were all from fast fashion brands. This included shops like, Topshop, H&M, Zara and Gap. It was very shocking to see the amount of fast fashion clothes I actually had which really made me think how oblivious we probably are into buying these clothes and how we may not even realise that we are contributing to this detrimental industry. I decided to create messy piles of clothes, similar to Boltanski's work but obviously not to that great extent of a fifty-tonne mountain. I think this idea of capturing the clothes in a messy state, portrays this idea of the mass production of these clothes and how it's almost impossible to arrange them in an orderly way as they are constantly being made and brought into shops. This shoot was a good starting point as it made me aware of the amount of clothes I own that come from fast fashion brands. When editing my images, I chose to change them into black & white as I felt as though having the clothes converted to different shades of grey, almost reflects the dark reality of fast fashion. For my next shoot, I will be carrying on with the same concept of photographing endless piles of clothes but instead of using my own clothes, I will visit fast fashion shops.
|
Original
|
Edited
|
|
|
Second Shoot
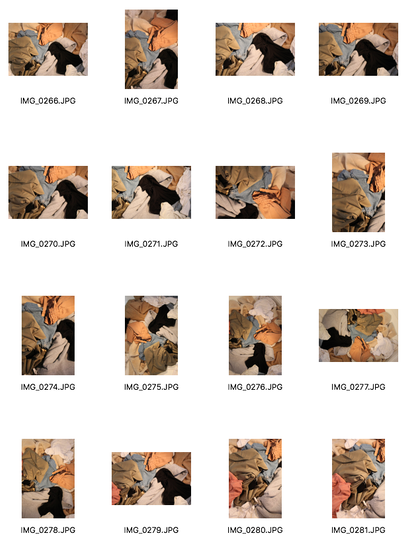
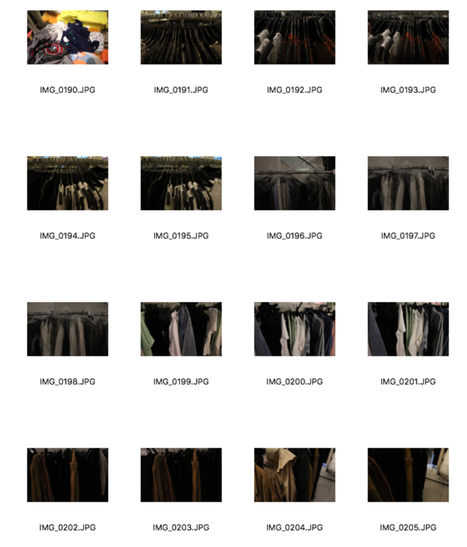
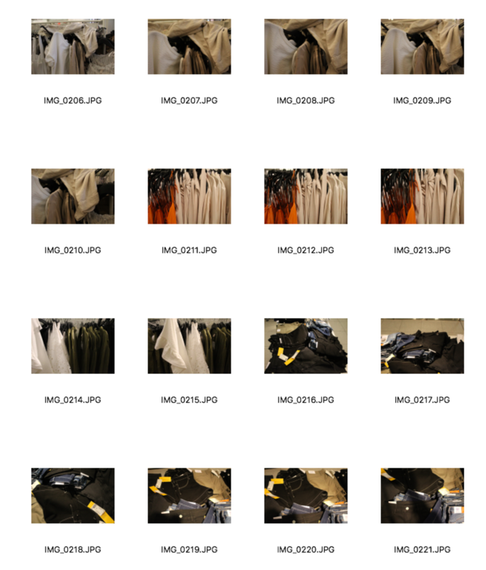
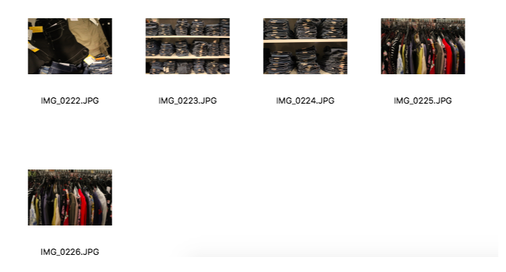
In this shoot, I went to fast fashion shops in Oxford Street, like Primark, Zara, Gap, H&M and Forever21 with the intention of capturing the messy piles of clothes. When I was in these shops, I found that there were so many rails of clothes that were squashed so close together, demonstrating the masses of clothes that are brought into these stores on a daily basis. Primark was the biggest store I visited and everywhere I looked there were piles and piles of clothes, surrounded by many people looking through them. Primark is an Irish brand and is known for their range of clothing, footwear and accessories for women, men and children at super cheap prices. Many fast fashion brands, including Primark, do not own their own factories and outsource manufacturing to their suppliers which means that they do not have control over their supply chain and can therefore take no responsibility for factory workers and any labour issues that may be occurring. I also went to photograph in Zara and Forever21 which are also huge fast fashion brands, producing clothes for very affordable prices. With new trends coming out every week, the goal of fast fashion is for consumers to buy as many garments as possible, as quickly as possible.
|
|
|
|
|
|
|
|
|
Original
|
Edited
|
|
|
|
|
Evaluation
When I was in these shops, I found it quite difficult to get shots of the clothes without anyone being in the frame of the photographs. The shops were extremely busy, meaning I had to wait for long periods of time in order to get clear photographs of just the clothes. Even though this shoot took me longer than I expected, it made me more aware of the large masses of people that visit these shops everyday. They are essentially indirectly contributing to this detrimental industry of fast fashion. Looking back at the images I took, I feel as though they do not illustrate well enough the actual amount of clothes there really was in each shop. The camera is only able to photograph a small section of the clothes, therefore is not able to show an accurate representation of the amount of clothes that are in these stores. This limitation has in fact inspired me to use Photoshop in my next development, as a way of emphasising the vast amounts of clothes.
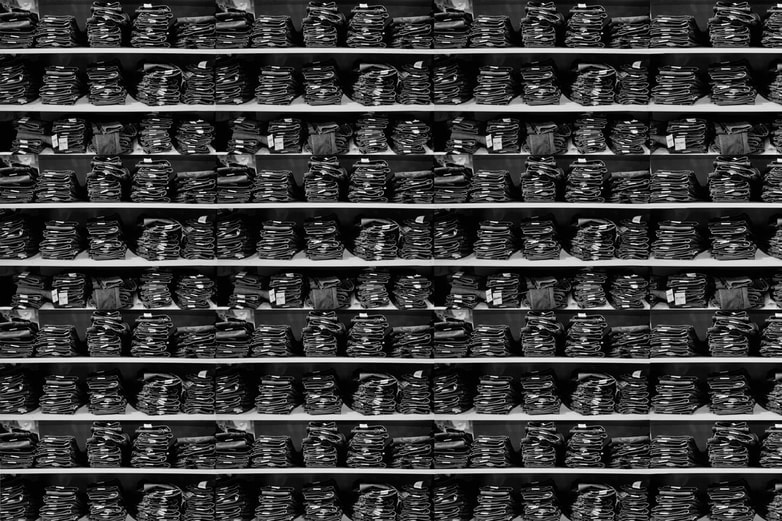
Andreas Gursky: Amazon Warehouse
|
German photographer Andreas Gursky created this huge, immensely packed image which portrays the amount of excess and waste that we create due to consumerism. Gursky visited Amazon warehouse in Arizona which was stocked with books and boxes. When visiting the warehouse, Gursky said that it was very tough because of the working conditions. Amazon is so quick and practical, for example, if you want something, it can come the next day. He wanted to show the contemporary world, the way it is. I am going to try and create something similar to Gursky's Amazon Warehouse by using one of my images of the clothes and repeating it many times on Photoshop to emphasise the immensity of the amounts of clothes that are actually produced every day in order to fulfil the consumer's needs.
|
Editing on Photoshop
I first opened up my image of the stacks of jeans that I photographed, I then adjusted the size and made it smaller in order to fit the other multiple images I was going to open. I then made sure each image was the same size, width: 5.7cm, height: 3.84cm. I then carried on opening the same image until I filled the white background up. Also, you could see the divide where I tried to layer each image so I made sure they were all aligned and then cropped any white sections that were left. In this slideshow, I used six of the same images but after capturing my process, I decided to add three more images to create an even more immensely packed imaged.
I am really happy with my response to Gursky's work as it really represents globalisation in fast fashion and how the increase in production of these clothes are significantly increasing. I like how I used photoshop to highlight the quantities of clothes that fast fashion shops sell. However, this was my first attempt and it is quite obvious to see that some of the jeans look as if they have been cut off. I think I can definitely improve and overcome this issue as I will try and use different tools on photoshop in order to create a seamless image, making it look as real and natural as possible.
IMPROVEMENTS
As I previously said, I wanted to try and use more tools on Photoshop in order to perfect my image of the jeans. I decided to do a second attempt and use the 'Clone stamp' tool in order to line up the white shelves as they were visibly not aligned previously. I selected 'alt' and chose the colour I wanted to use to fill in the gaps or make the shelves look the same level. I also used the 'Clone stamp' tool to cover any jeans that had looked like they had been cut off. I am much more pleased with this image as the shelves look aligned which makes the image look as if there were actually that many jeans.
CHANGE OF BRIEF
I was really interested in the topic of fast fashion and I was successfully able to create images with a meaningful message behind them, however, I am still wanting to experiment with the the other side of fashion photography where using models play a huge role. I intend to create work that uses models as the main subject. I want to consider how photographers light and compose their images, and how fashion editorials use the model to present a narrative. As I mentioned at the beginning of this project, I was fascinated by the theme of sculptures and statuary which Hoyningen-Huene included in his work, therefore I want to experiment including this imagery in my work as I develop it.
First Shoot
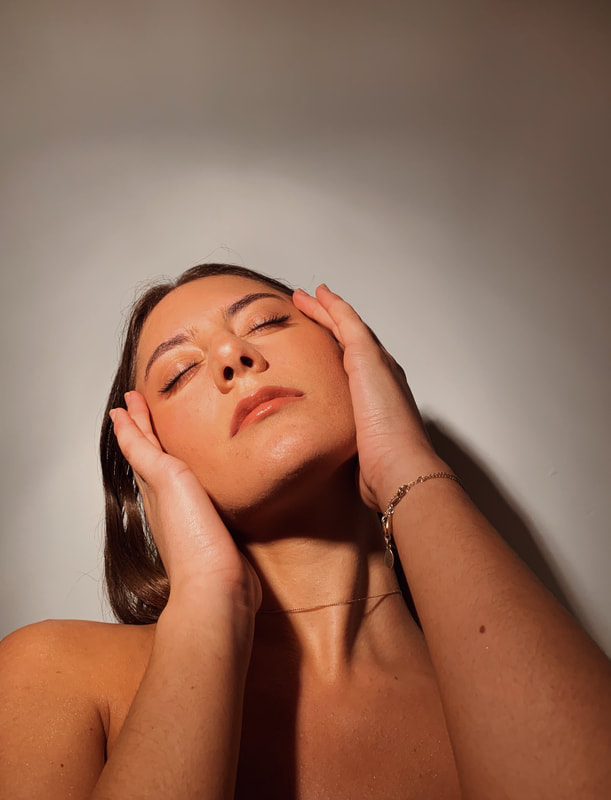
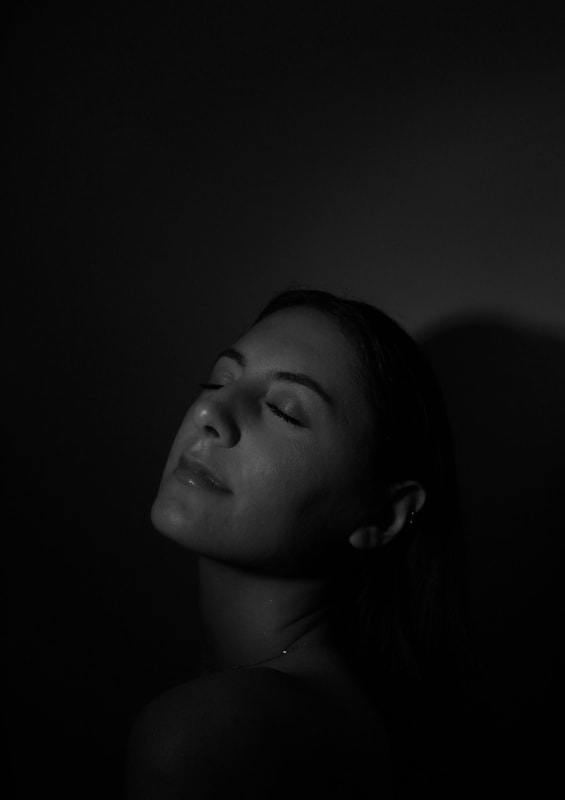
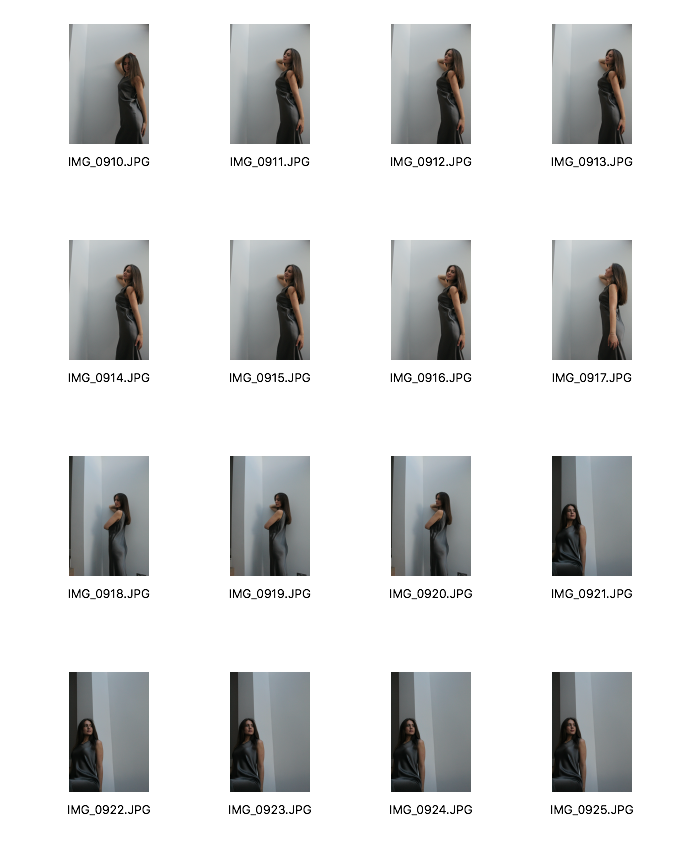
As I decided to change my brief and focus more on photographing a model, I decided that I wanted to begin experimenting with lighting. Following my research on my six chosen photographers for the curatorship task, one main theme throughout most of the photographers I researched was the use of strong contrasts between light and dark. I wanted to therefore initially start photographing my model with simple lighting directed on her. Also, most of the photographers I looked at, including George Hoyningen-Huene, Peter Lindbergh and Richard Avedon, mostly shot their images in black-and-white, which really emphasised the contrast between the light and shadows created. Therefore, after this shoot, I will also try editing my images into black-and-white.

|
|
|
Best Images
|
|
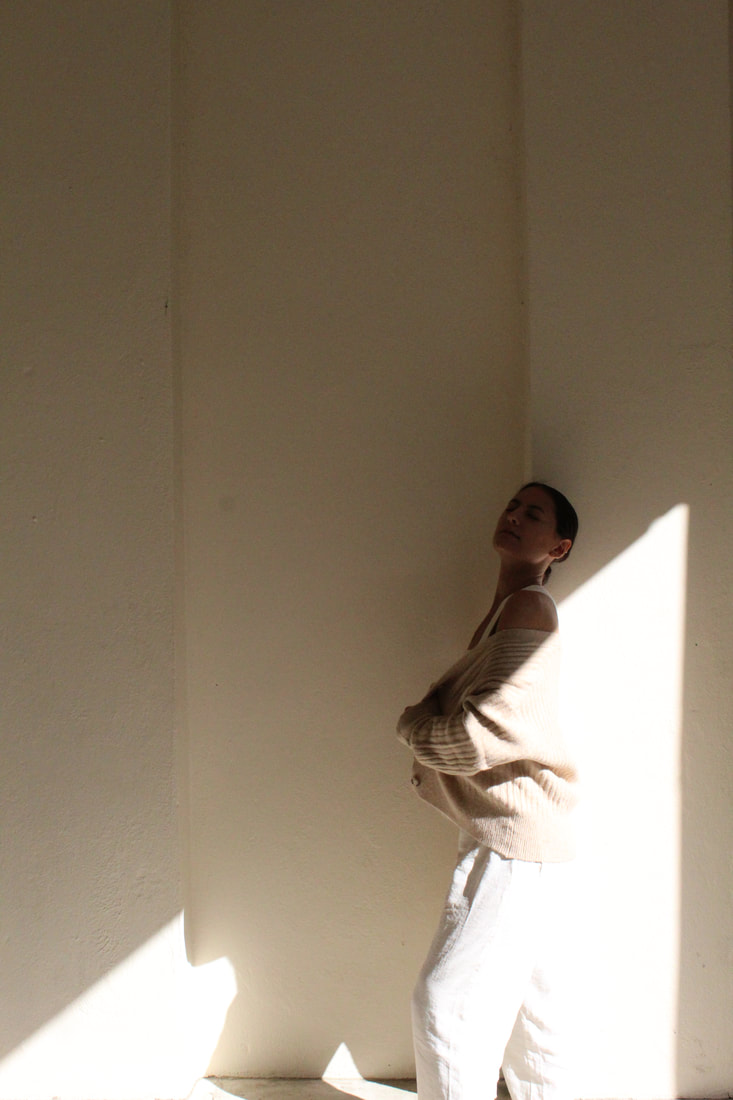
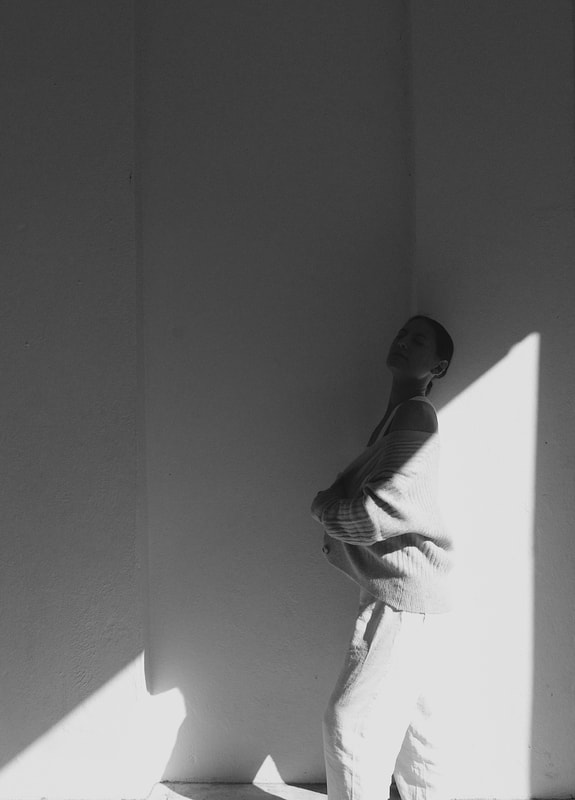
I placed my model in front of a plain white background and directed a strong light onto her. Whilst photographing her, I experimented placing the light at different angles and it took a few attempts to get the correct positioning. When editing my images, I wanted to see what they would look like without a black-and-white filter but I actually preferred most of my photographs when they weren't black-and-white. However, I did edit the image above on the right, using a black-and-white filter on photoshop, as the original unedited image had very dark shadows, so by using a black-and-white filter, it emphasised these shadows. The dark shadows were created due to the low ISO which I had set. I used a low ISO for some shots as I wanted to see what effects it would create. Even though I set my ISO to a low speed, some of the images were quite successful as it almost created strong contrasts between the light on her face and the dark background. Reflecting back on this shoot, the overall lighting wasn't great as the light I used was quite yellow and the rest of the room was pitch black. In order to improve this, I would either use a photography studio with flood lights or I would shoot outdoors in natural lighting, making sure the sun is behind me (the photographer).
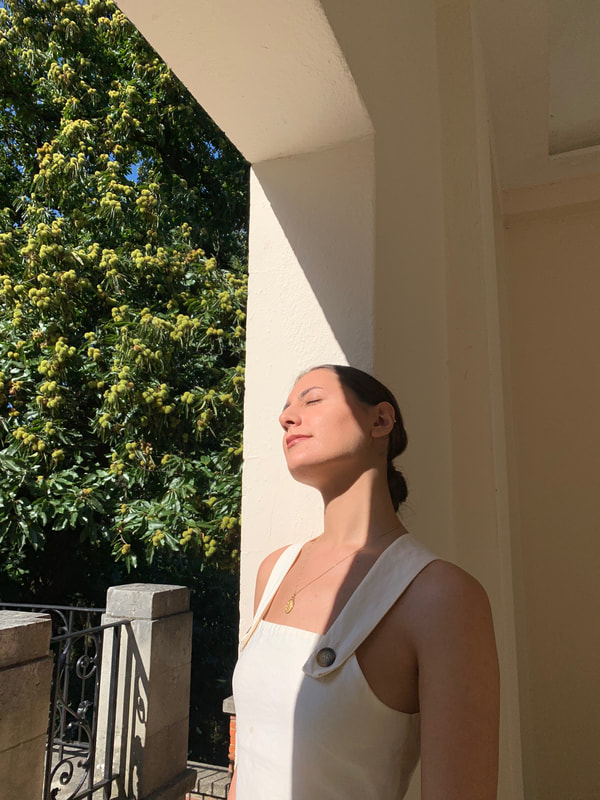
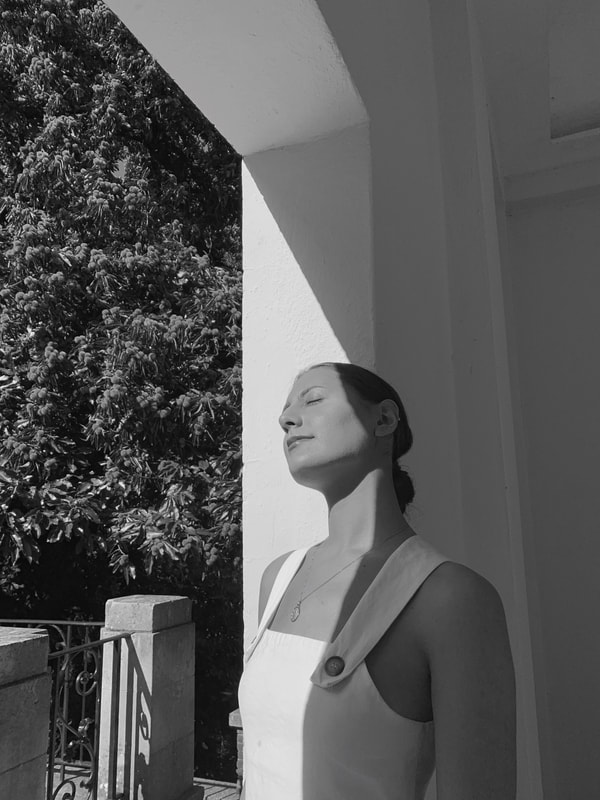
Most photographers that I researched shot most of their images outdoors using natural lighting only. Louise Dahl-Wolfe was one of these and she always made sure that the clothing she was photographing on the model was the main focus. She did this by choosing a background opposite to the shade of the clothing. She also used very exotic, minimal locations with bright natural sunlight. Further on in my development, I will want to experiment photographing outdoors and using more minimal backgrounds just like Dahl-Wolfe. For my next shoot I will carry on experimenting with strong light, but I will photograph outdoors with natural lighting.
Most photographers that I researched shot most of their images outdoors using natural lighting only. Louise Dahl-Wolfe was one of these and she always made sure that the clothing she was photographing on the model was the main focus. She did this by choosing a background opposite to the shade of the clothing. She also used very exotic, minimal locations with bright natural sunlight. Further on in my development, I will want to experiment photographing outdoors and using more minimal backgrounds just like Dahl-Wolfe. For my next shoot I will carry on experimenting with strong light, but I will photograph outdoors with natural lighting.
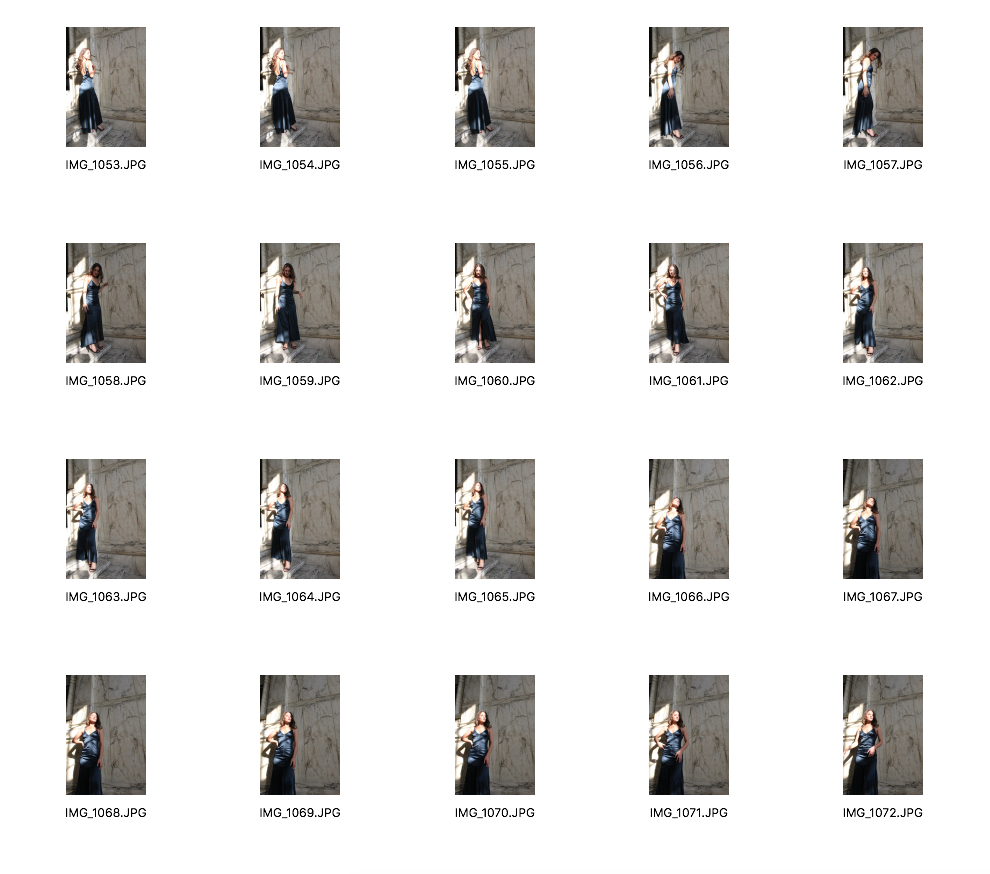
Second Shoot: Plan + Research
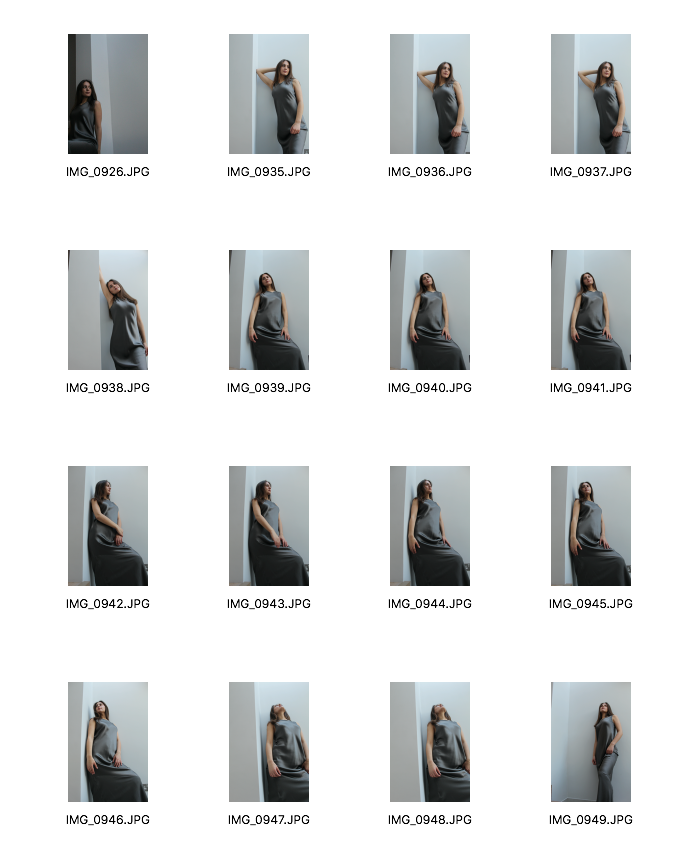
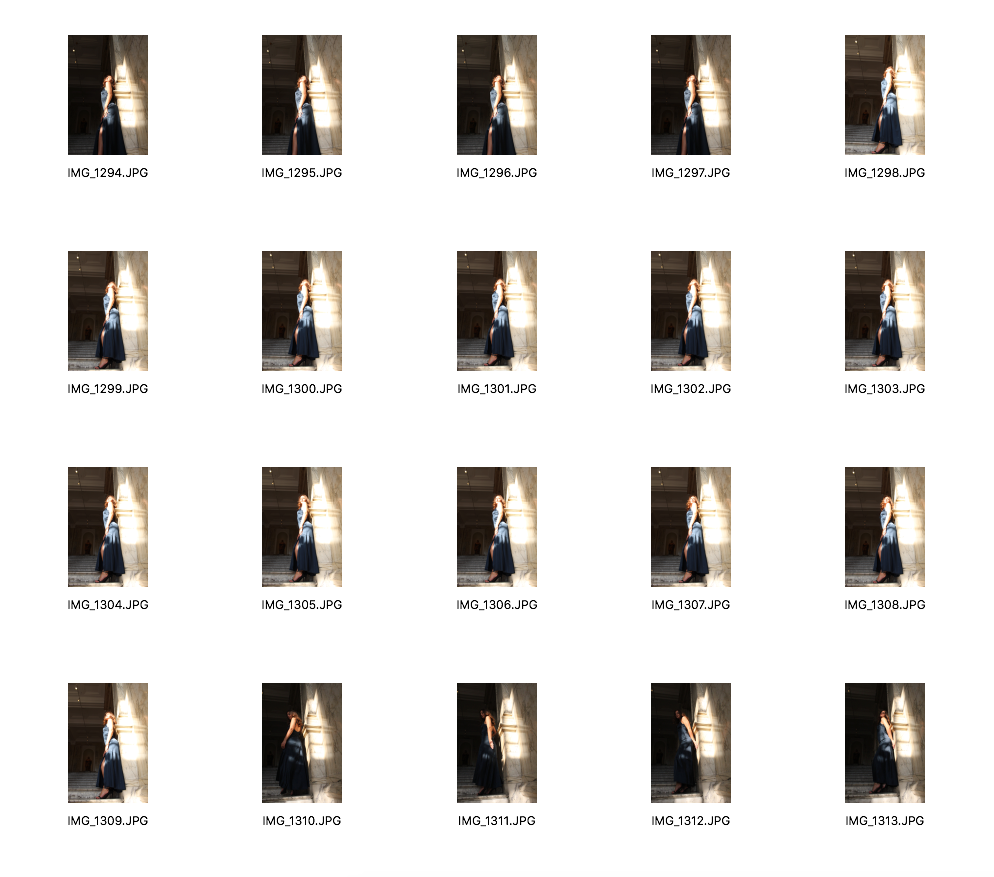
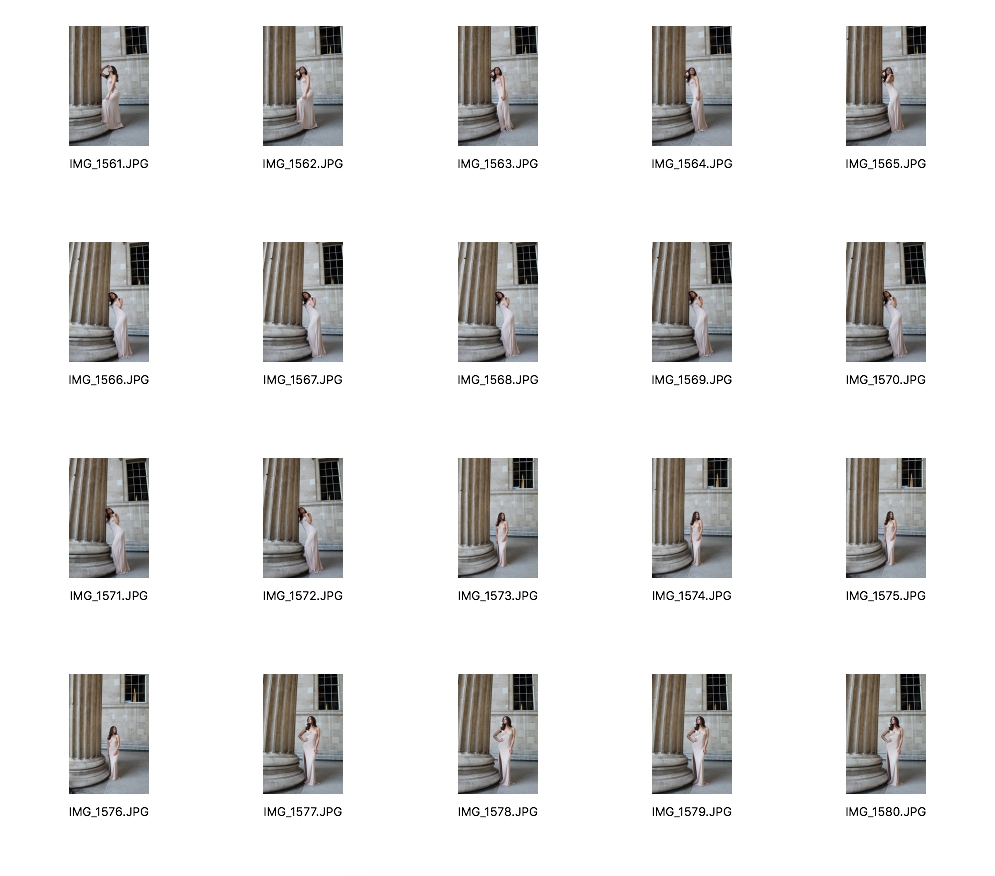
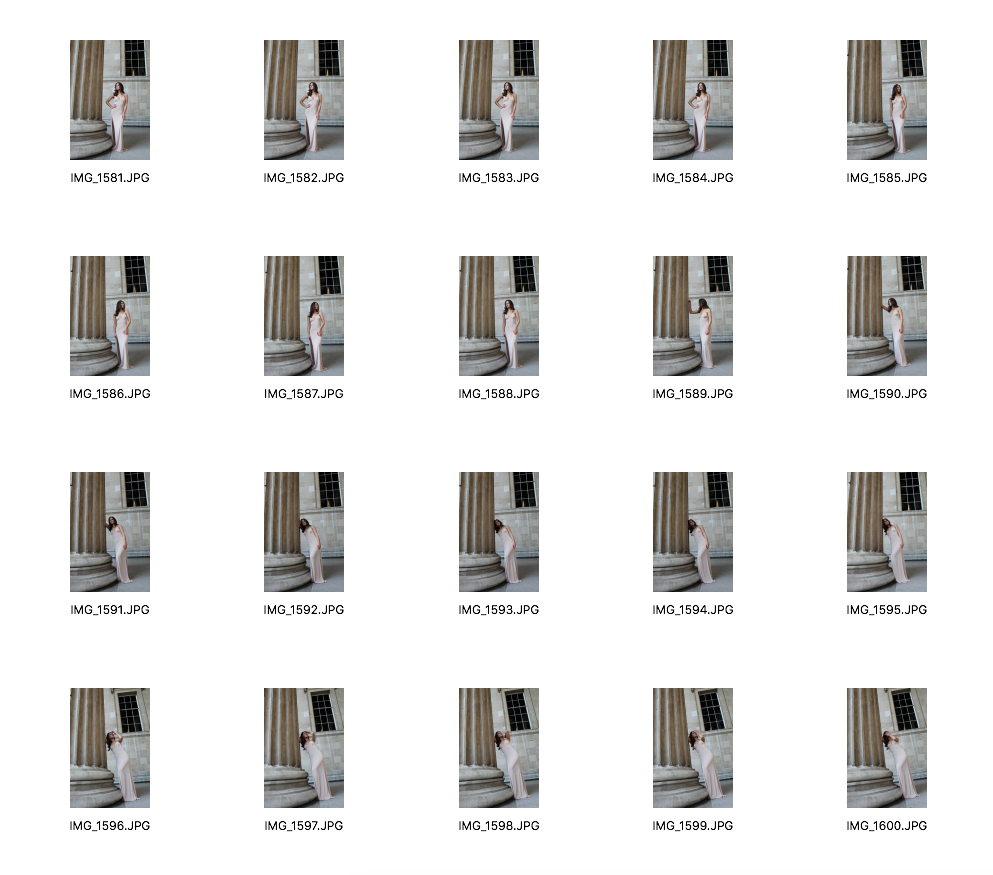
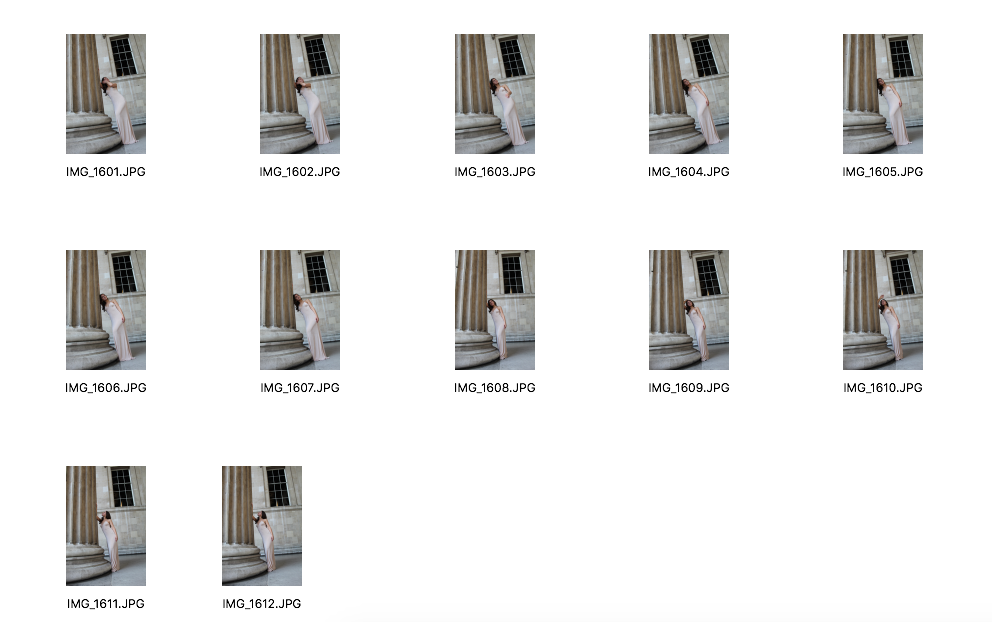
For my second shoot, I want to carry on using strong lighting against my model, but instead of using artificial lighting indoors, I want to go outdoors and use natural light. Below, I have created two slideshows showing some examples where Dahl-Wolfe and Huene used lighting and shadows effectively. Both, Huene and Dahl-Wolfe, were two of the most influential fashion photographers of the beginning of the 20th century. They both had very different, distinctive styles, however, they shared similar characteristics, which can be seen through their photographs. I analysed both these photographers in my curatorship and I have decided to explore their techniques further. Dahl-Wolfe pioneered the use of natural lighting in fashion photography and shooting on location and outdoors. Her images were mostly shot against minimal, structured backgrounds. Huene was also a photographer who has inspired me for my next shoot as he was exceptionally skilled when it came to lighting and composition. In terms of the themes these two photographers included in their work, Huene's images were mostly inspired by Greece and it's classical sculptures, columns and statuary, which I think is really interesting as he was considering the wider context of his images and trying to represent this theme whilst photographing his subjects.
Lousie Dahl-Wolfe
George Hoyningen-Huene
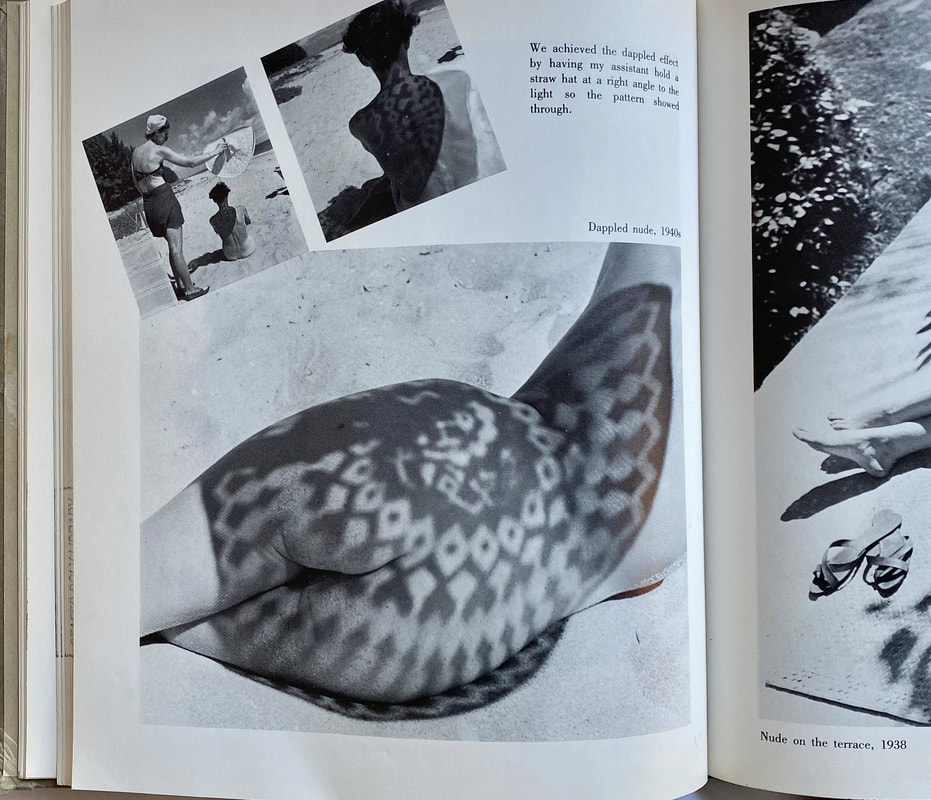
As I am looking at Louise Dahl-Wolfe’s work, I decided to include a few pages from her book that I own: A photographer’s scrapbook. It presents a fuller view of her interests in life and photography and it also provides some behind-the-scenes from some of her shoots. This was a specifically good resource for me as I got to read how she created various effects with light and shadows. For example, her photograph ‘Dappled Nude, 1940s’ was achieved by holding a straw hat at a right angle to the light, allowing the pattern to show through, which in turn created a dappled effect on the model’s body.
|

|
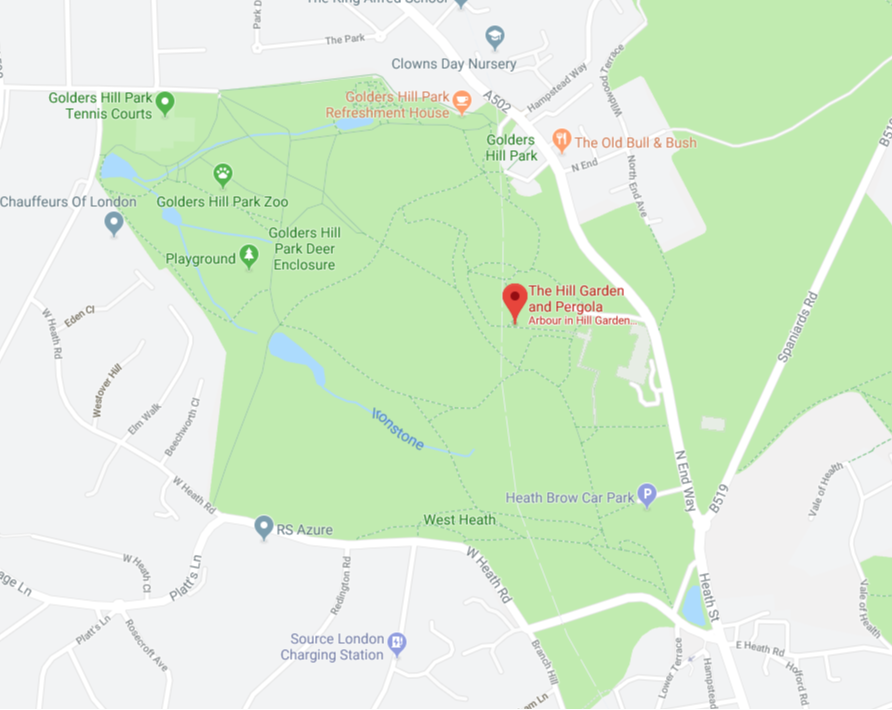
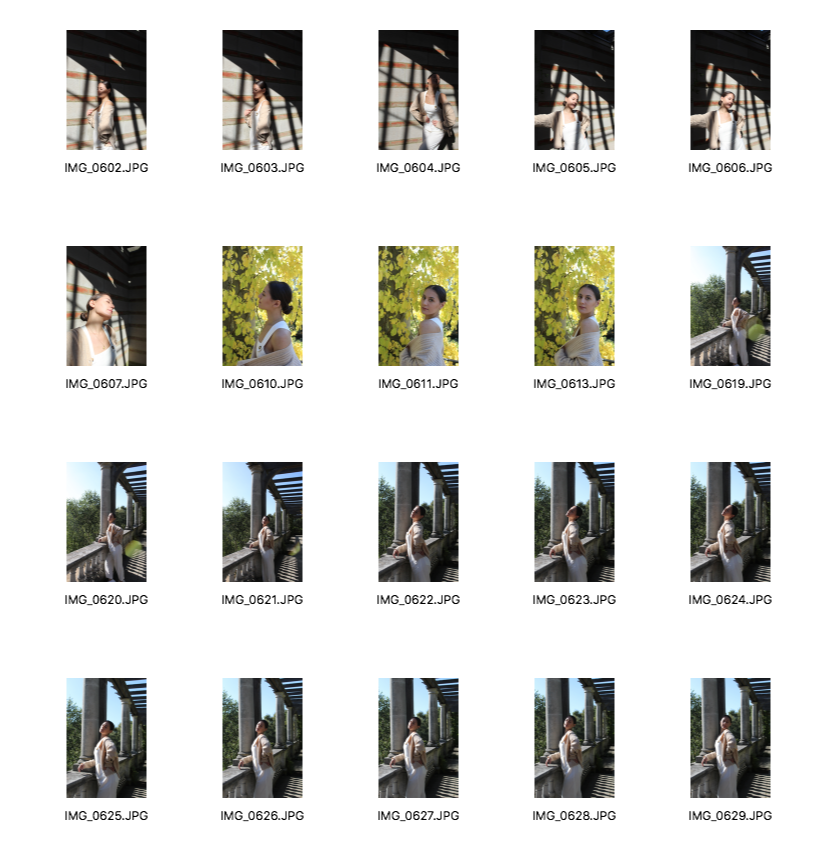
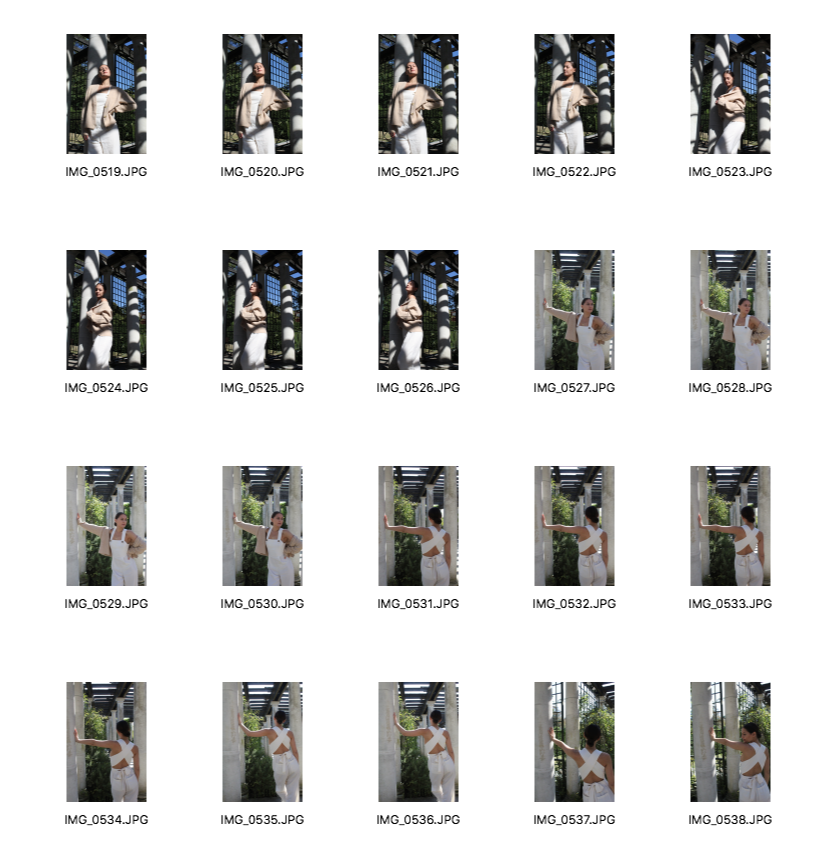
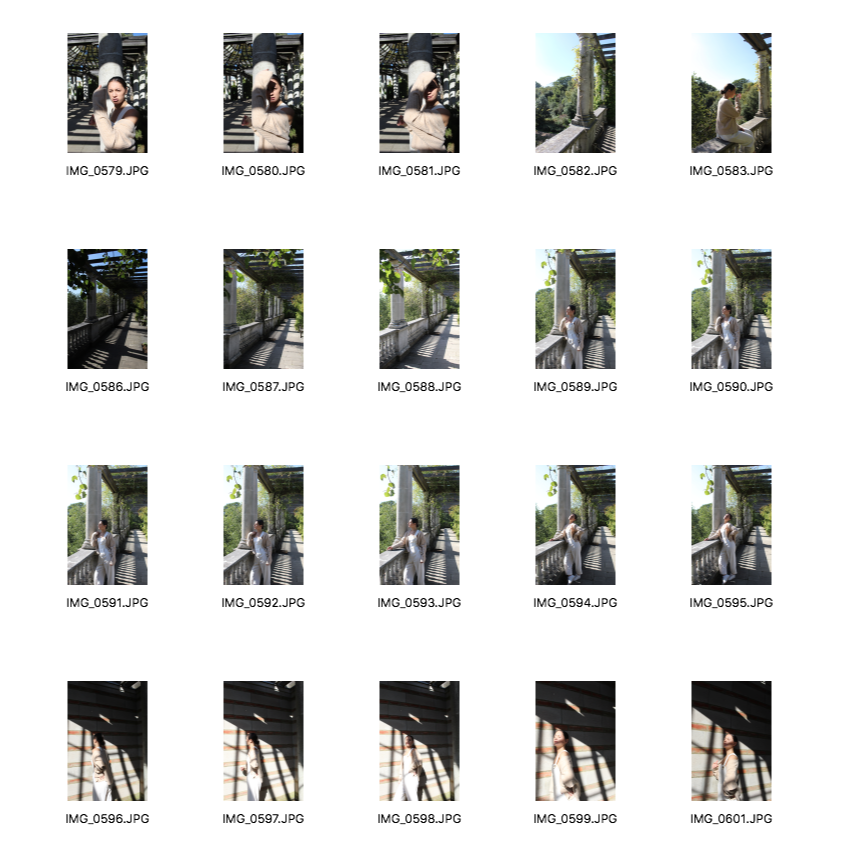
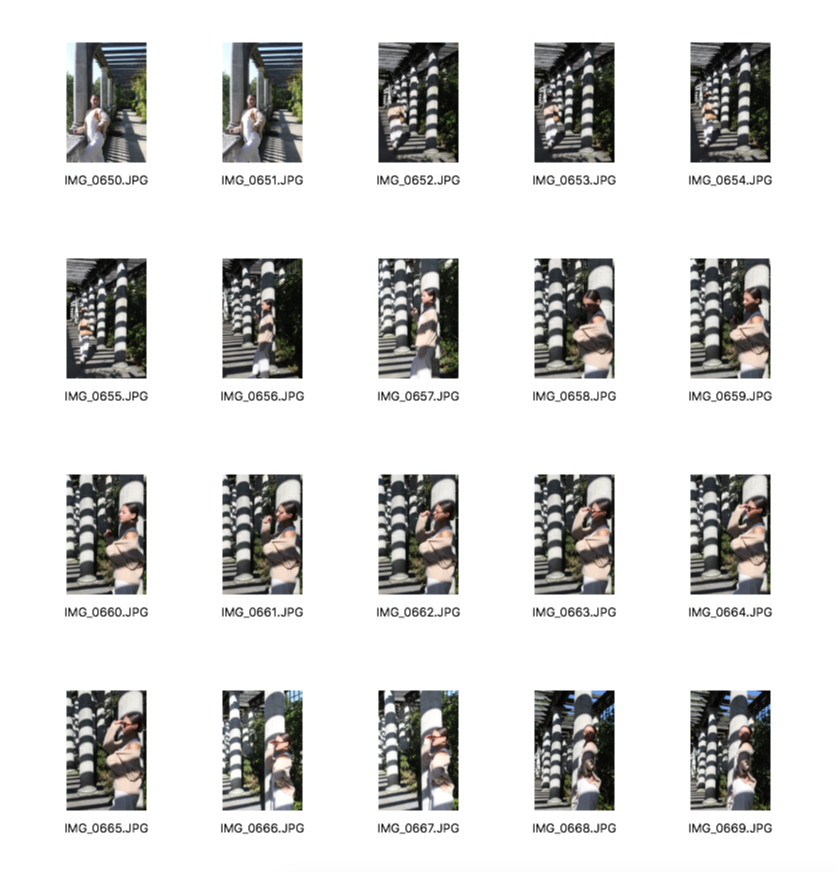
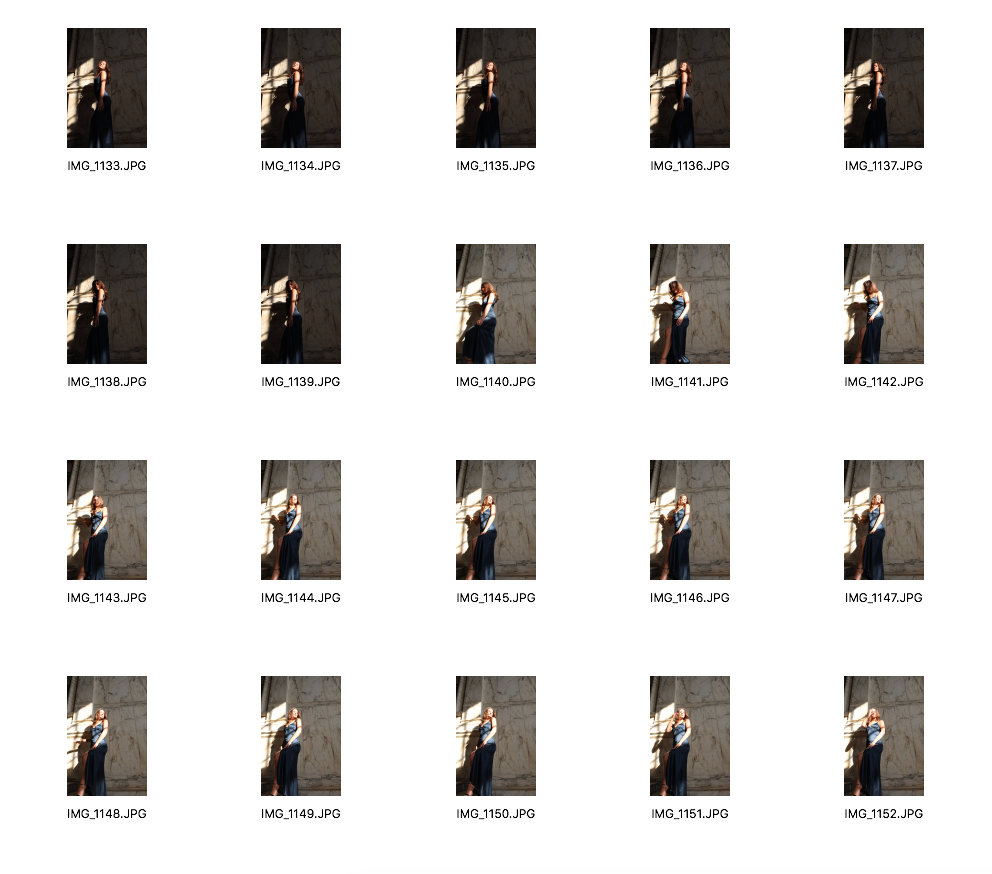
I have decided to go to The Hill Garden and Pergola for my next shoot which is located in Golders Hill park, keeping in mind that I am aiming to incorporate strong lighting and shadows. Constructed in 1905, the Hill Garden and Pergola will be a great first location for my shoot as its architectural complexities and columns reminds me of Huene' work. I am planning to visit this location on a bright day so that there will be a lot of sunlight in order for me to use the natural lighting effectively to create harsh lines. It would be ideal to photograph here at around 5pm as the sun won't be too bright, but I am aware that it shuts at 3:30pm.
The Hill Garden and Pergola location
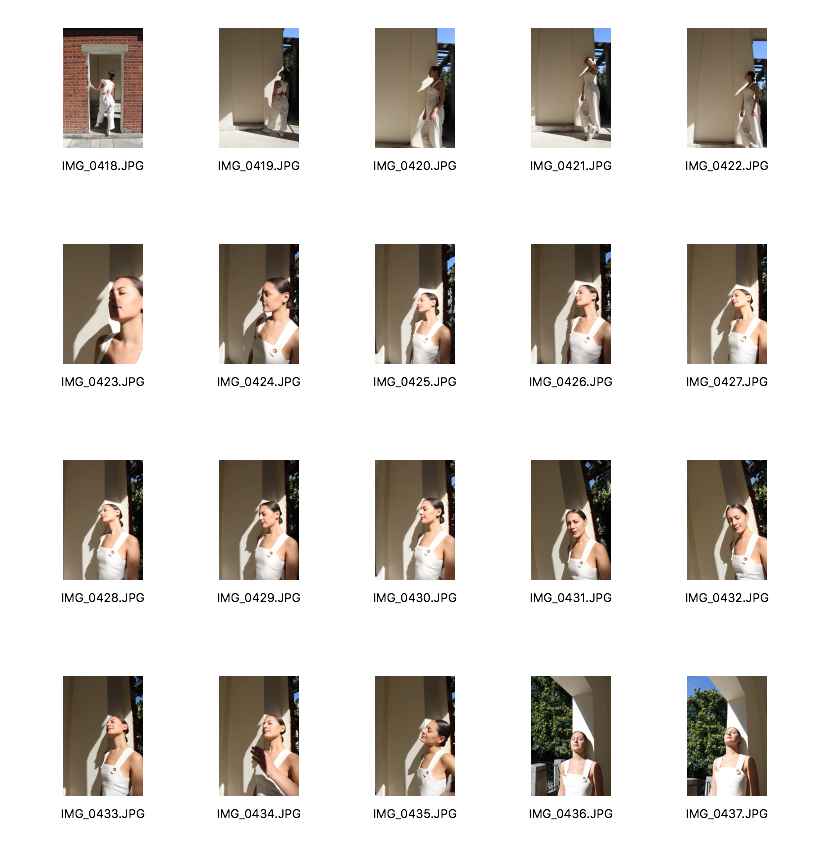
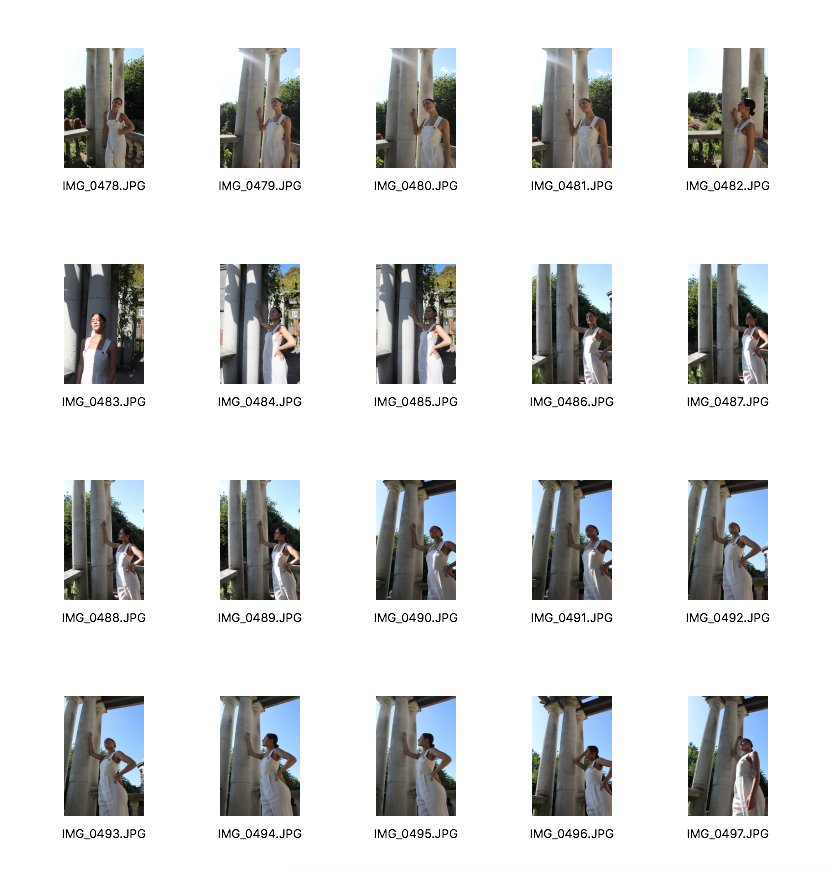
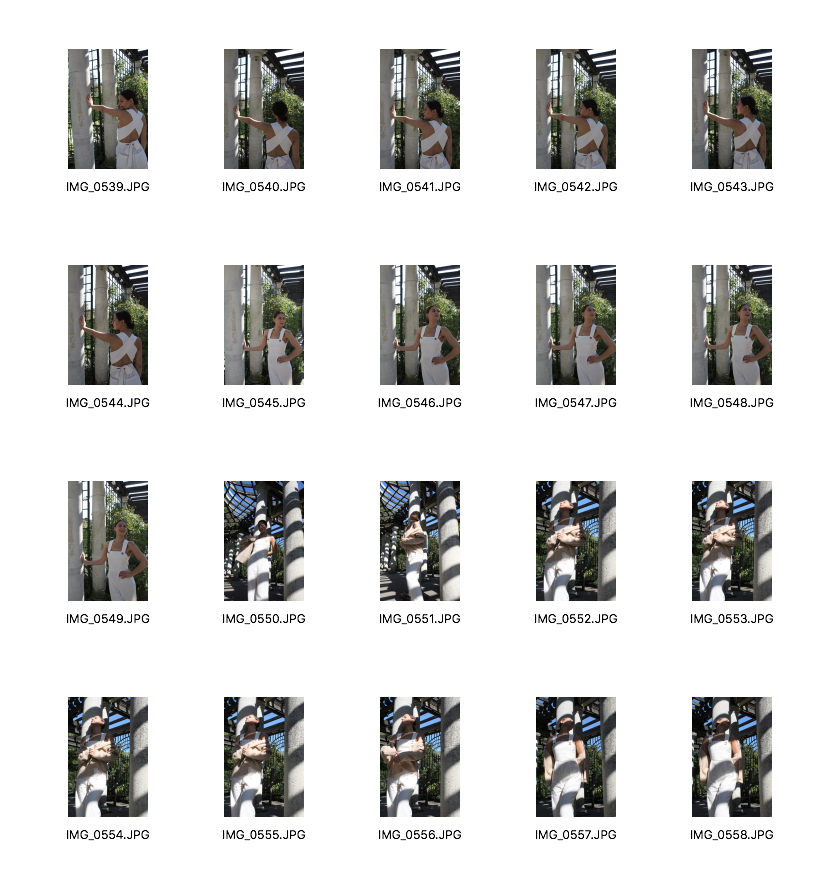
Contact sheet
|
|
|
Using Photoshop to edit my images
|
Unedited images
|
Edited images
|
|
|
|
|
|

|
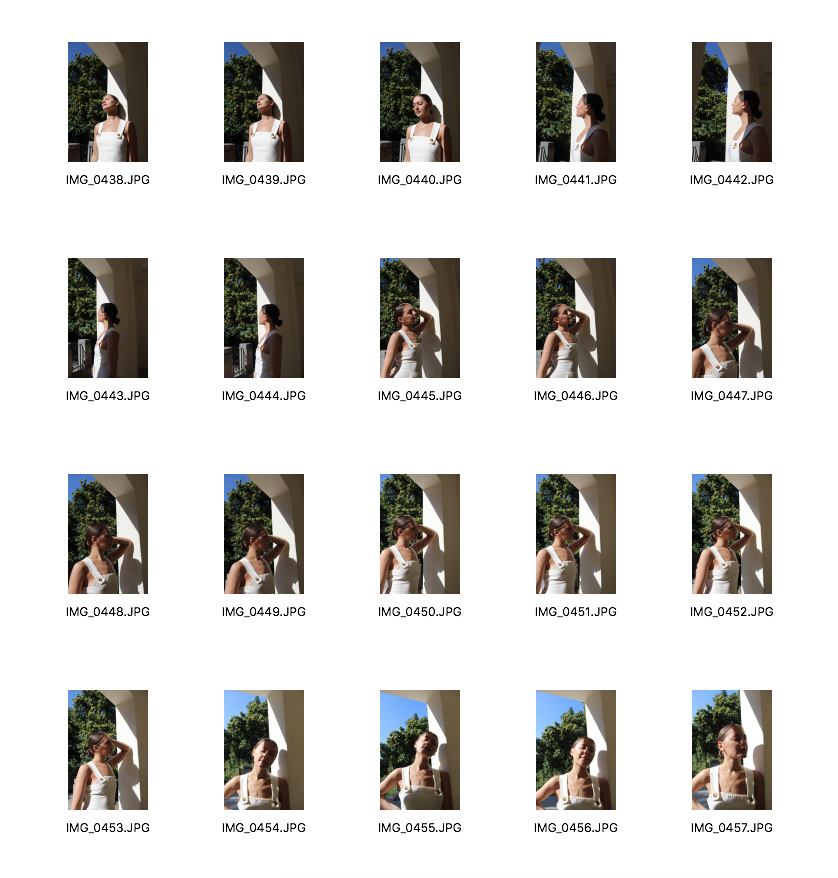
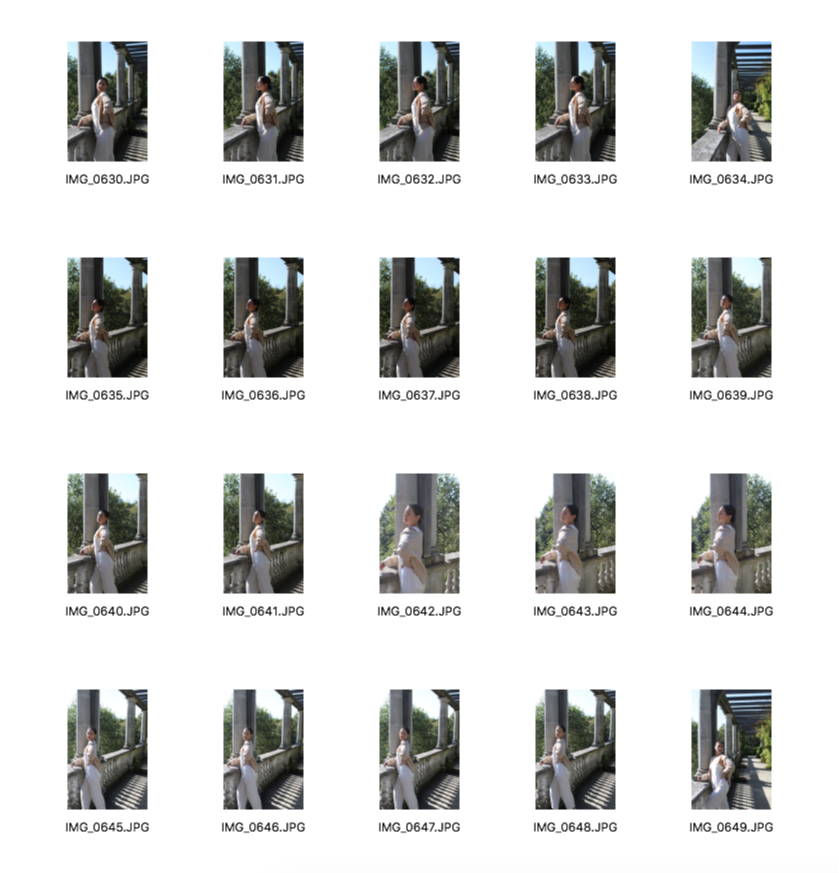
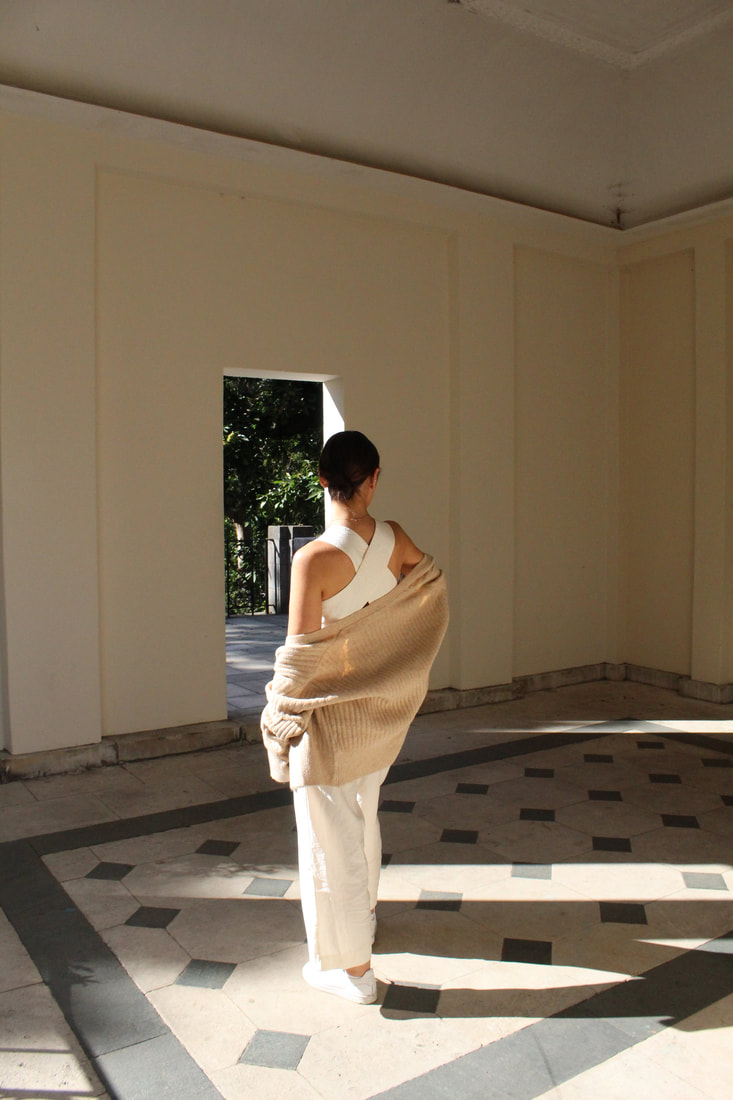
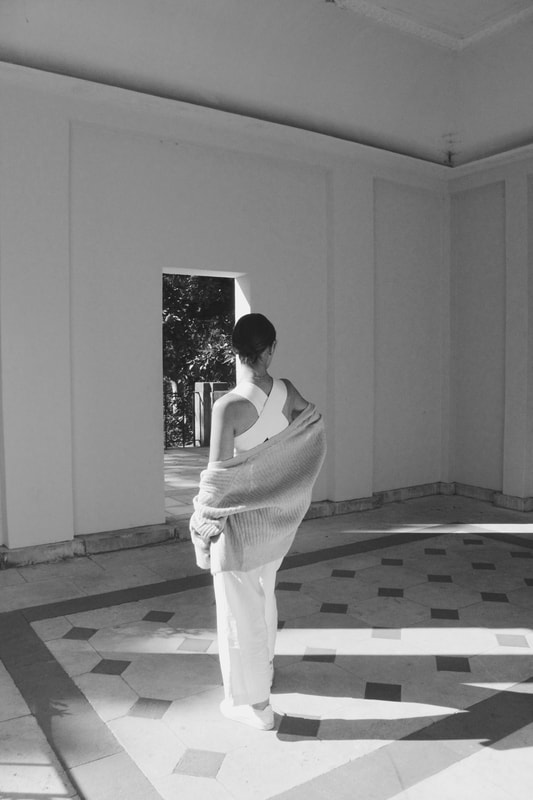
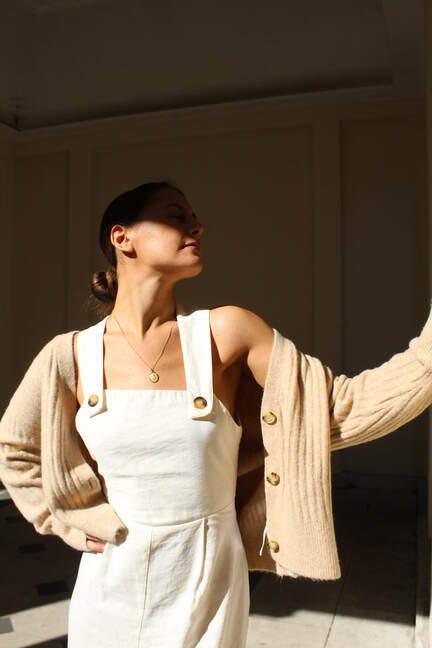
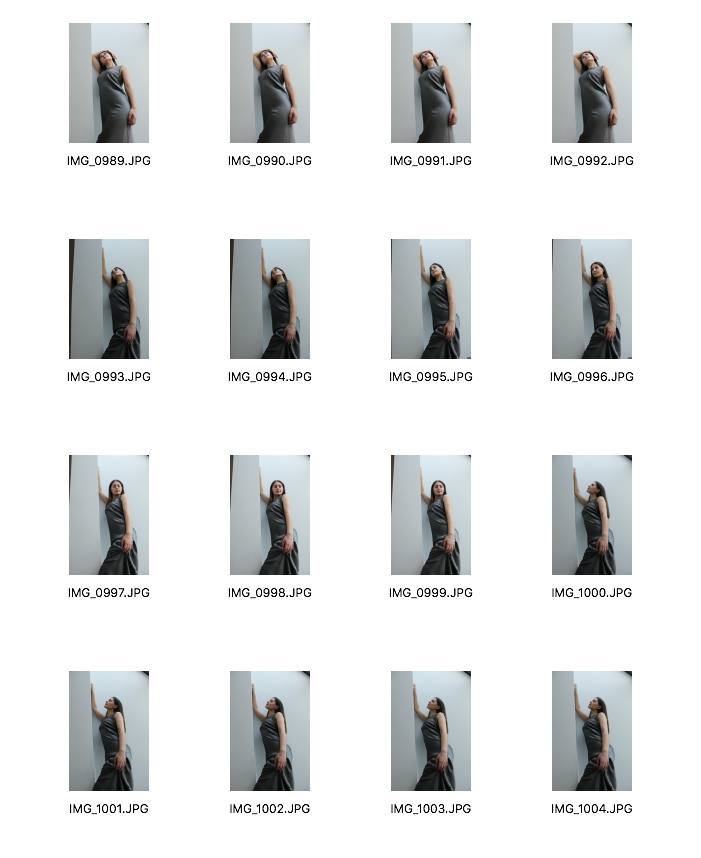
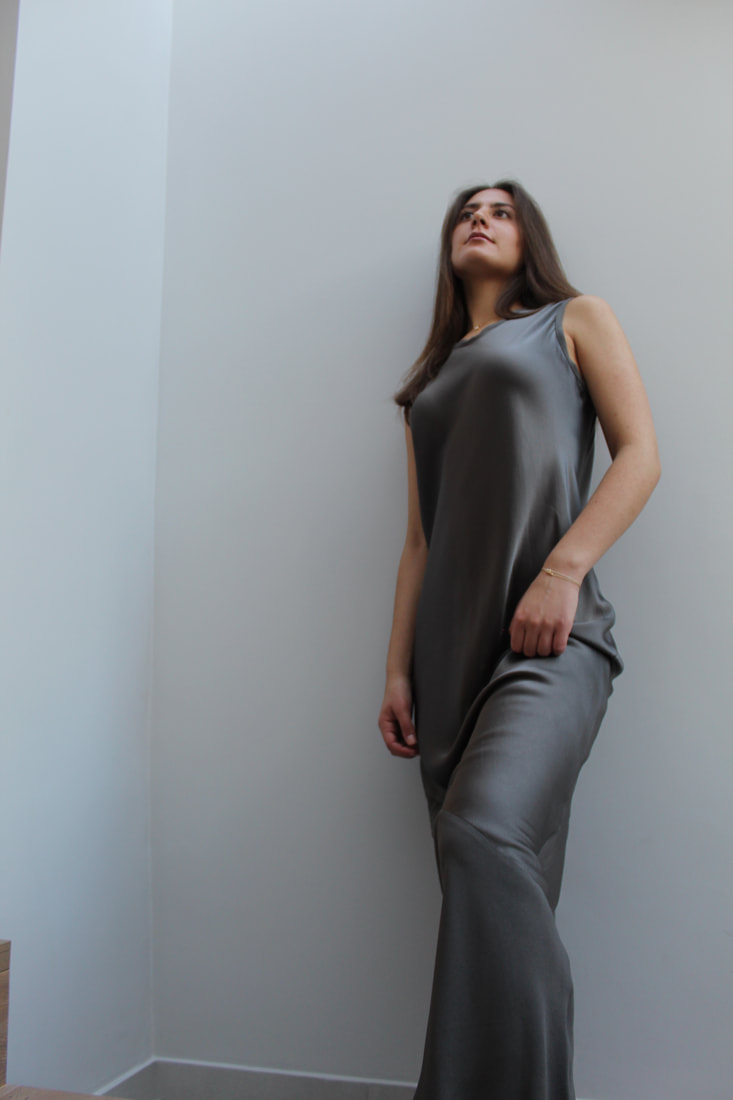
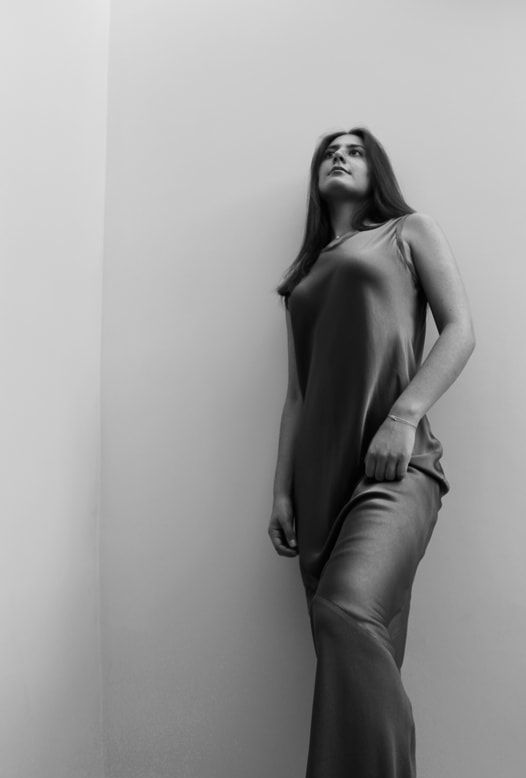
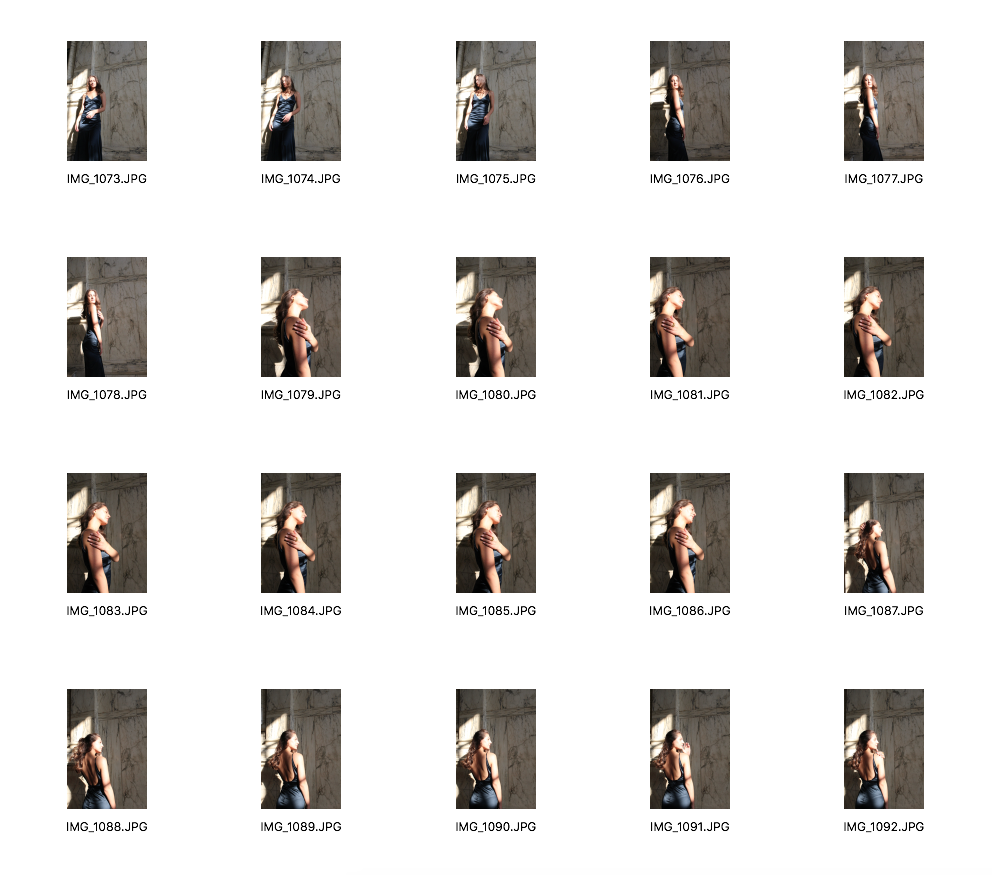
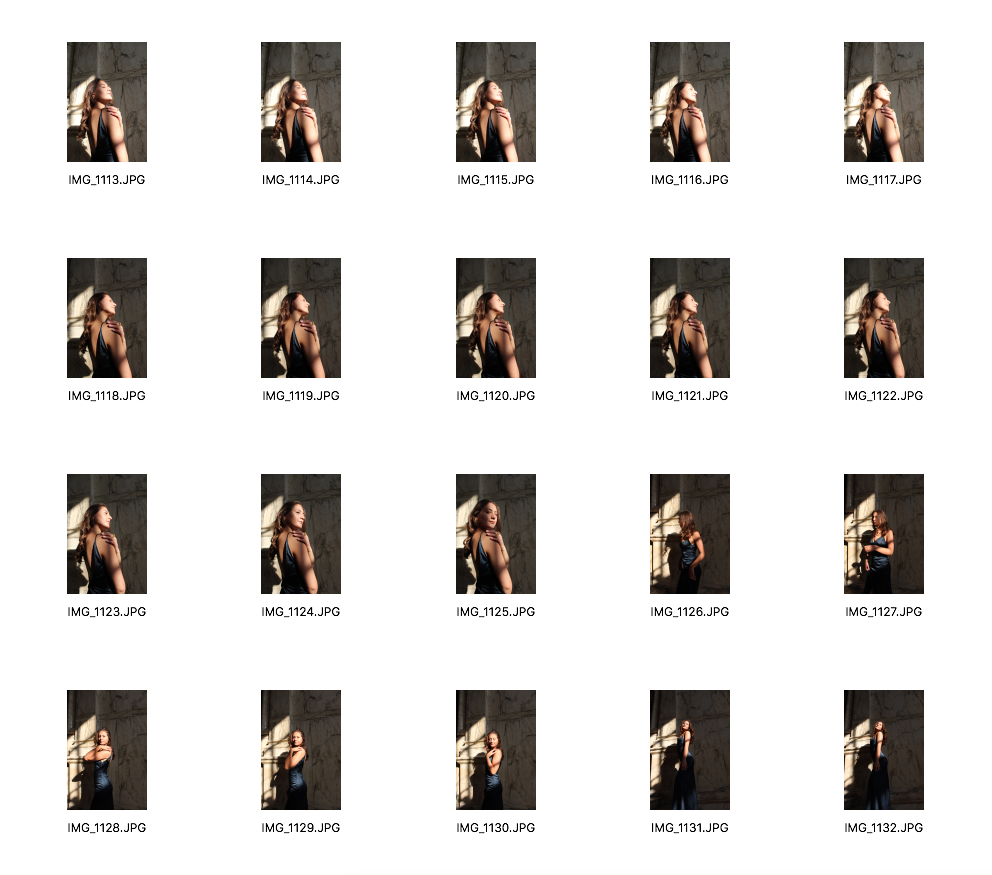
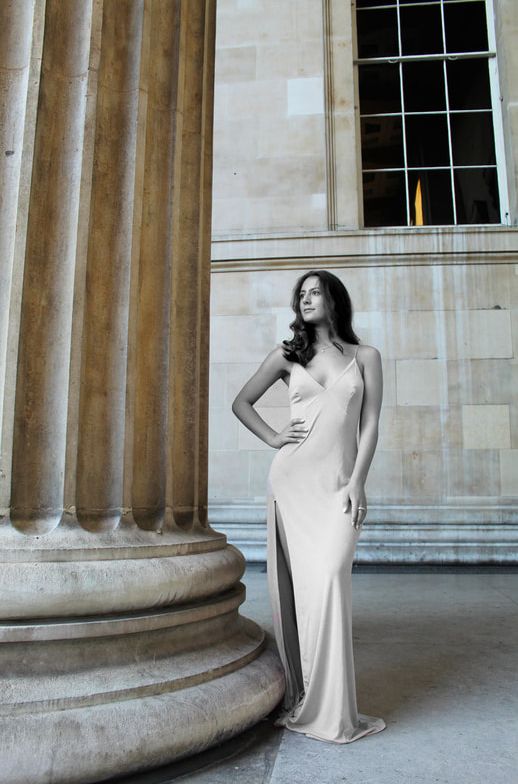
Looking at the images I have included by Dahl-Wolfe and Huene, the models seem to be wearing very simple, minimalistic clothes so I also wanted to dress my model in plain clothing so that it wasn't distracting. I dressed her in a plain white jumpsuit and a neutral-toned cardigan. I also didn't want her hair to be too distracting so I put her hair in a sleek low bun. I wanted to make sure that I used the natural light effectively, so I always had my model in a position where there was sunlight. When photographing my model in direct sunlights, I always stood in shade and made sure the sun was behind me. I also used techniques by photographer Richard Avedon, who would shoot his models from a lower angle in order to elongate their bodies and give them more power. The way she is stood in the first image with her cardigan loosely hung and her legs crossed, reminds me of a classical greek sculpture which was a main theme throughout George Hoyningen-Huene's imagery. I decided to edit my images into black-and-white as the sharp lines created by the sun were more prominent when the images were black-and-white compared to the coloured images. I set my ISO to 100 as it was a very bright day.
After experimenting with outdoor lighting, I learnt that lighting plays a huge role in how photographers compose their images. It takes a lot of attempts experimenting with different lighting and angles in order to result in an effective image. This shoot has definitely made me more aware of the importance of lighting and how it really can change an image. Looking back at my images, I managed to use the natural lighting effectively without my images being too over-exposed.
After experimenting with outdoor lighting, I learnt that lighting plays a huge role in how photographers compose their images. It takes a lot of attempts experimenting with different lighting and angles in order to result in an effective image. This shoot has definitely made me more aware of the importance of lighting and how it really can change an image. Looking back at my images, I managed to use the natural lighting effectively without my images being too over-exposed.
Tim Walker
I want to explore British fashion photographer, Tim Walker. As I want to start considering the different locations I can shoot in, I thought Walker was a perfect example of a photographer whose locations play a huge role in his images. His images stretch far beyond the idea of typical fashion images and he uses models as a way of presenting a narrative. Walker has been creating signature fairytale scenarios for magazines such as Vogue, W and Love since the mid 1990s. He became interested in photography while working in the Conde Nast Library in London. After graduating from Exeter College of Art and Design, he moved to New York and worked as an assistant for Richard Avedon. His photographs always tell captivating stories which have no boundaries to them and are open to the viewer's own perspective. Even though he is considered a fashion photographer, he initially wasn't interested in fashion, he was interested in people, but what he loved about fashion photography was that it allowed him to explore dreams and fantasy. His magical imagery and extravagant sets evoke a sense of wonder which allows the viewer to imagine and dream. At the age of 25, Walker shot his first Vogue fashion story and ever since, he has been contributing to the magazine with his extravagant and supernatural images.
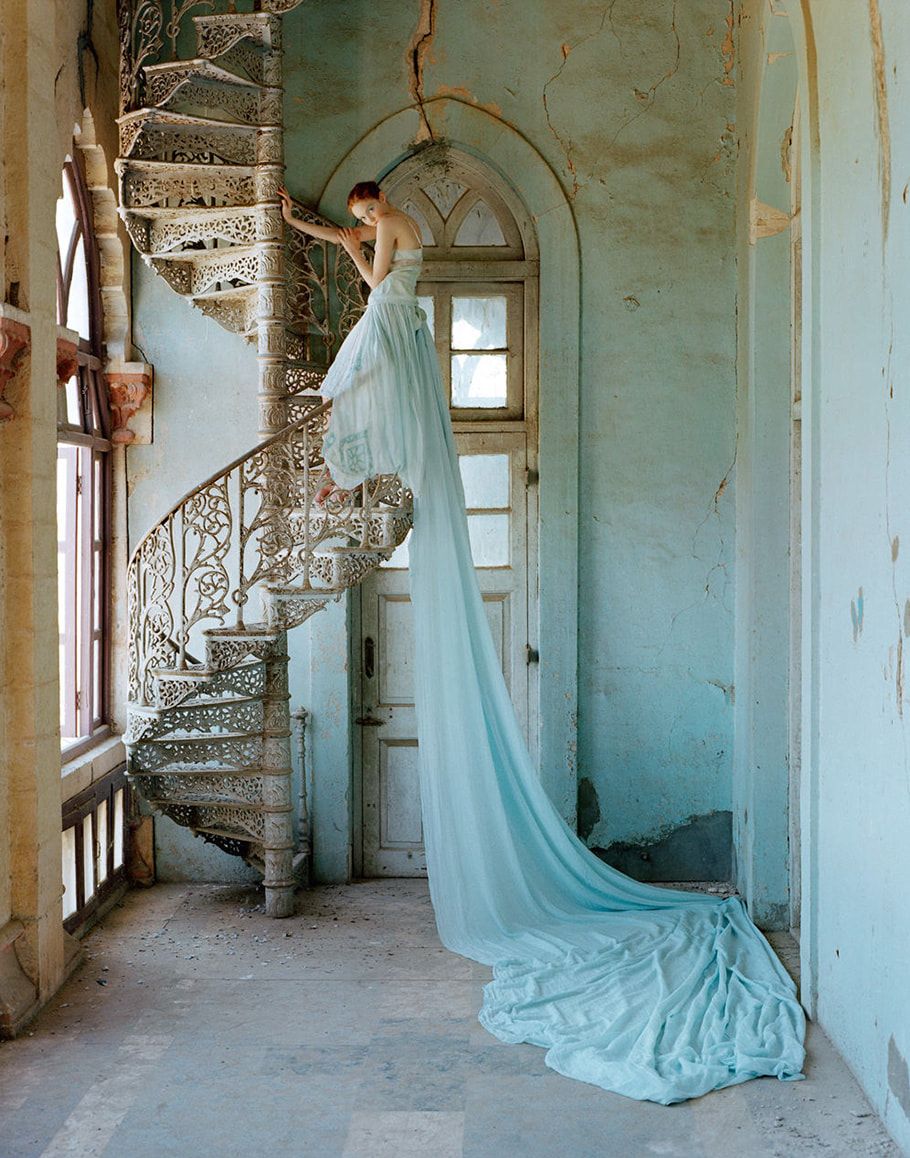
Lily and spiral staircase, 2005
|

Stella Tennant and pink powder cloud, Eglingham Hall, Northumberland, 2007
|
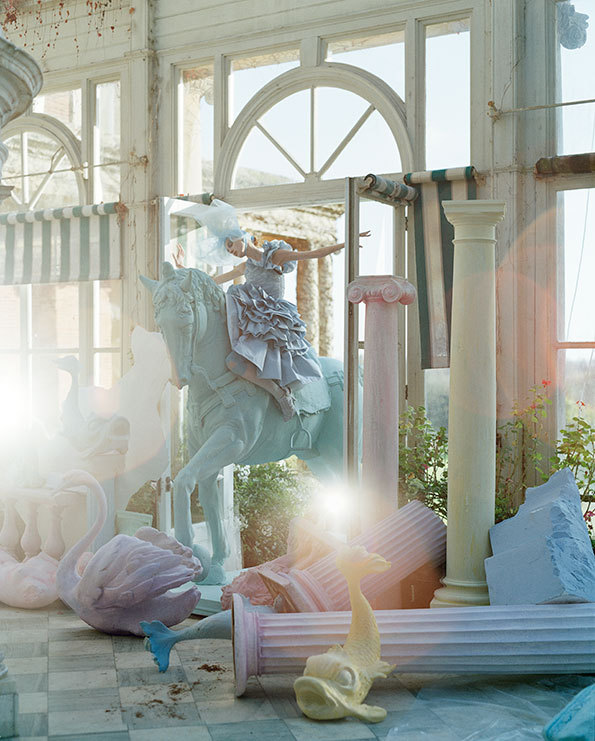
Olga Shearer on blue horse Sennowe Park, Norfolk, 2007
|
After my second shoot, I had realised that it was not only the use of strong lighting and shadows which made my shoot successful, but it was also the location I was photographing in. As I have mentioned, the Hill Garden and Pergola is a very old building and I wanted to begin experimenting with older, neoclassical architecture as the backgrounds of my images. Neoclassical architecture is mainly characterised by a dramatic use of columns, simplicity of geometric forms, and a preference for blank walls. I think having this common motif throughout my images with the contrast of the more glamorous model is really effective. I have done some research on Walker's iconic image, 'Lily and spiral staircase' (seen above), which uses this idea of having the glamorous model against an old, harsh background. The use of the soft, draped material of the gown contrast with the hard curved lines of the staircase. The trail of the dress, which is a key element to this image, flows through the image leading the viewer up along the dress, almost making the viewer forget about the harsh background of the image. The viewer gets to focus on the elegant dress in detail. The use of natural lighting is also another component which makes this image so spectacular. The full-length window on the left side of the image lets in bright natural light, lighting up the dress and model but also creates shadows within the image. The angelic dress compliments the light blue colour of the wall but it almost looks as if the dress reflects its colours onto the surrounding background, reflecting the significance of the dress and how it almost takes over the environment. This image was published in magazines such as British Vogue and Harper's Bazaar and it evoked a desire and aspiration for the Stella McCartney dress which was being photographed. Walker had travelled to India and discovered an old palace which he quickly shot and then edited the image by sketching a girl with a long dress over it. He had put a lot of effort into this image by visualising the photograph he wanted to create and all the precise details that needed to be achieved.
Tim Walker: Wonderful things exhibition
My visit to the exhibition
The Victoria and Albert Museum was hosting an immersive exhibition, exploring Tim Walker's photography. This was very beneficial for me as I had already started looking at his work so going to this exhibition helped me explore all the different styles of work he has produced, from his pictures to his extraordinary installations. Designed by Shona Heath, Walker's long-term collaborator, the exhibition makes you feel as if you are part of Walker's shoots. Susanna Brown, the curator of the exhibition, describes it as "mind-blowing" and "so rich" with it's beautiful textures like velvet, linen, wood and cloudy skies. Each room was designed thoroughly, allowing the viewers to experience Walker's creative processes. As part of this exhibition, Walker wanted to create photographic projects, each inspired by objects in the V&A's collections. Walker said that he thought the V&A "was the most inspiring place in the world... Many of the objects that I saw during my research at the museum made my heart swell and I wanted to try to create a photograph that would relate not only to the physical presence and beauty of that object, but also to my emotional reaction to it." In the first room, one hundred photographs from a range of projects provide viewers who might be unfamiliar with Walker's work a chance to see the surreal inventiveness for which he is known. The photographs here are separated into thematic groups. For example, one was called 'The Wall Of Muses' which didn't necessarily feature conventional fashion models, but instead featured Walker's 'muses' which to him are collaborators who articulate his imaginings better than he ever can. As he had created projects directly linked to the V&A, one room displayed work that was directly influenced by his experience of the treasures he encountered at the V&A. Each picture in this room was created in a way that reflected Walker's emotions upon exploring the museum.
Third Shoot
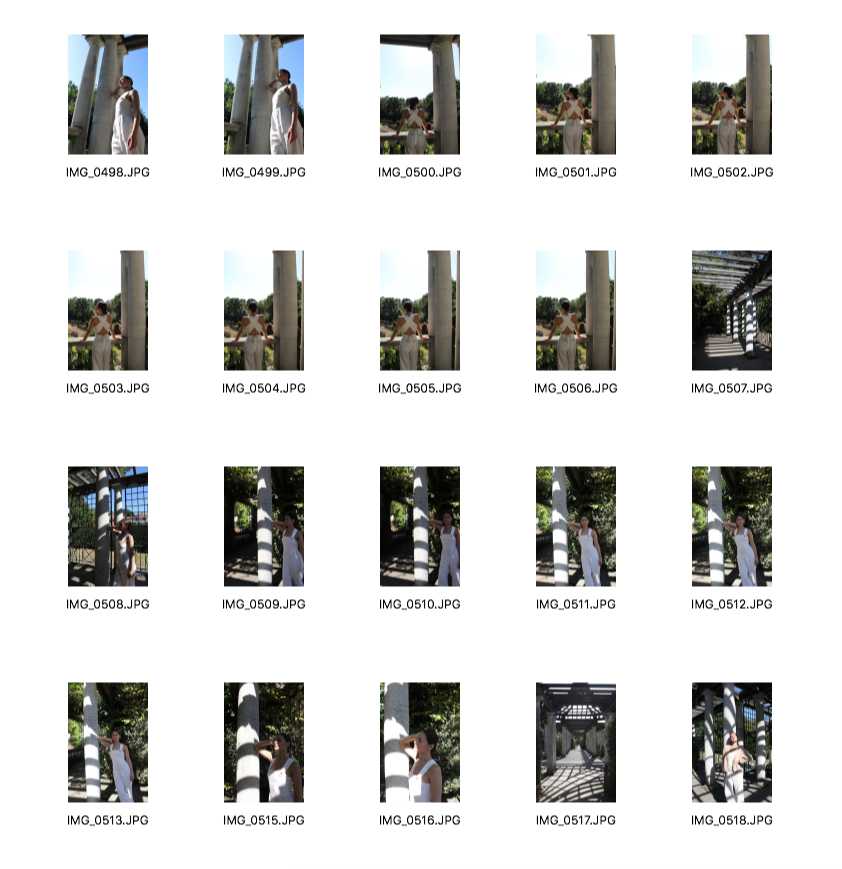
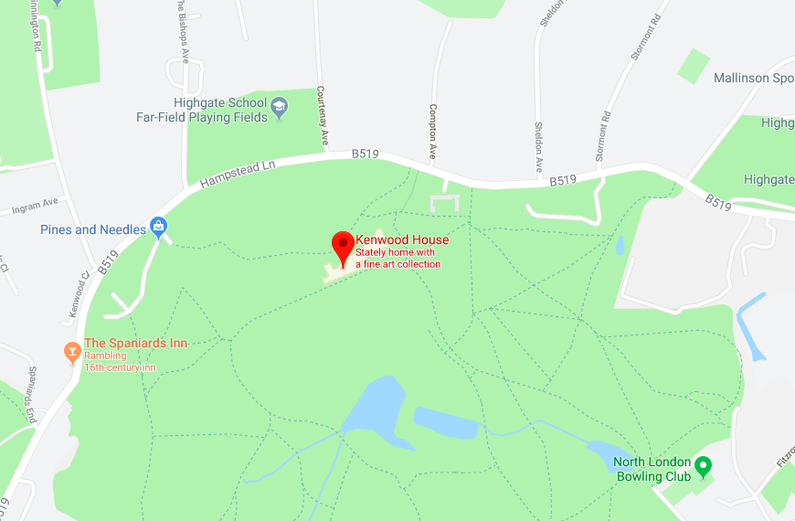
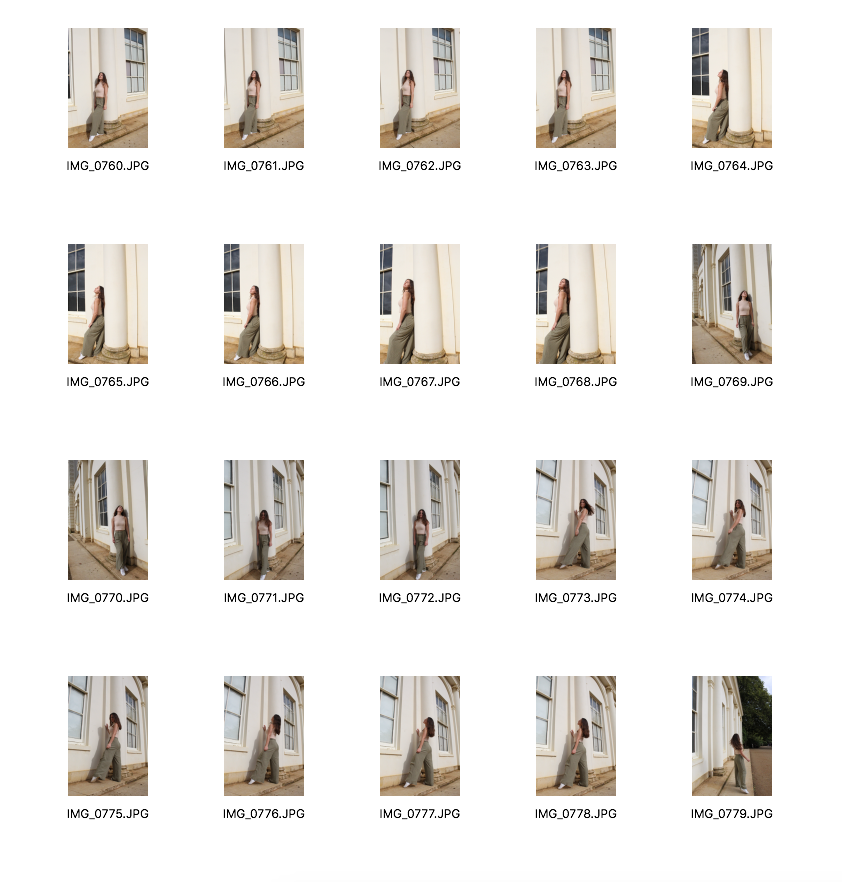
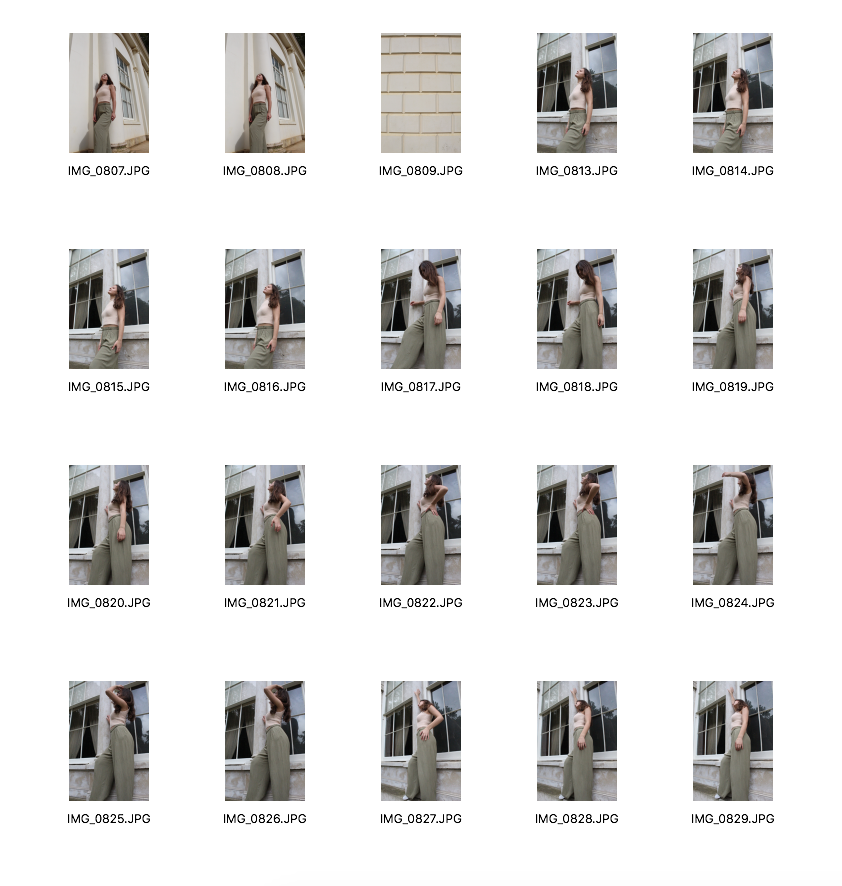
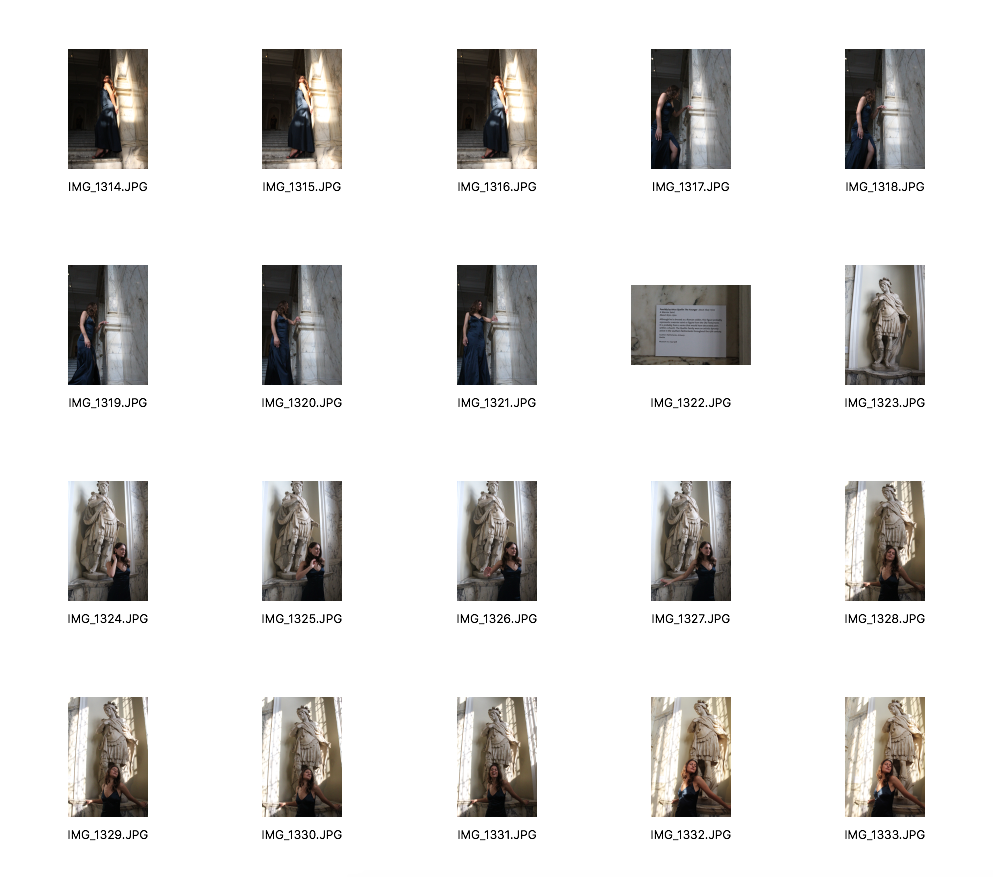
For my next shoot I have decided to visit another location: Kenwood House, which is located in Hampstead Heath. It is a neoclassical villa, built by architect Robert Adam in the 17th century. Its Georgian architecture imitates Classical Roman and Greek architecture with its tall columns, intricate detail, symmetry harmony and balance. In this shoot, I have decided to dress my model in flowy trousers as it will contrast with the clean straight lines of the house. When I visited Kenwood House, I wanted to go inside the house to explore the interior design as well as the exterior as I wanted to find out more about the house and its historical context.
Kenwood House location
Contact Sheet
|

|
Best Images
|

|
I decided to photograph my model against the exterior of the house as there were many tall columns which is what I was looking for. I wanted to experiment with the idea of having a model dressed in modern clothing against old buildings. After this shoot, I had realised that the clothing I had chosen was not exactly what I was aiming for. My intention was for the flowy trousers to contrast with the straight, structural lines, however, after looking at the images, the clothing looks very casual and so could have been more glamorous. This would have been achieved if I dressed my model in a dress. On the other hand, I think my images are successful as I was able to use different techniques. For example, in the second image above, I used rule of thirds to make sure my mode was in the centre of the image. The harsh texture of the brick wall contrasts with the smooth texture of my model's clothes. Shooting in this location, has really led to an interest in this idea of classical imagery and I am going to carry on considering ways in which I can include this theme in my next shoot.
Fourth Shoot
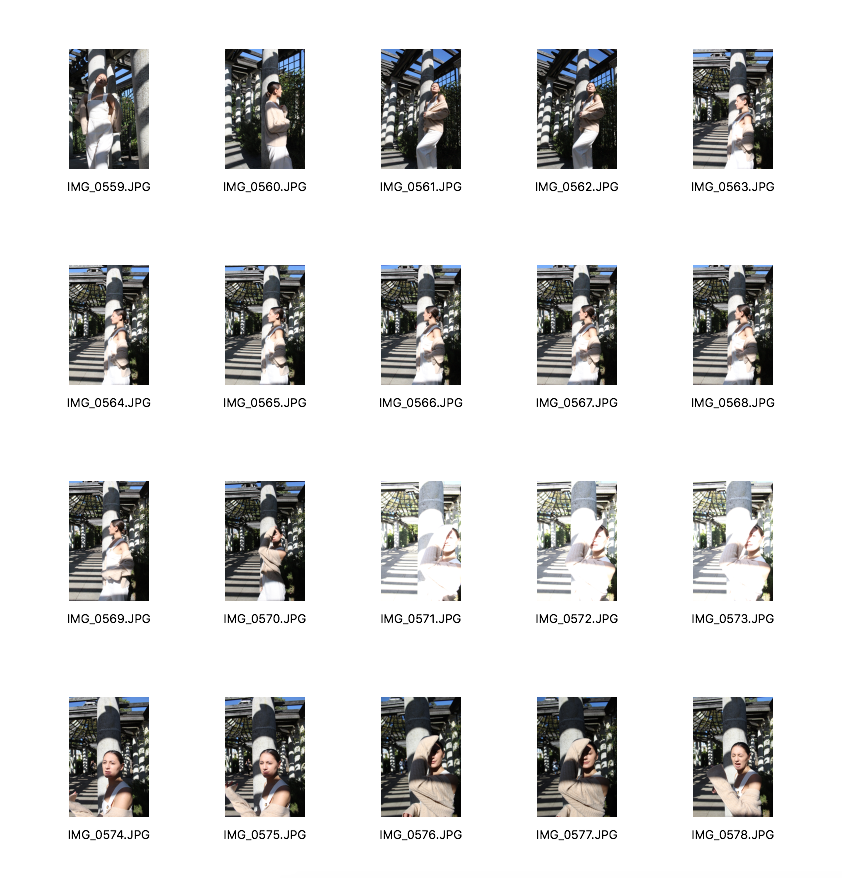
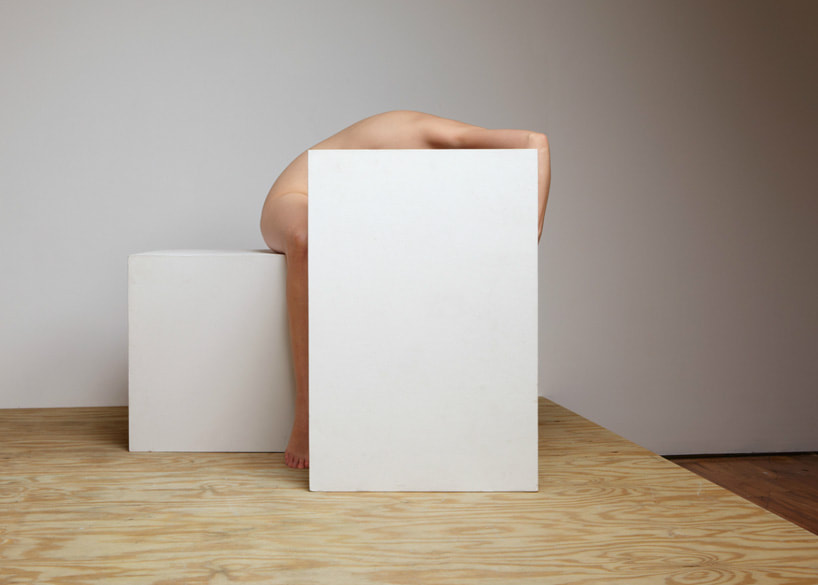
In this shoot, I am planning on dressing my model in a long, simple column dress. Throughout my shoots, a reoccurring technique I have been using is photographing my model from a lower angle, making her look quite statuesque. I have decided to really just focus on the clothing in this shoot. I am going to photograph indoors for this shoot as I want to experiment with the type of clothing my model is wearing. I think the type of clothing she is wearing is quite important as clothes essentially function as a wider visual language that can tell us a lot about the time, place, and society in which they were created and worn. As I am trying to capture classical imagery, I think my model needs to be dressed in a way that suits this, therefore a long column dress would be appropriate.
Contact Sheet

|
|
|
|
|
|
|
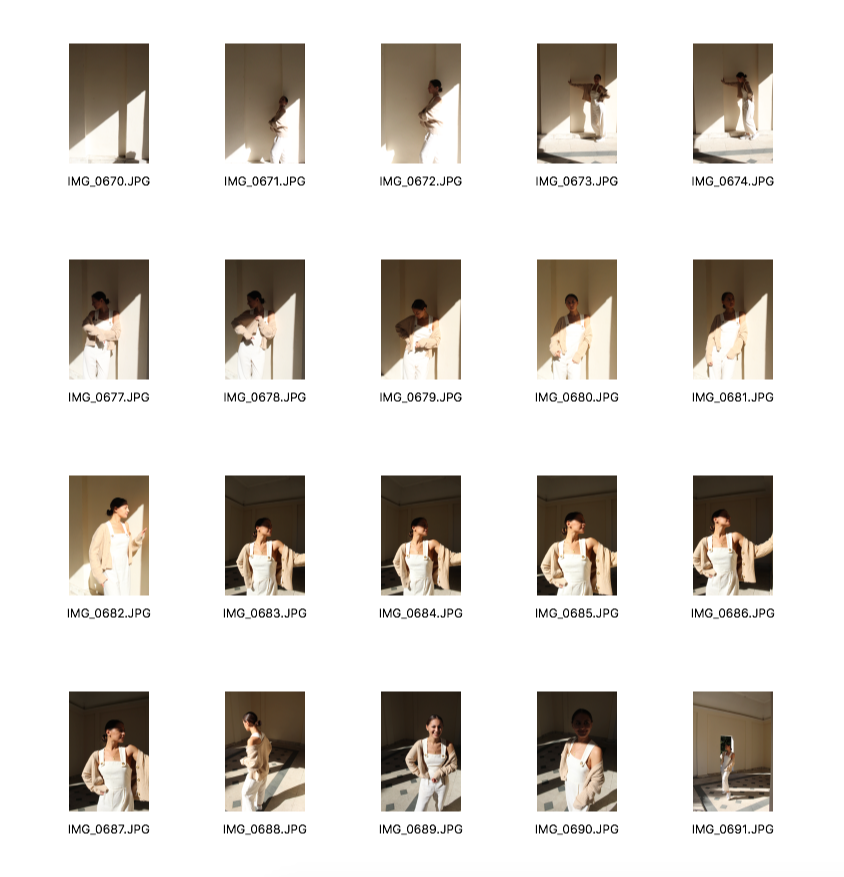
Original
|
Edited
|
I did this shoot indoors as planned, with my model in a dress. The room which I was shooting in had a large skylight which helped create natural, soft lighting. There were no harsh shadows, which I liked. I had my model stand in front of a plain white wall. This shoot was mainly a way of seeing the difference clothing makes. I will definitely be dressing my model in a dress for my next shoot.
Mood Board for Next Shoot
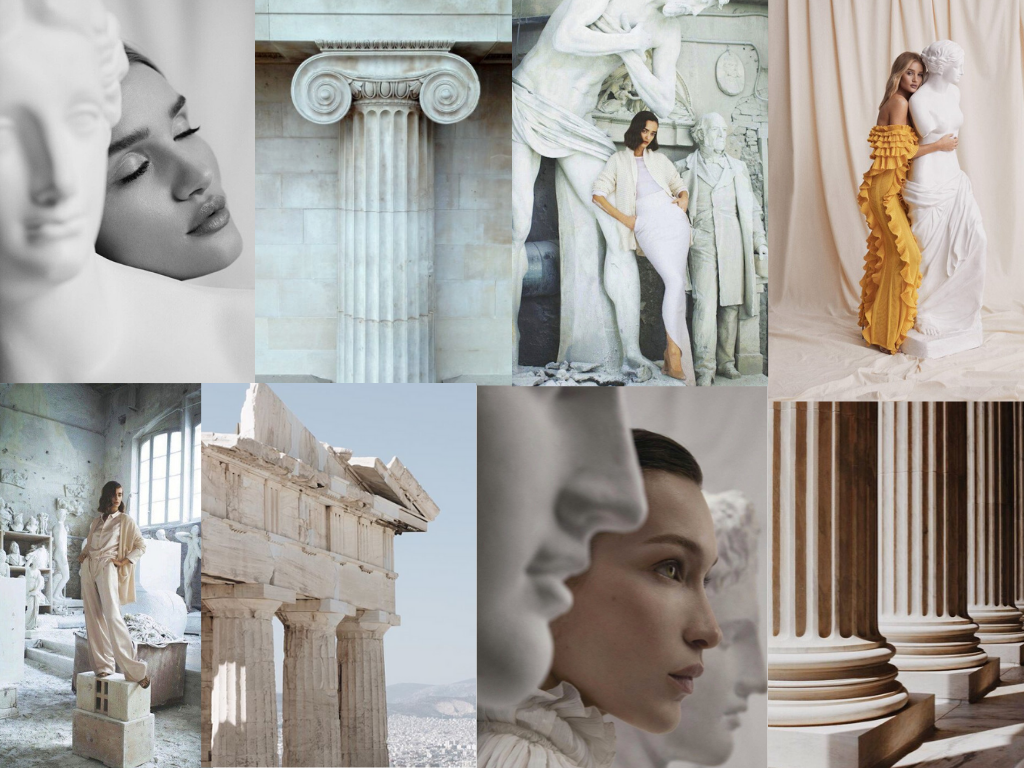
I have created this mood board to specifically focus on Greek architecture, columns and statues. For my third shoot I had focused on placing my model against columns in Kenwood House which was inspired by Greek and Roman classical architecture, and in my fourth shoot, my main focus was the clothing my model was wearing to suit the theme I was going for. Having done these shoots, I want to develop this by combining them together. I will do this by photographing my model in a location with classical Greek sculptures and pillars whilst dressed in a long dress. I have decided to explore this idea further, so I created this mood board to help me with inspiration for my next shoots. My main inspiration for this whole concept is photographer Huene, but also my Greek heritage. I have been visiting Greece ever since I can remember and my family always took me to ancient sites which broadened my knowledge and understanding of the Greek civilisation. I have been fascinated by the details of ancient statues and the way the sculptors capture their expression and emotions.
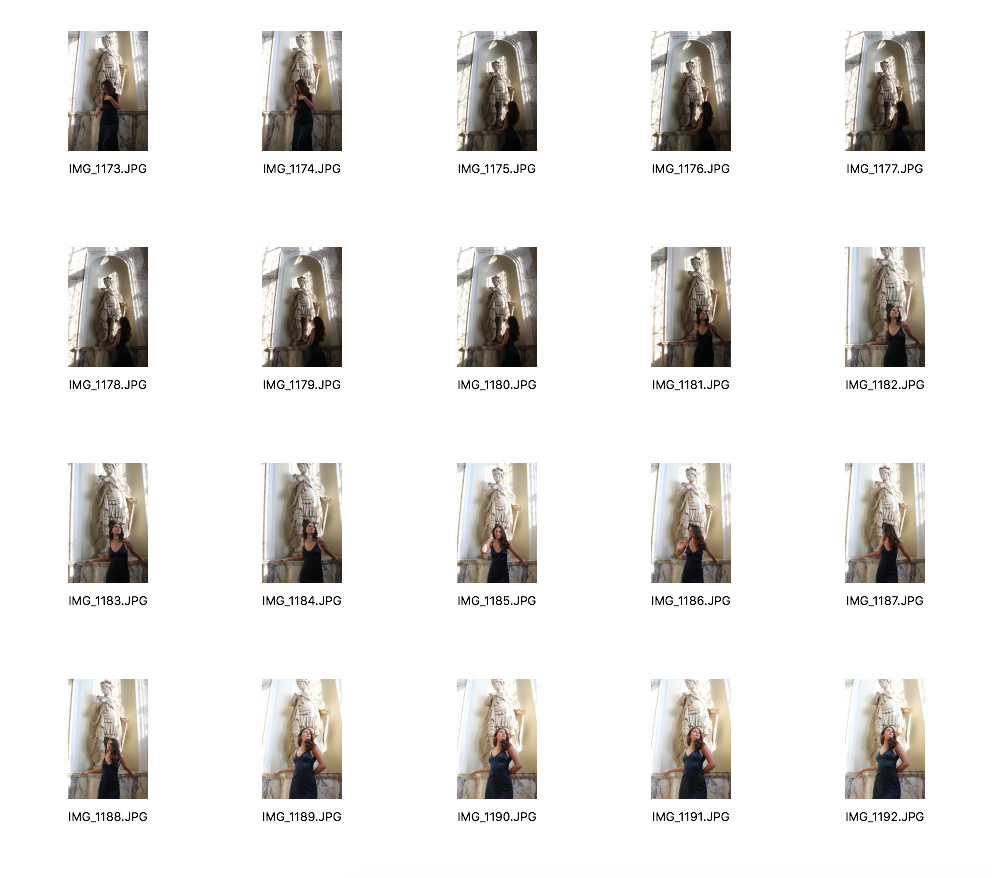
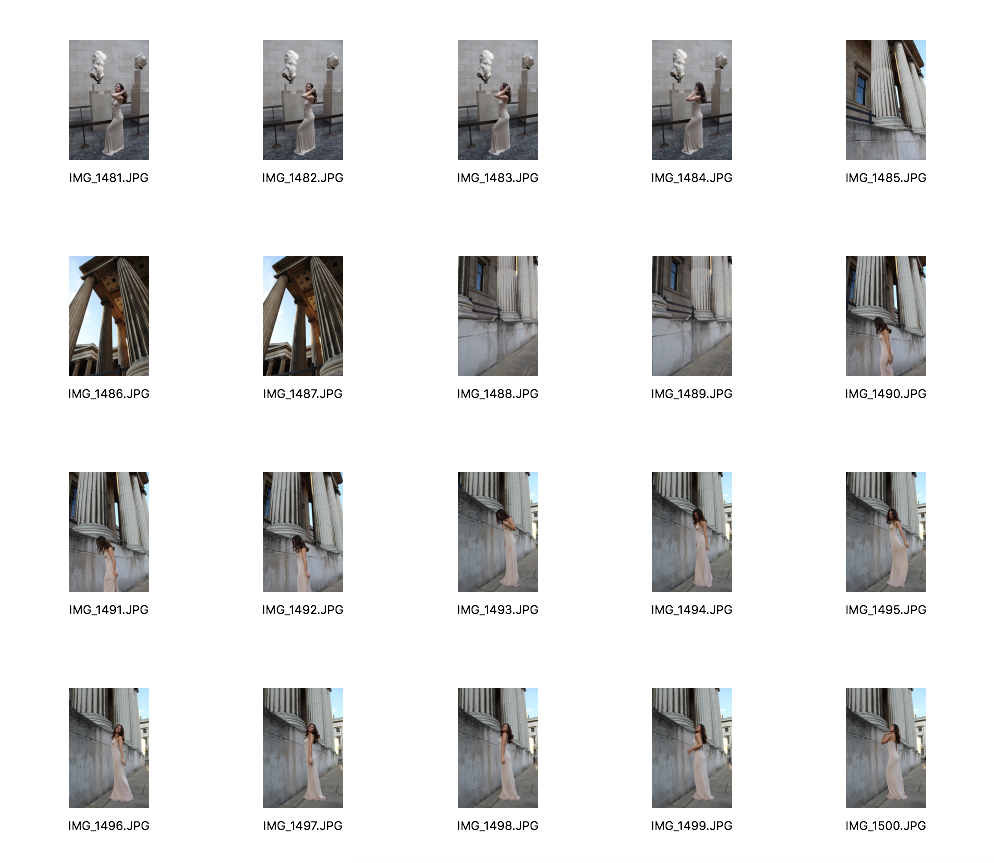
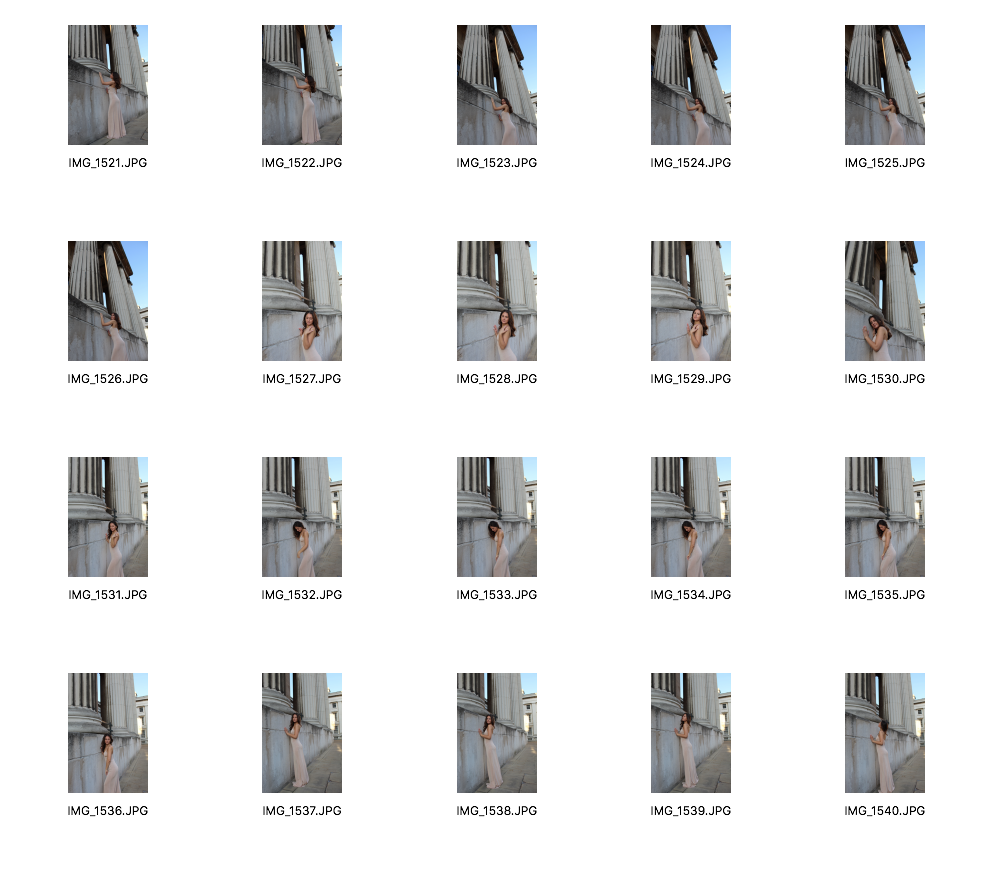
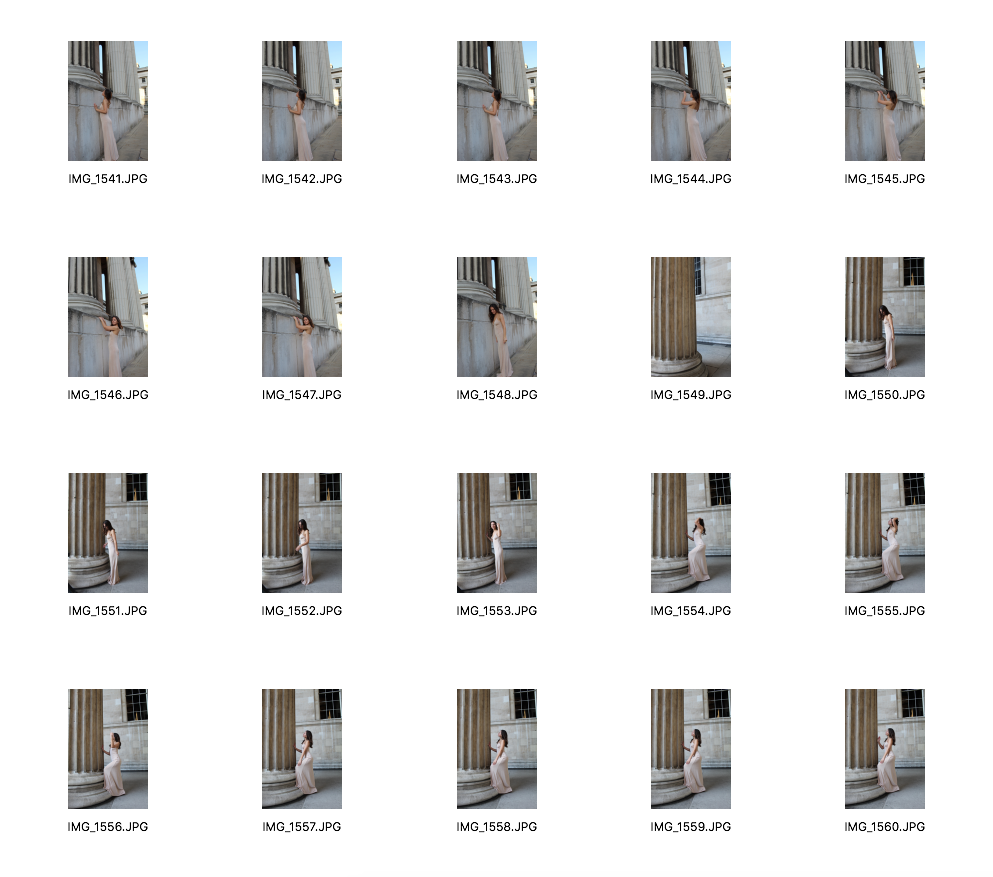
Plan for my fifth shoot
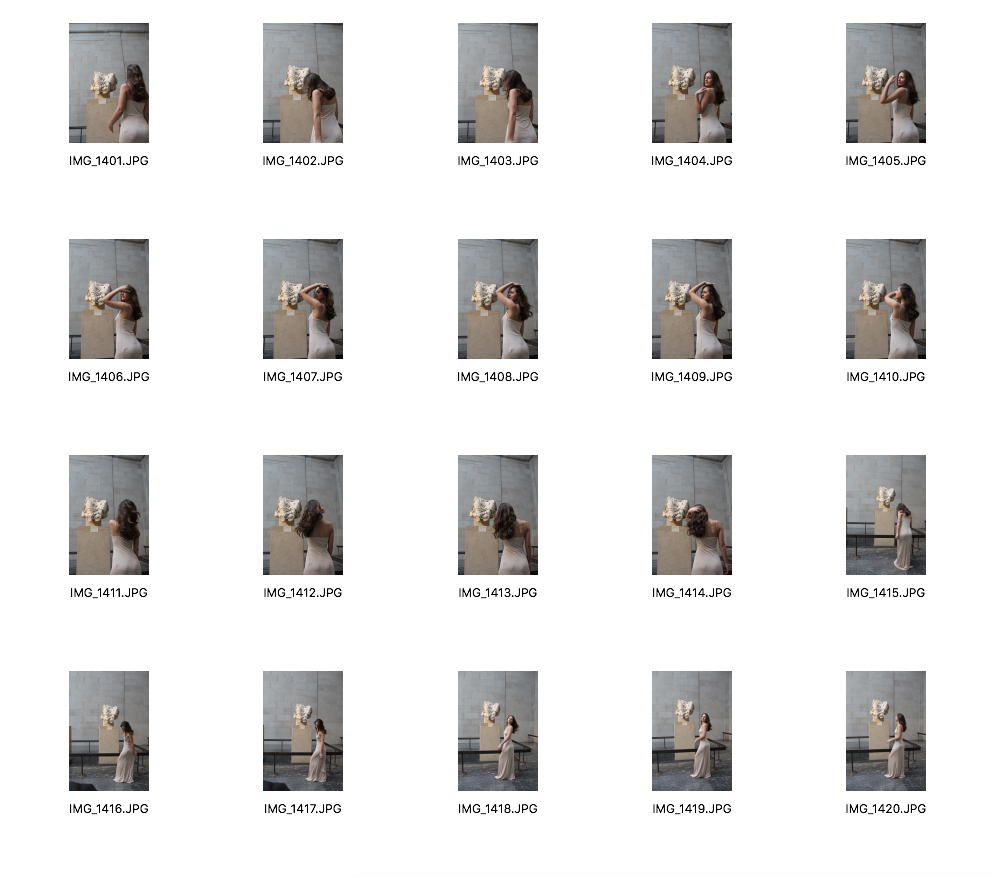
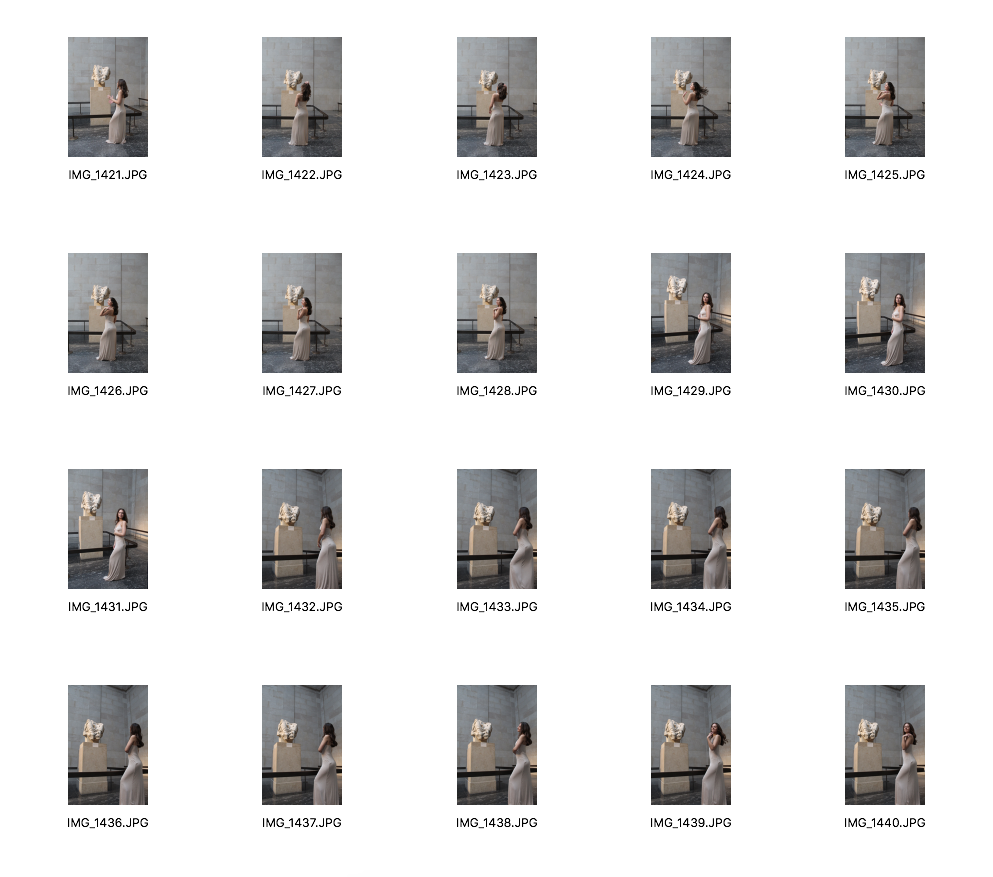
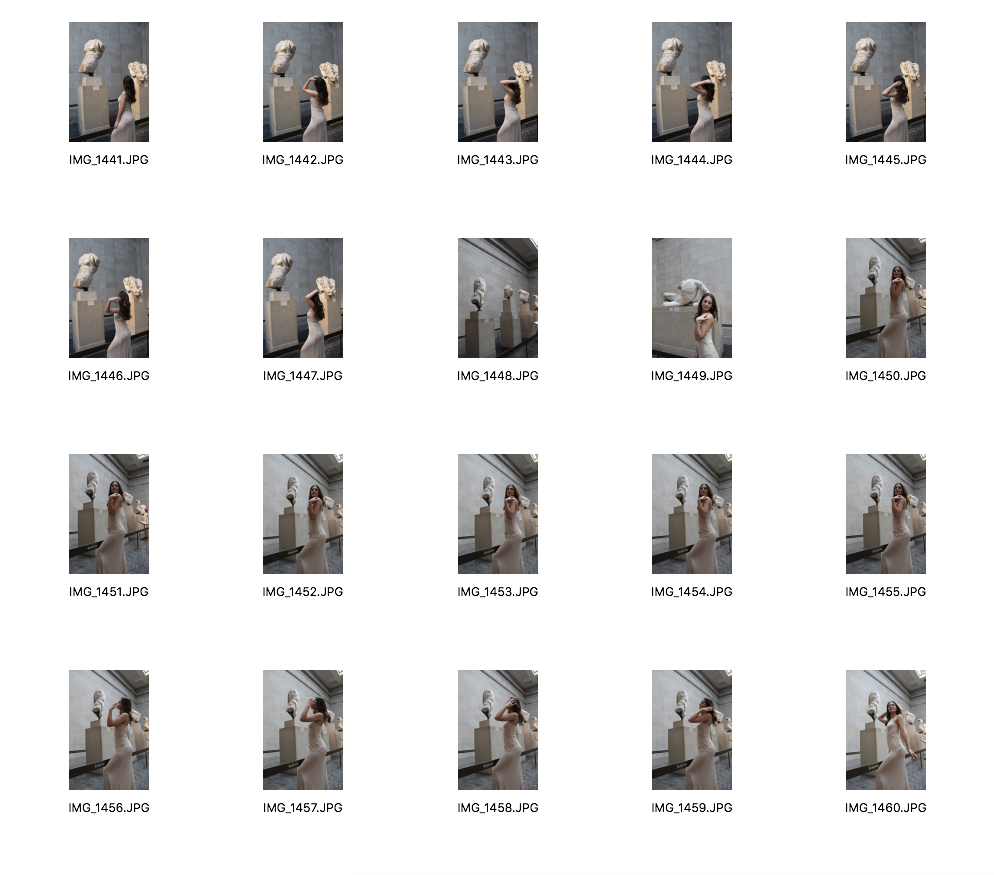
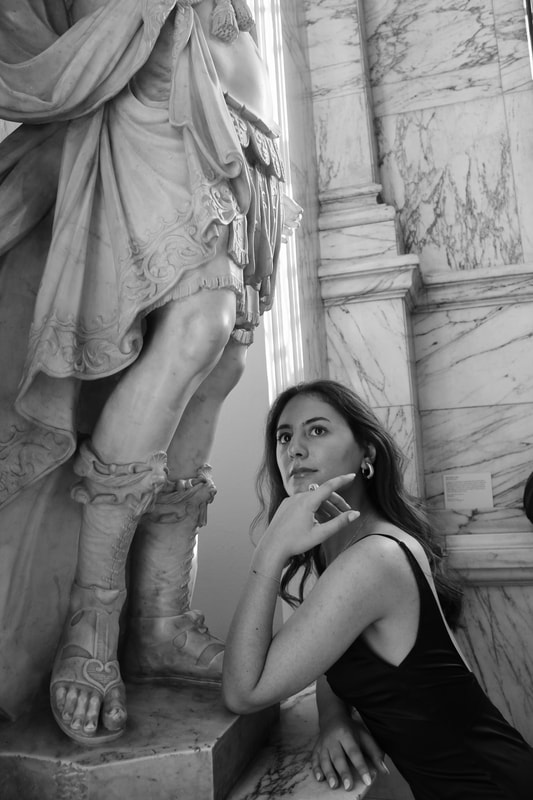
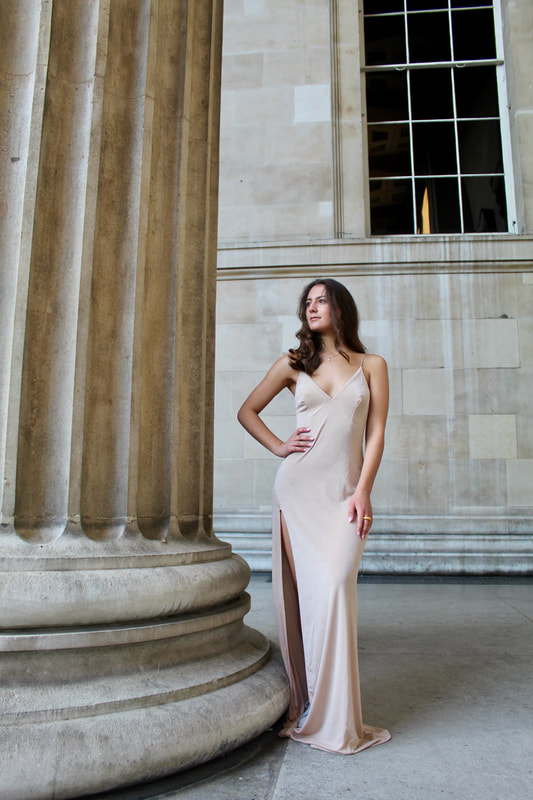
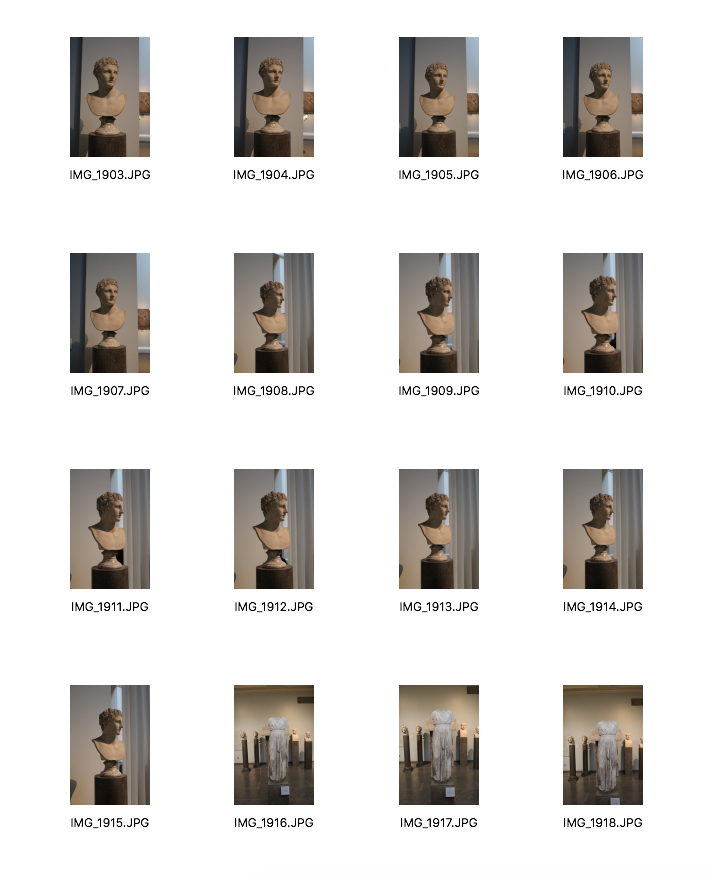
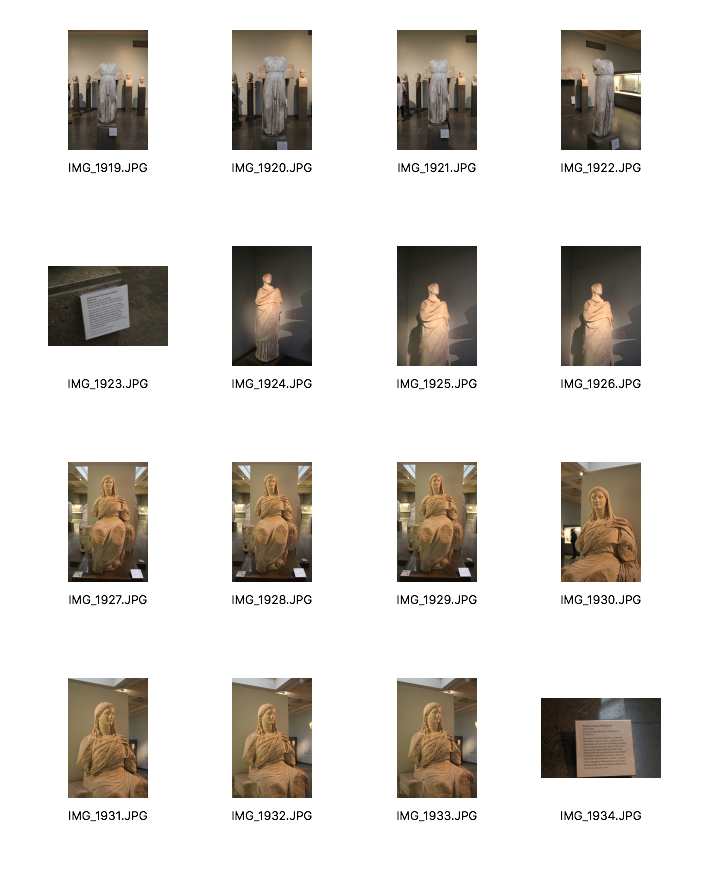
Having made my mood board, I have decided to visit the British Museum and the Victoria & Albert museum (V&A), as both these museums display Greek statues and sculptures. I am planning on dressing my model in muted and earthy tones which will compliment the white marble of the statues. The soft, flowy dresses will contrast with the sculptural details and lines. I am also planning for my model to wear gold jewellery; earrings, bracelets and necklaces. Ancient Greeks wore a lot of jewellery made from precious metals like gold and silver, which is why I have decided to use jewellery as it will add to the Grecian theme. My aim for this shoot is to photograph my model beside Greek statues in the museum almost portraying Greek heritage in a modernistic way. I will use different angles to photograph, for example, from below to also give my model a statuesque posture.
Location of Museums
|
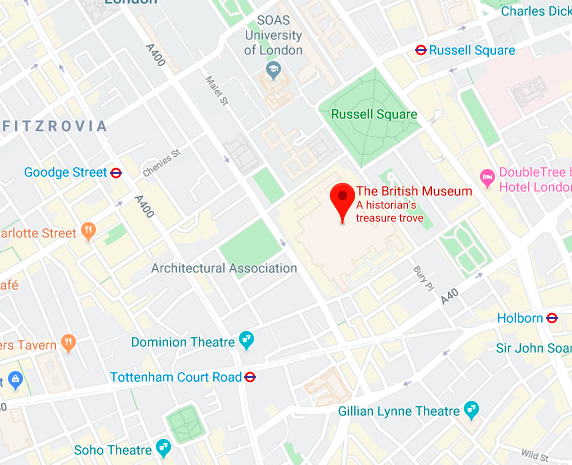
The British Museum is located in Bloomsbury, London
|
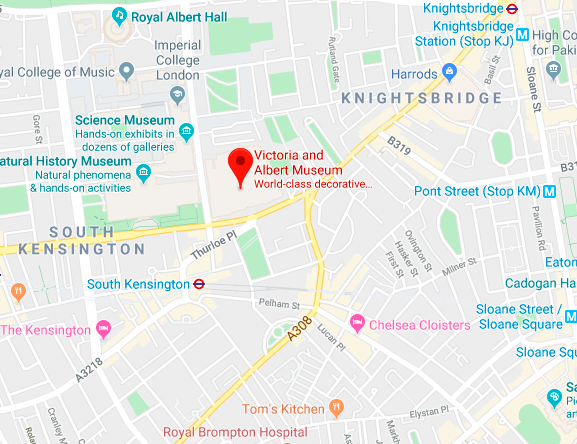
The V&A is located in South Kensington, London
|
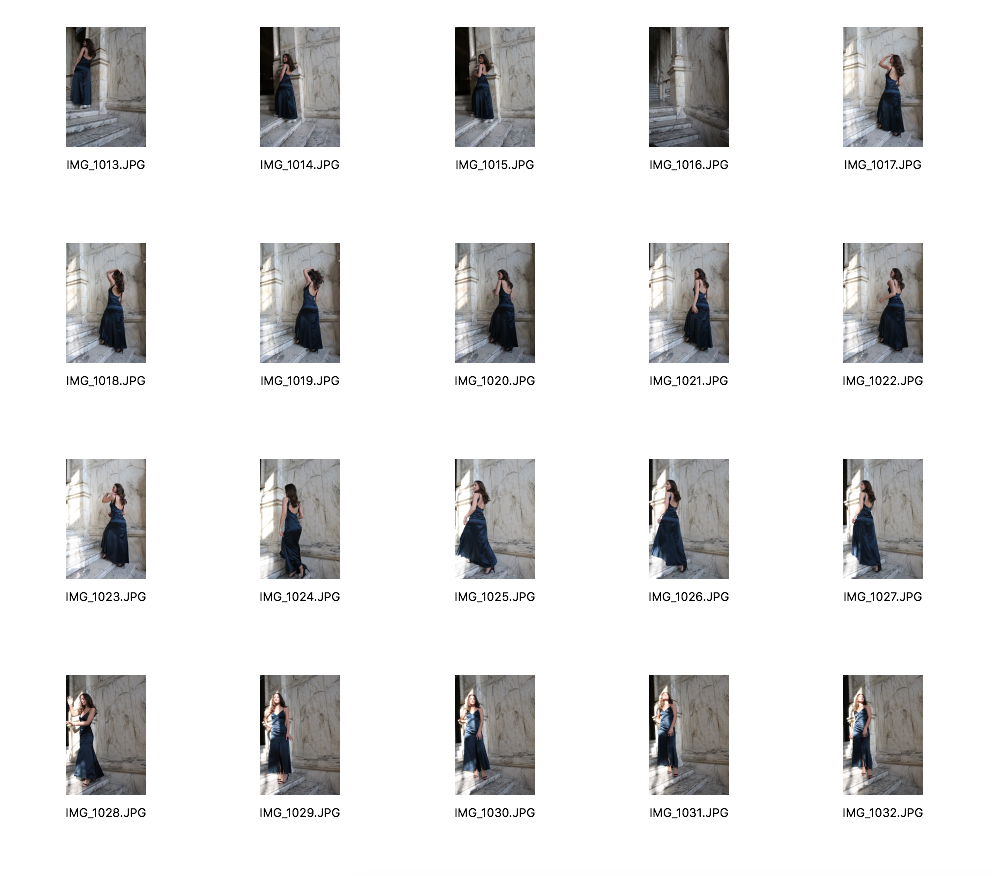
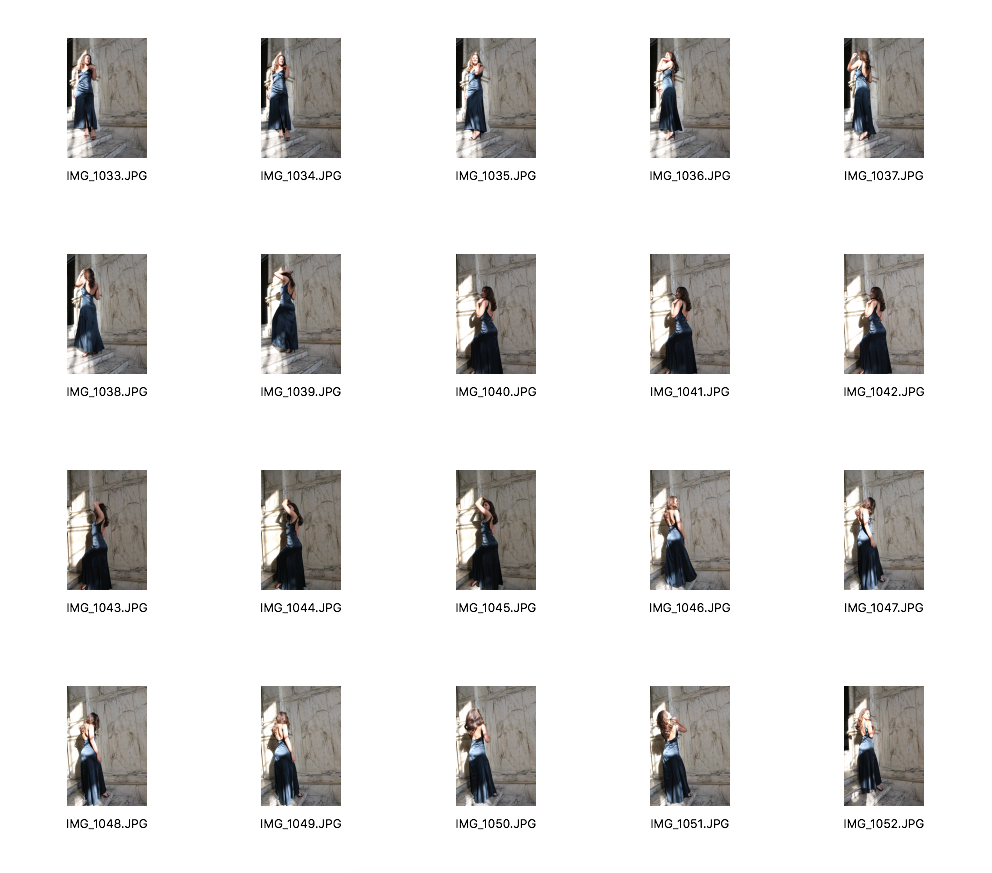
Contact Sheets
|
|
|
|
|
|
|
|
|
|
|
|
|
|
|
|
|

|
|
|
|
|
|
|
|
|
|
|
|
|
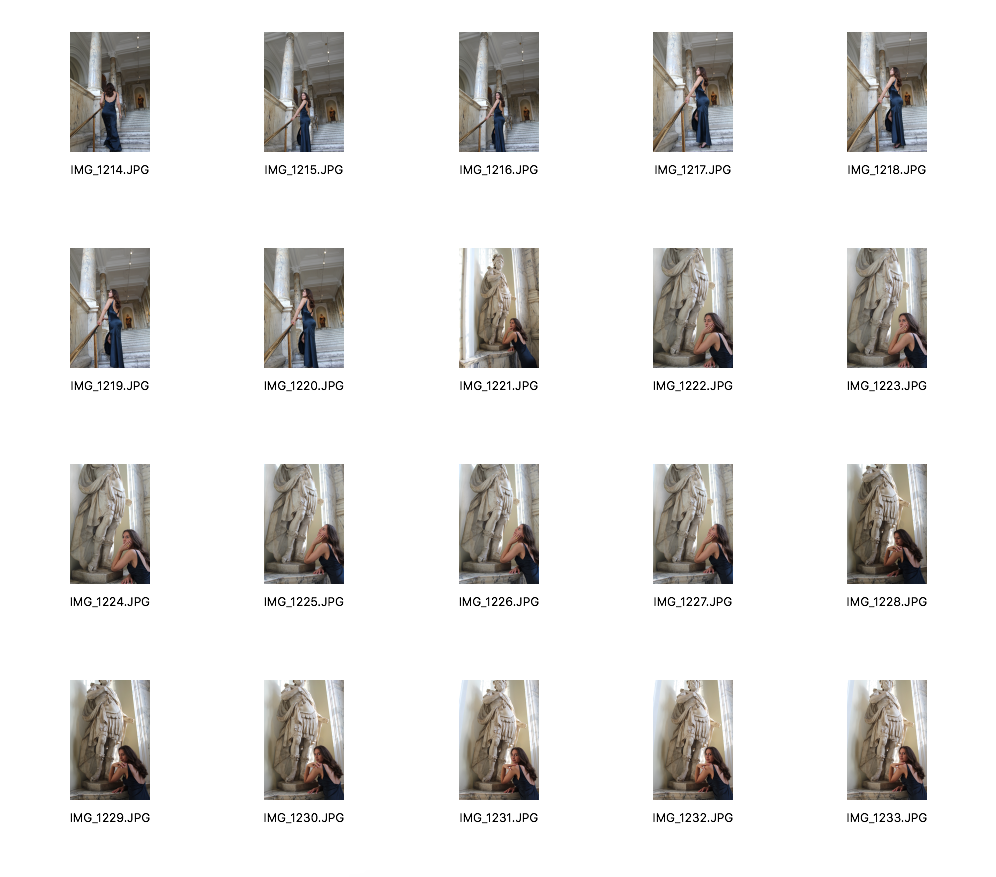
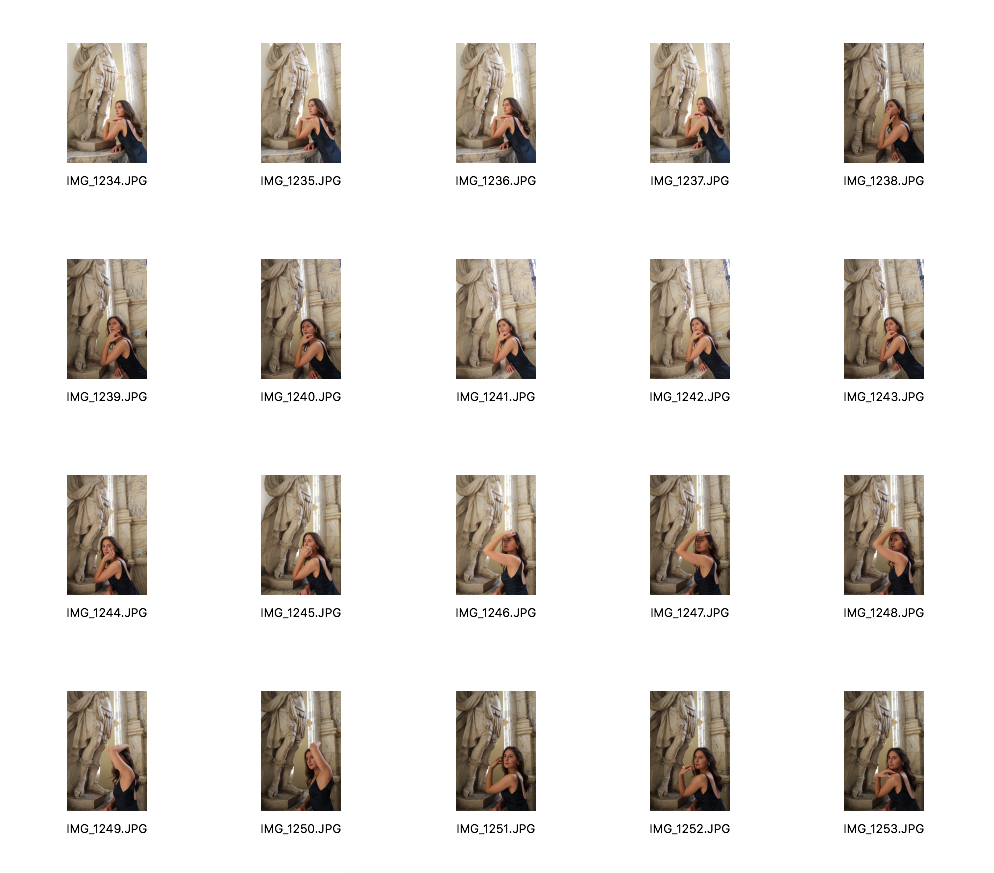
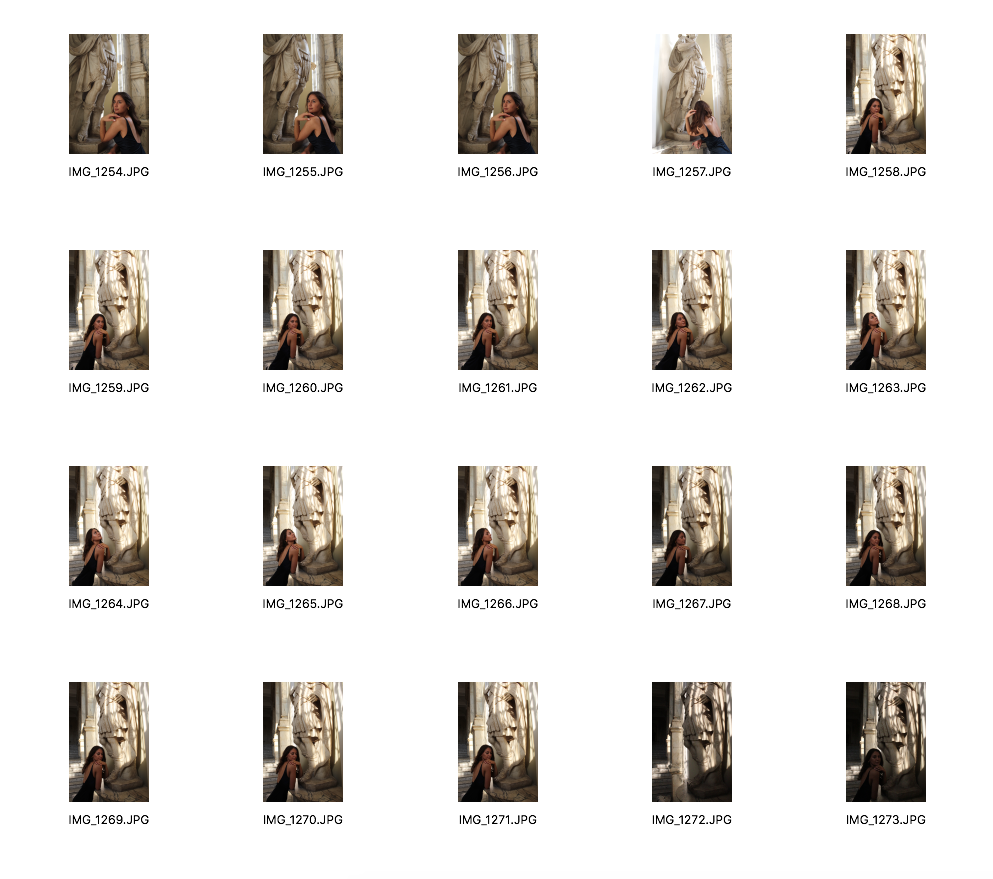
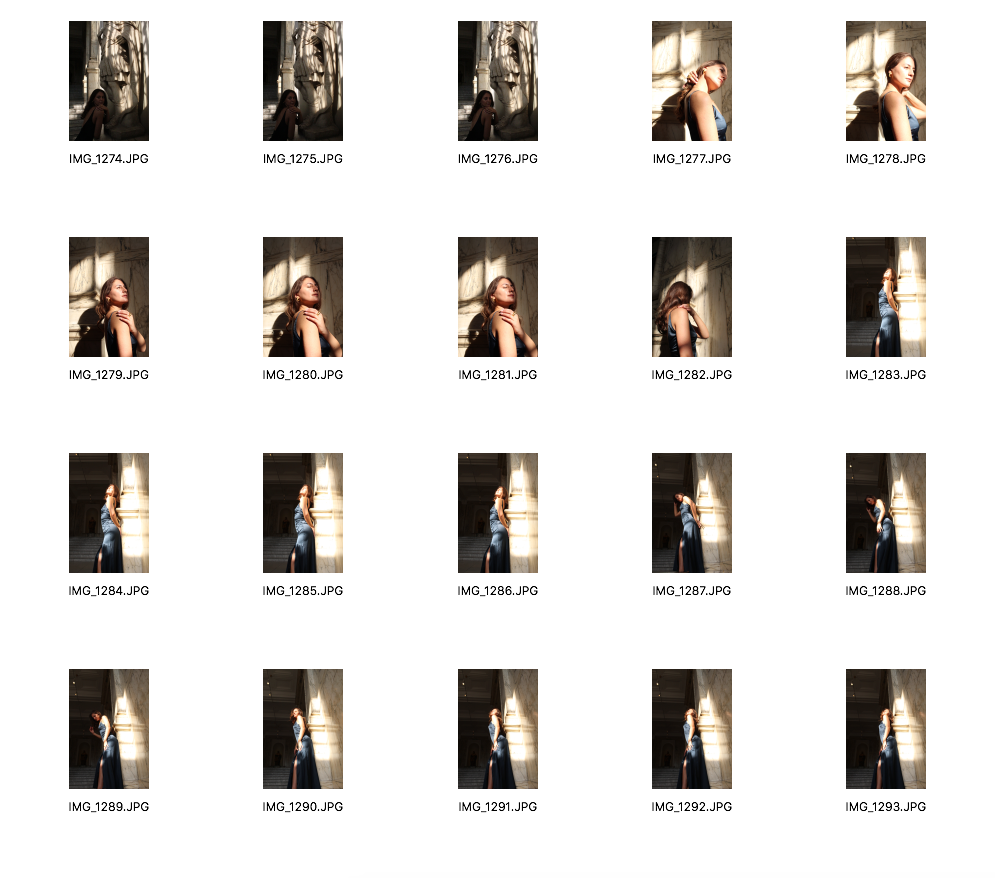
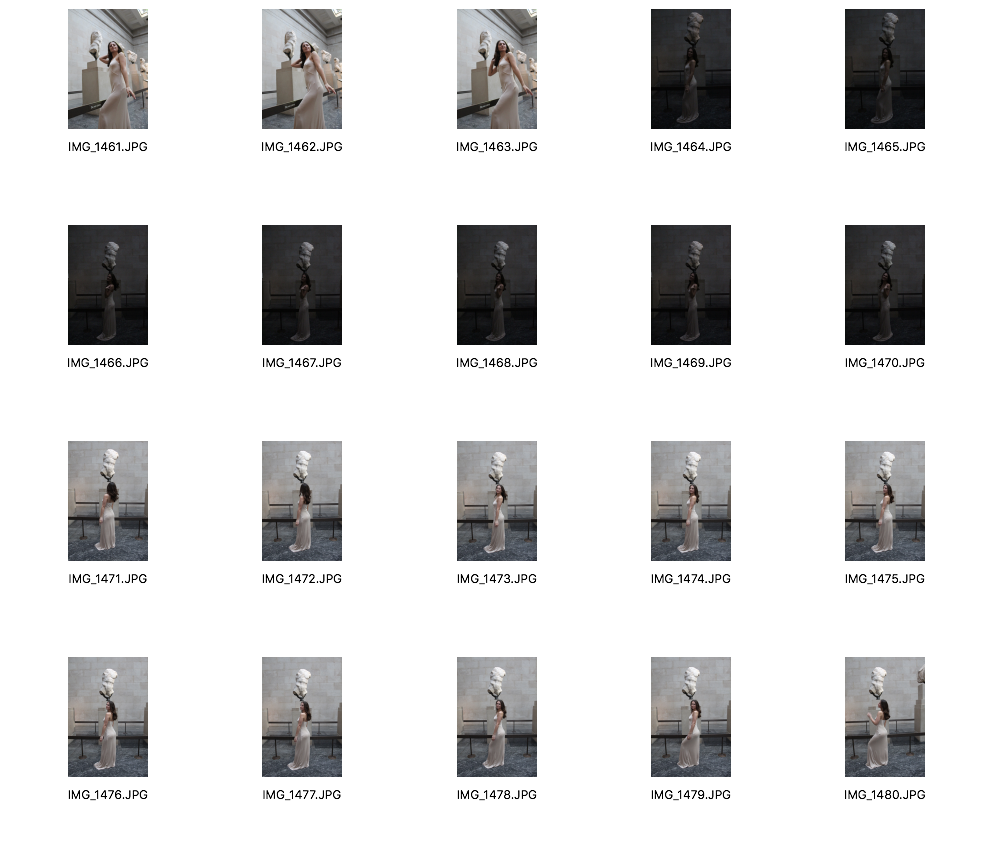
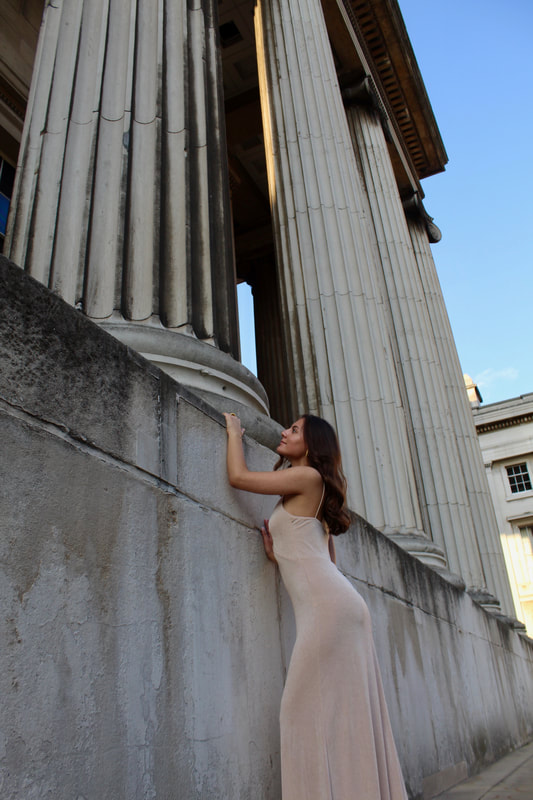
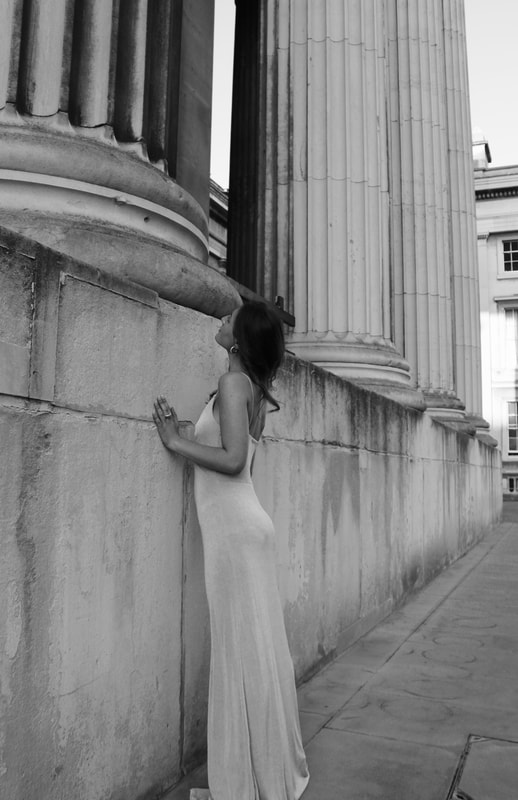
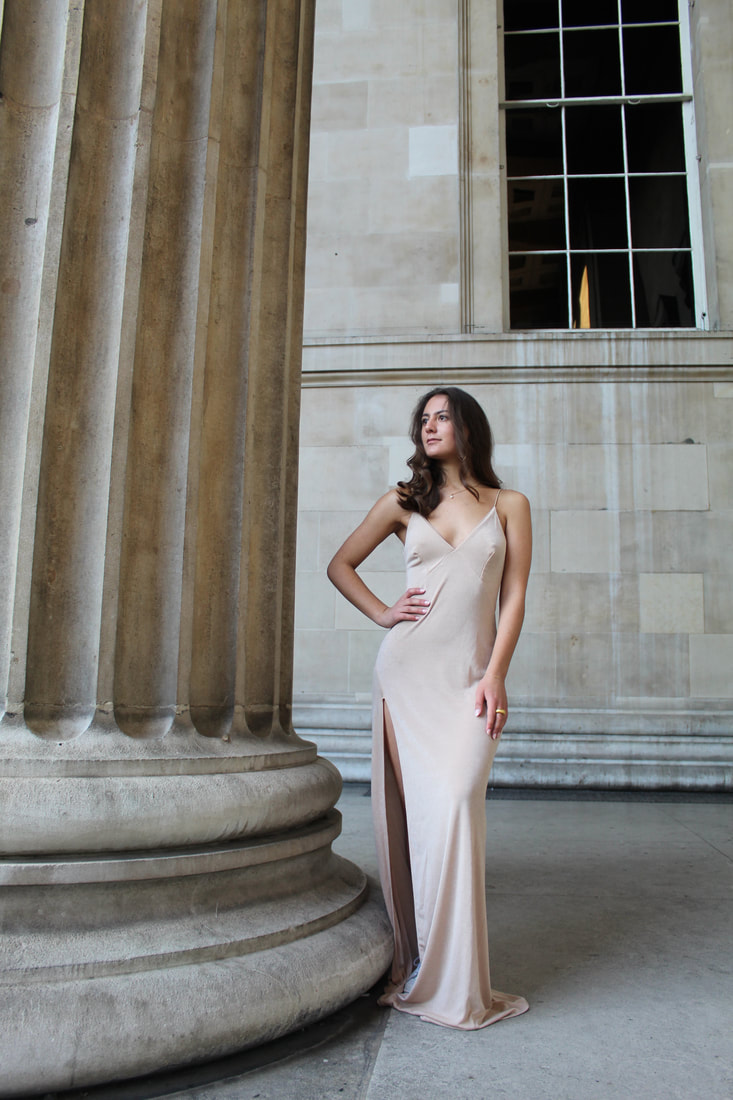
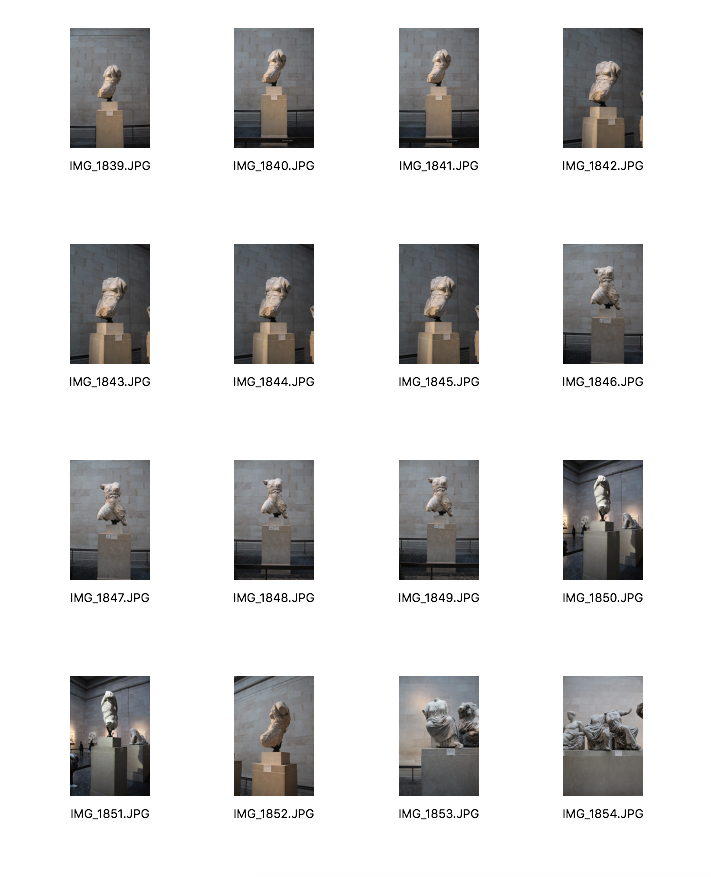
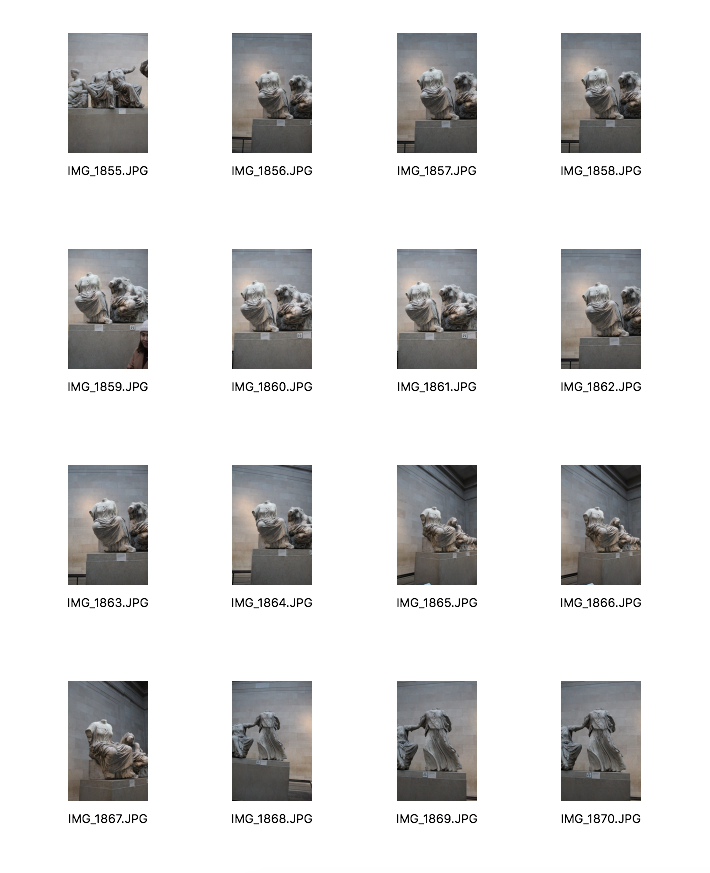
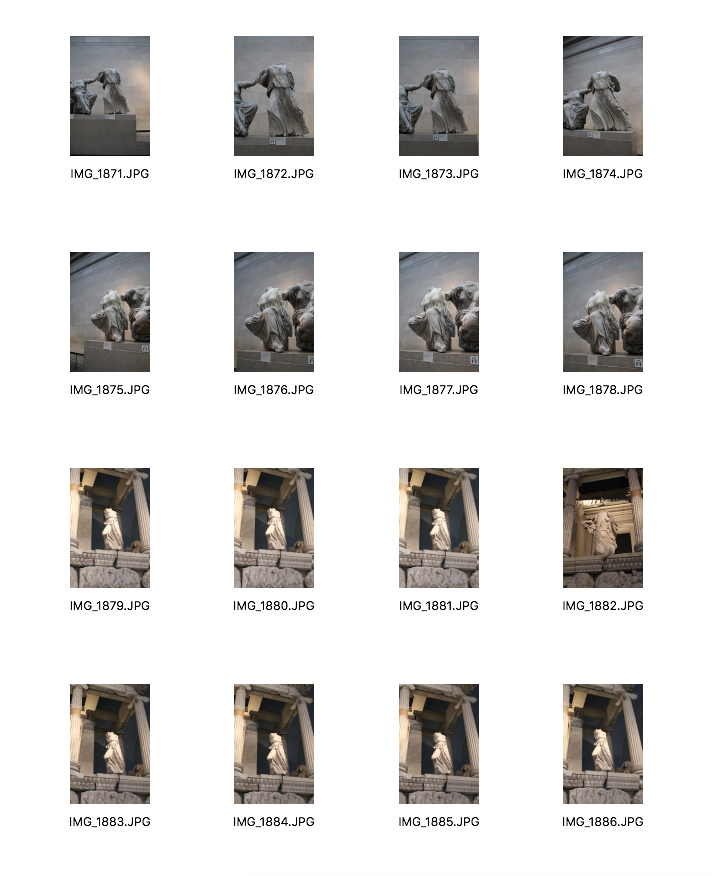
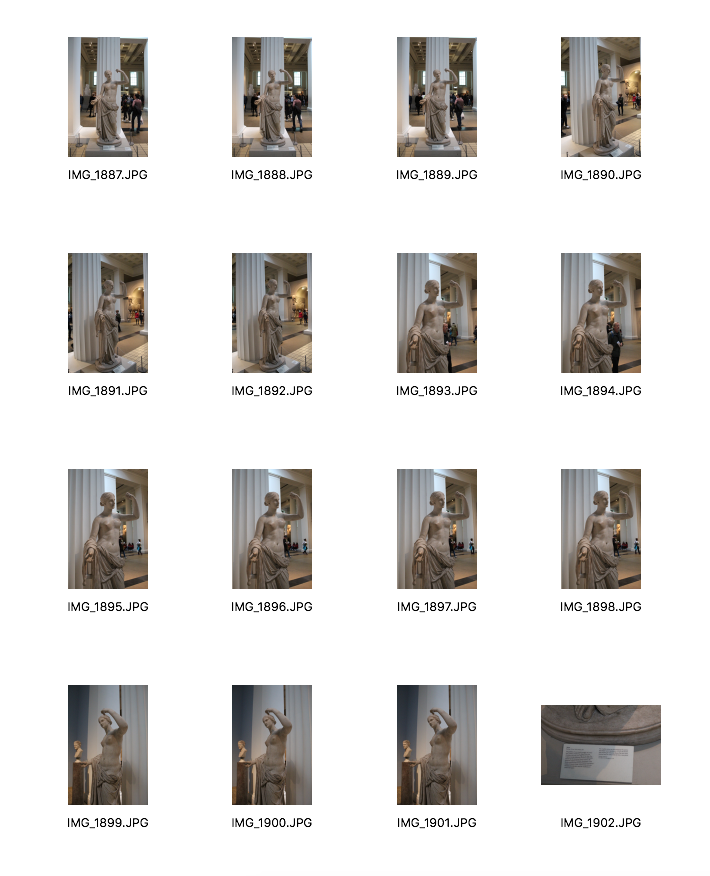
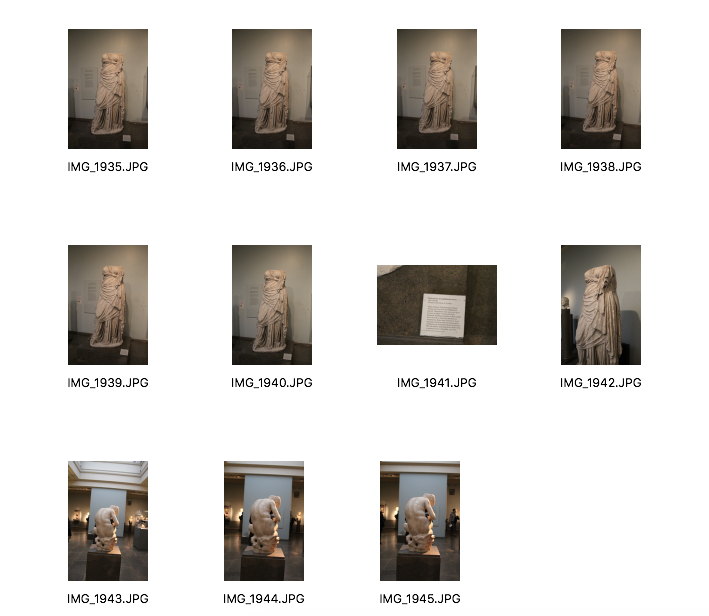
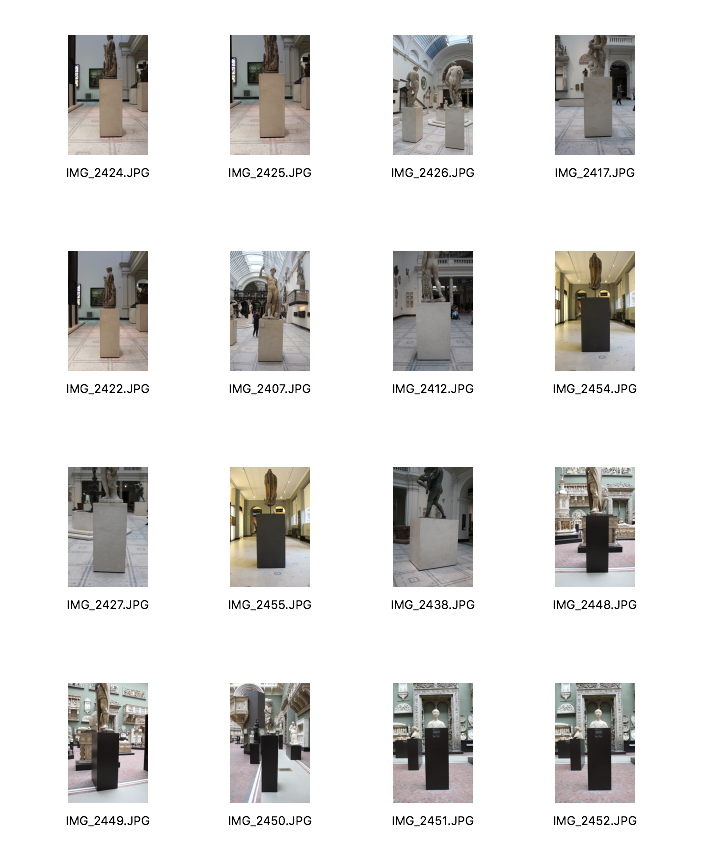
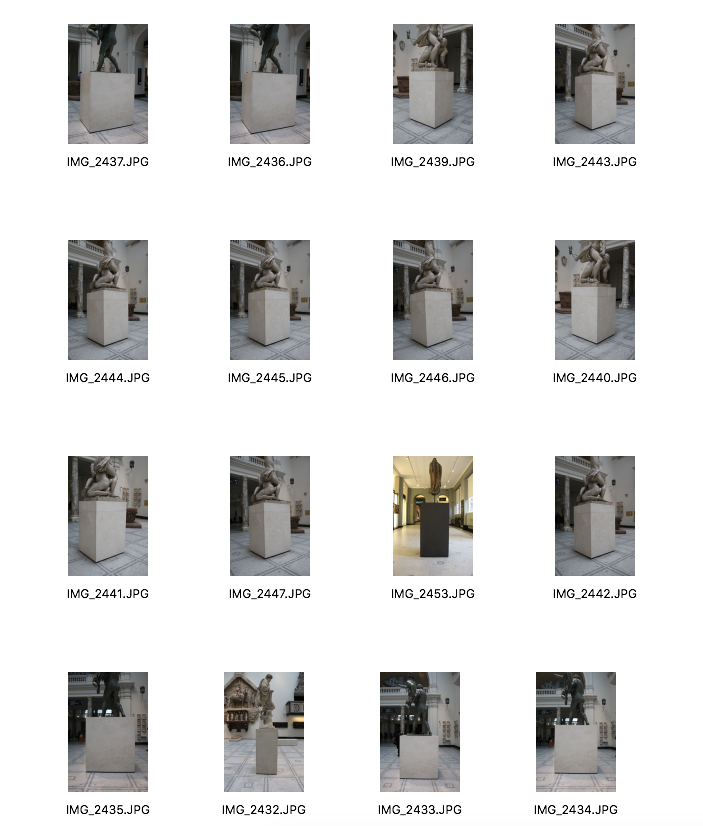
This shoot was successful as I followed my plan and went to both of the locations. I first visited the V&A but there weren't any statues that were specifically Greek, which was what I was looking for. However, I still decided to use the V&A as a backdrop of my images as the colours and architecture of the museum resembled statues. For example, I found this part of the museum that had marble walls and gold railings. The white marble walls almost imitated the colours of statues which was why I still decided to shoot there. I wanted my model to interact with the environment and almost become part of it. Whilst I was shooting in this part of the museum, there was also a statue which I wanted to use. Even though it wasn't a greek statue, I still wanted to use it as the aim of this shoot was to photograph my model against statues and columns. The spot I decided to shoot in had a large window next to where I was photographing my model which, created effective shadows and lighting. I made sure I was always stood with the sunlight behind me. otherwise my images would have been over-exposed.
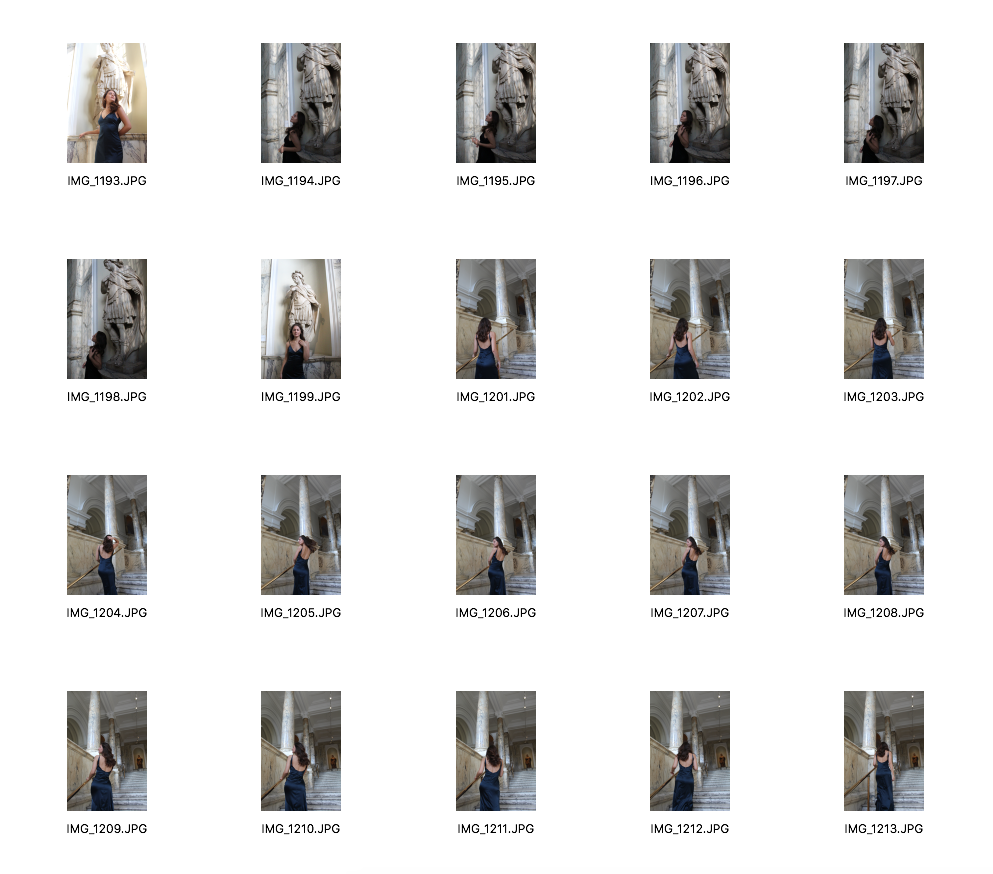
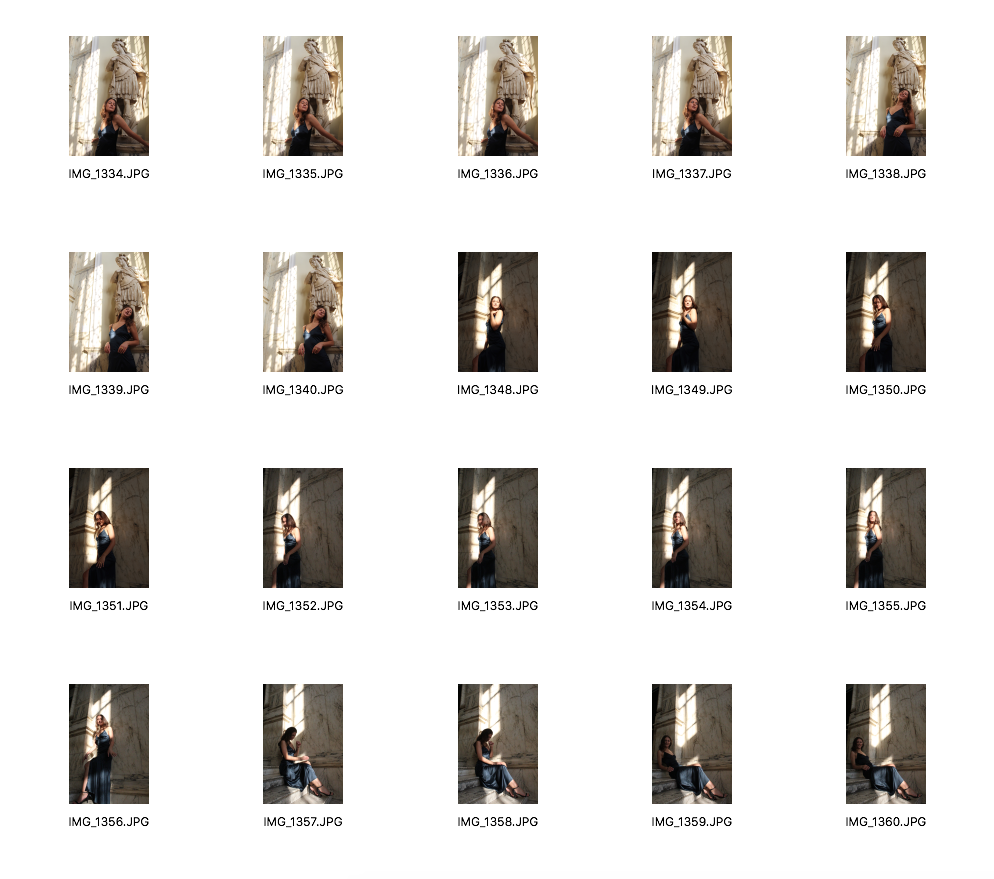
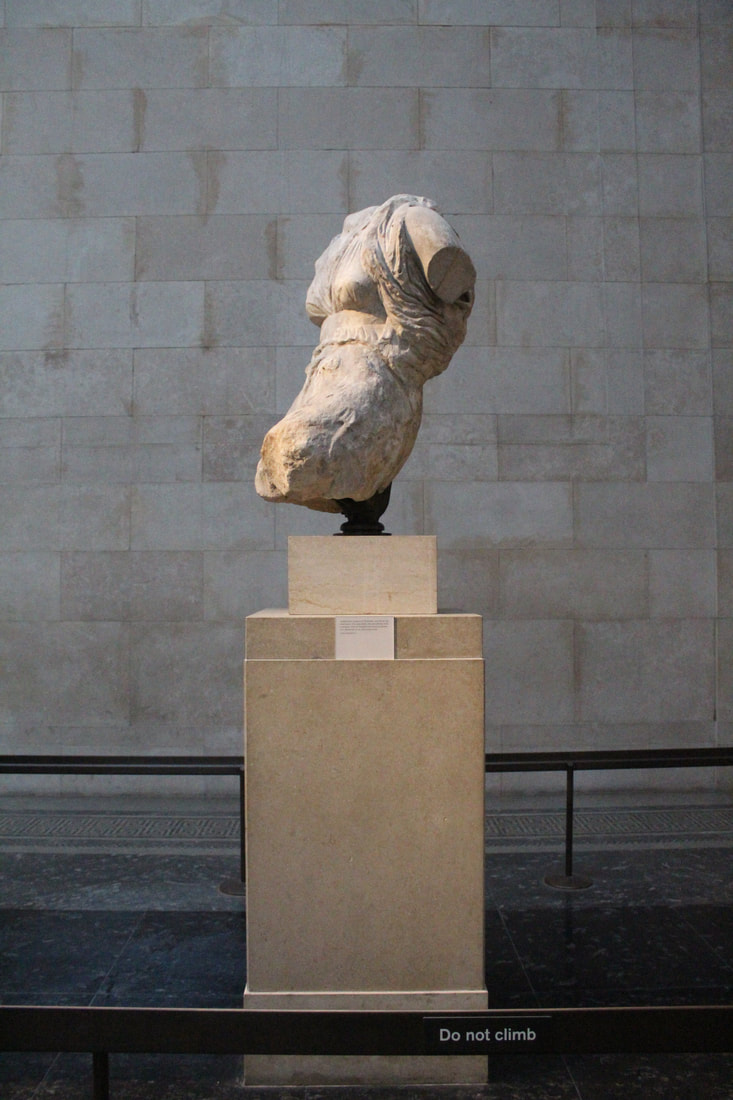
I then visited the British museum as the Parthenon sculptures from Athens have been placed in this museum. Sometimes known as the 'Elgin Marbles', these sculptures have been on permanent display in the British Museum since 1817. Even though this was a perfect location for my shoot, all the sculptures were surrounded by barriers which didn't allow me to shoot my model interacting with the sculptures. However, I did still try and photograph my model standing near the statues, but I don't think it was very successful. The British Museum was designed by architect Sir Robert Smirke in 1823. It was designed in the Greek Revival style which emulated Greek architecture. This style had become increasingly popular since the late-18th century, when western Europeans had began to explore the sites of Ancient Greece. This meant that the exterior of the museum was a perfect location for me to photograph as it had Greek features like large columns and pediments. As the shoot inside of the British Museum was not what I was exactly aiming for, I decided to use the columns that were on the outside of the museum. The slim-fitting shape of the dresses I used were similar to column dresses, which was effective as it added to this common motif of statuary and columns.
I then visited the British museum as the Parthenon sculptures from Athens have been placed in this museum. Sometimes known as the 'Elgin Marbles', these sculptures have been on permanent display in the British Museum since 1817. Even though this was a perfect location for my shoot, all the sculptures were surrounded by barriers which didn't allow me to shoot my model interacting with the sculptures. However, I did still try and photograph my model standing near the statues, but I don't think it was very successful. The British Museum was designed by architect Sir Robert Smirke in 1823. It was designed in the Greek Revival style which emulated Greek architecture. This style had become increasingly popular since the late-18th century, when western Europeans had began to explore the sites of Ancient Greece. This meant that the exterior of the museum was a perfect location for me to photograph as it had Greek features like large columns and pediments. As the shoot inside of the British Museum was not what I was exactly aiming for, I decided to use the columns that were on the outside of the museum. The slim-fitting shape of the dresses I used were similar to column dresses, which was effective as it added to this common motif of statuary and columns.
Best images
|
|
|
|
Next Development and Steps on Photoshop
For my next development, I want to use my images from my last shoot and upload them on photoshop, with the aim of creating a living statue. As I have begun looking at the idea of sculptures and statues, I want to explore the possibilities of what I can create using photoshop and stretch my artistic ideas further. I have shown each step below on how I attempted to create a 'living statue'.
1. Firstly, I opened up my chosen image onto photoshop
2. Then I selected Image > Adjustments > Brightness/Contrast
3. I adjusted the brightness to 7 and the contrast to 20
4. I then selected Image > Image rotation > Arbitrary as my image was not completely straight
5. I rotated my image anticlockwise by 0.3 degrees
6. Then I selected the whole image to crop it. I cropped it by going onto Image > Crop
7. I then selected the Quick Selection Tool in order to only select the model as I wanted to make her black and white
8. Then Image > Adjustments > Black & White
9. Then I went back to brightness/contrast to decrease the contrast of the black and white effect and increase the brightness a bit
10. I also went back to Image > Adjustments > Levels
11. Then, I had to select the Magnetic Lasso Tool, as part of the model's dress was not selected when I used the Quick Selection Tool. I selected the area which was not black and white and repeated the steps in order to make it black & white.
|
Before
|
After
|
The outcome was quite successful as I managed to make my model black and white, whilst keeping the background the same. I am not sure whether turning her black and white looks as realistic as I wanted it to look. I think I want to try and consider different ways of making my model a 'living statue'.
Jacqueline Hayden
My previous development of making my model a living statue did not look as effective which is why I have decided to consider the work of Jacqueline Hayden. One of her series is called 'Ancient Statuary', where she created digital compositions of her photographs of older figure models and photographs she made of ancient statuary. This series has been shown in numerous museum exhibitions, including the Brooklyn Museum of Art and the New Museum of Contemporary Art. I think the idea behind her images is very interesting and I can use this as a starting point for my next developments.
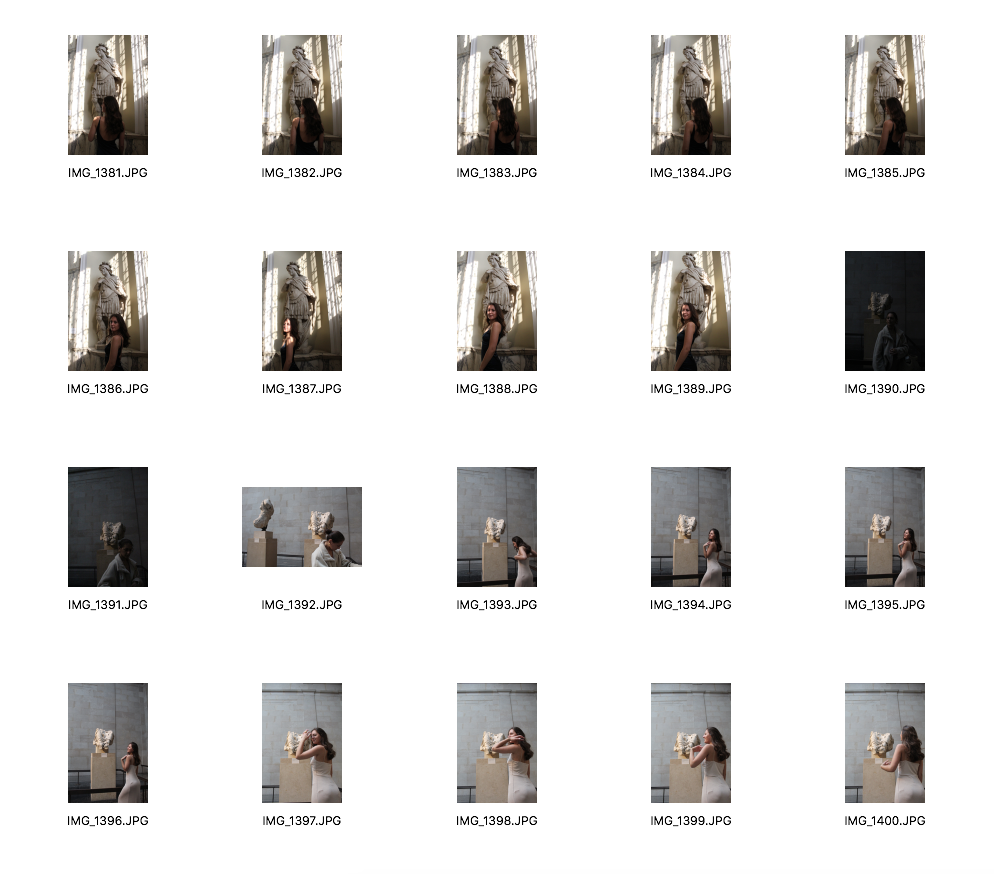
I am going to visit the British Museum again, but this time just photograph sculptures. By doing this I will be able to photoshop my model onto the statues, creating a digital statue, like Hayden has done.
I am going to visit the British Museum again, but this time just photograph sculptures. By doing this I will be able to photoshop my model onto the statues, creating a digital statue, like Hayden has done.
|
|
Contact Sheet
|
|
|
|
|
|
|
|
In order to photoshop my model onto the statue, I need to make sure that the angle my model is positioned in, is similar to the angle of the sculpture so that it looks realistic. I have decided to go back to my previous shoots and pick out a few images. For example, when I have captured a sculpture from the side, I will use an image where my model is also positioned to the side.
Images I will use
|
|
Using Photoshop: Steps
1. Firstly, I opened up both of the images I was going to use
2. Then I selected the image of the model and copied it onto the image of the statue
3. I then added a layer onto the image of my model
4. Then I pressed 'CMD' and 'T' to transform my image and put it in the right position
5. After that, I selected the 'Quick selection tool' and selected the areas of the image I wanted to erase
6. Then I selected the 'Eraser Tool' and erased the white background, making sure the opacity was 100%
7. I wanted to make both layers black and white so I first selected the background layer and went on Image>Adjustments>Hue/saturation
8. I put the saturation all the way down so it became black and white
9. I repeated this step but made sure I selected Layer 1
10. After that, I wanted to erase parts of Layer 1 in order to make both layers blend in
11. I turned down the opacity so that the eraser wouldn't be so harsh
12. I then turned down the opacity of Layer 1 so that it blended more with the statue
13. I carried on erasing parts of my images so that it all looked blended in
14. The final step was to use the 'Clone stamp Tool' to remove the barriers that were around the sculpture
|
Artist
|
Me
|
The final outcome was successful as I achieved the artist's intentions by creating a digital statue. I think my response looks quite realistic, however, I do think there could have been some improvements. For example, I could have blended my model more with the actual statue and also, I could have used the clone stamp tool make her dress the same texture as the sculpture. By doing this, it has led me to consider the wider theme of sculptures. By visiting museums and capturing the different sculptures, I have been inspired by the way these sculptures depict and represent the human form. Therefore, for my next development, I intend to begin photographing the human form in an abstract way.
Next Development
Bill Brandt
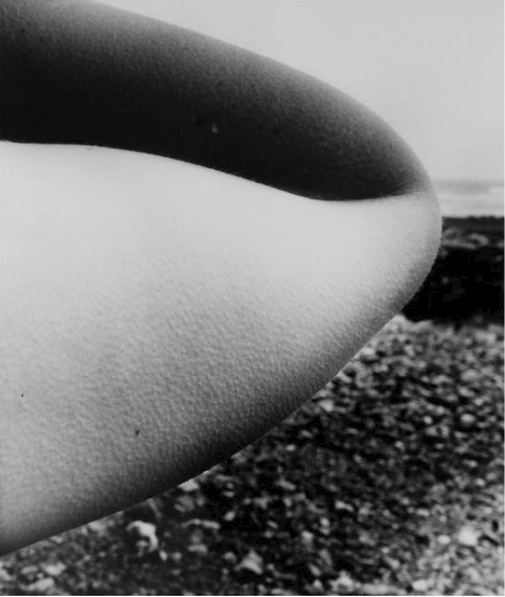
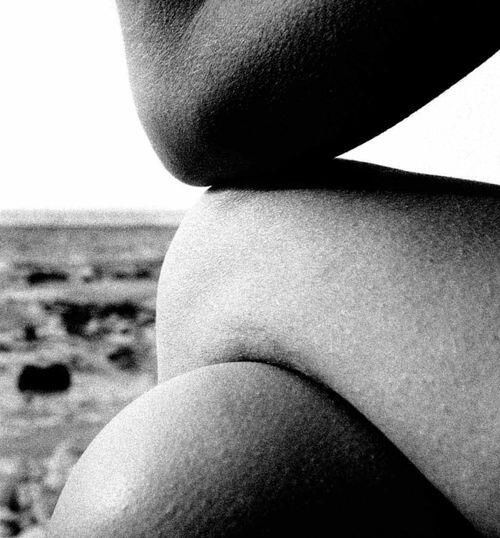
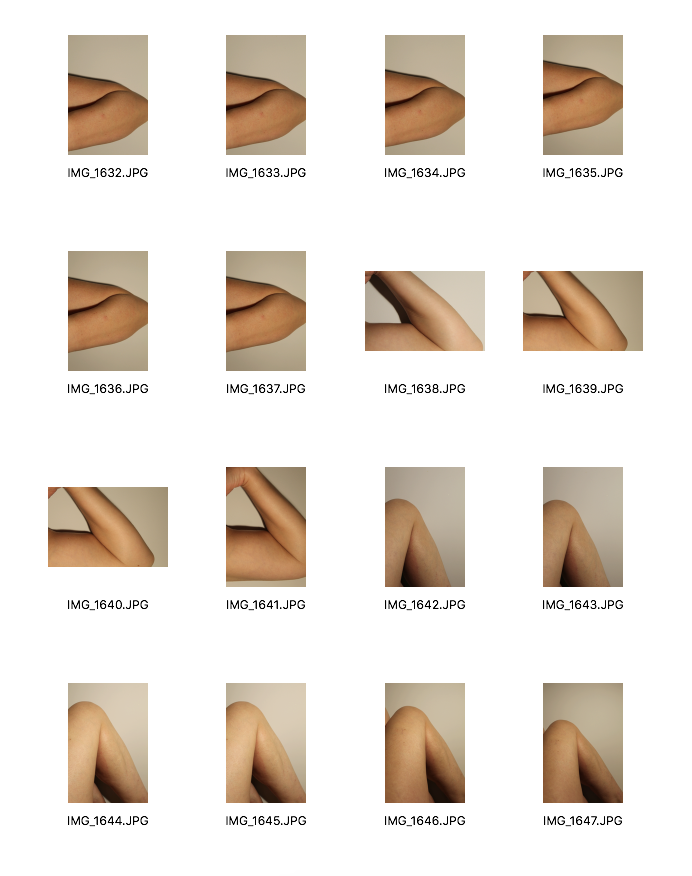
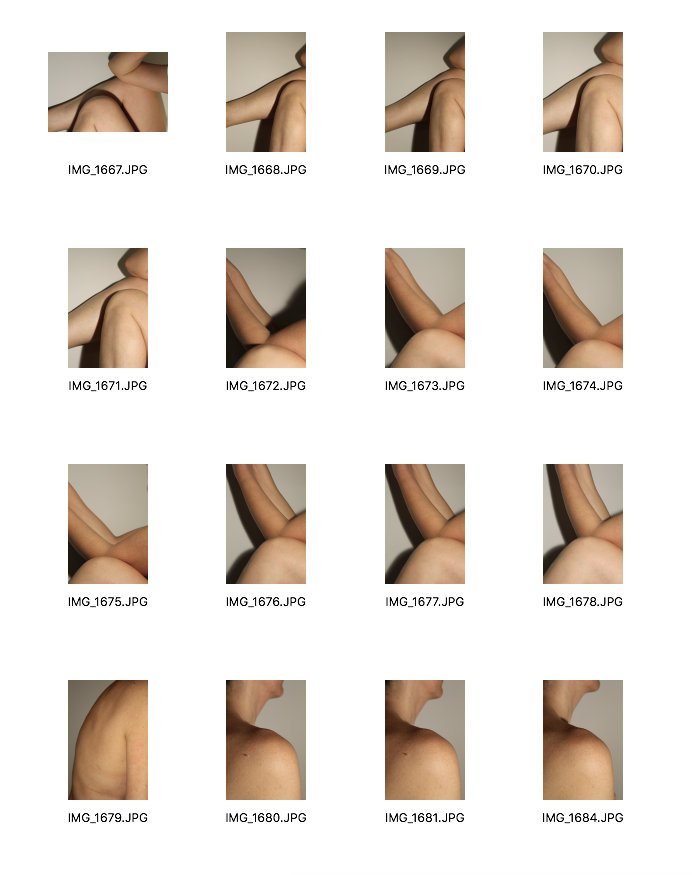
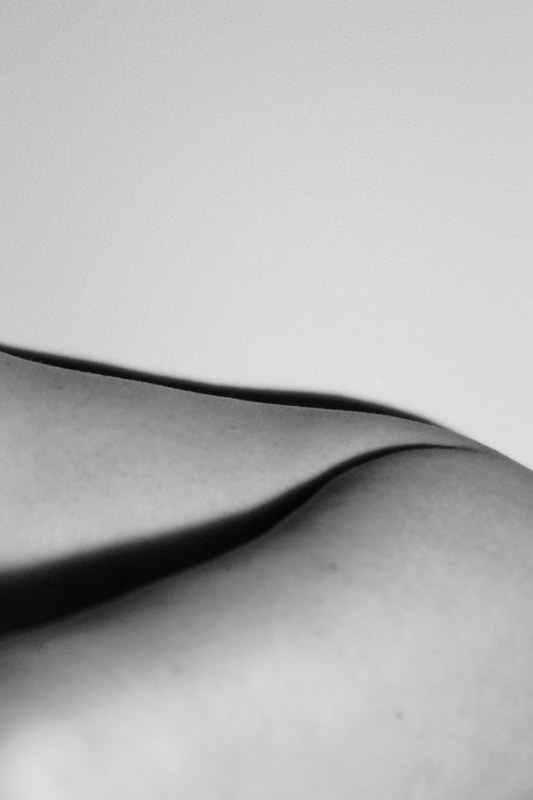
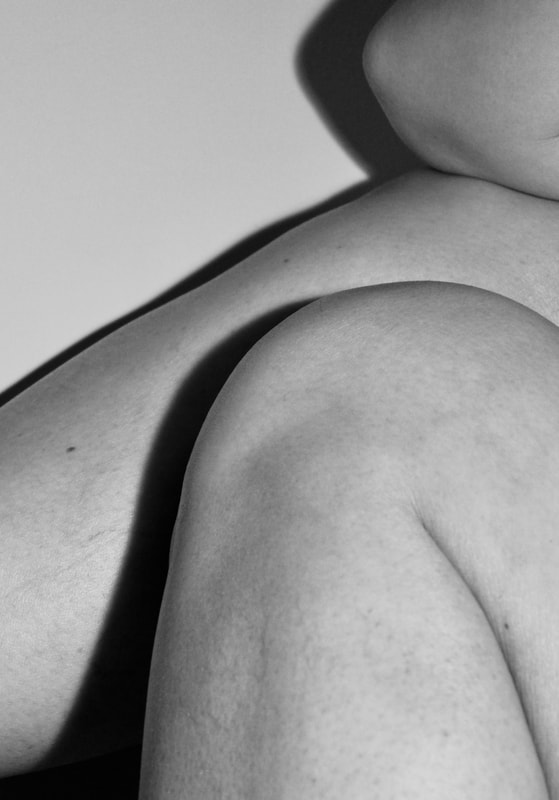
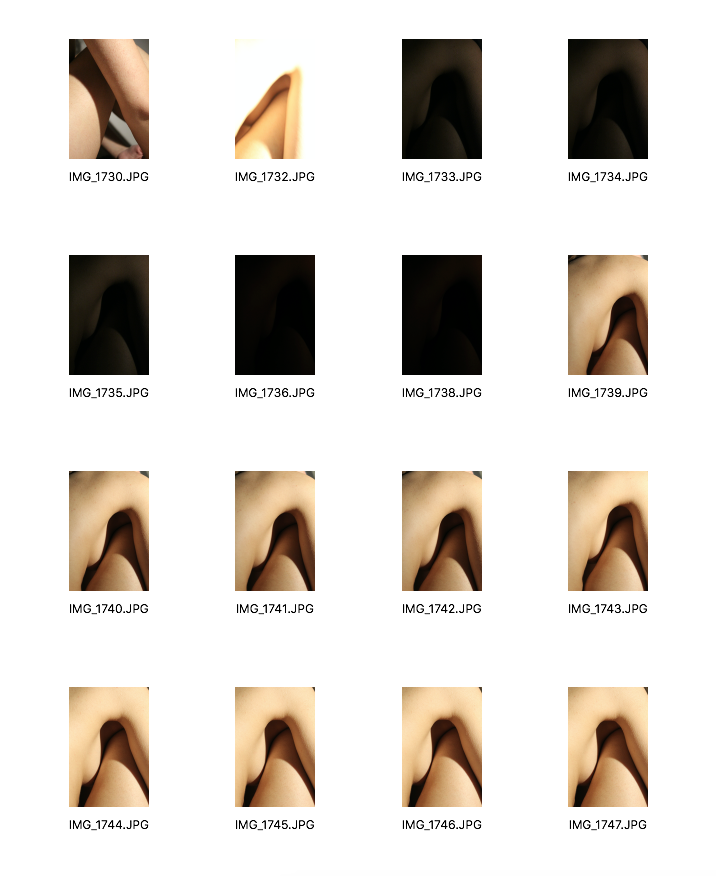
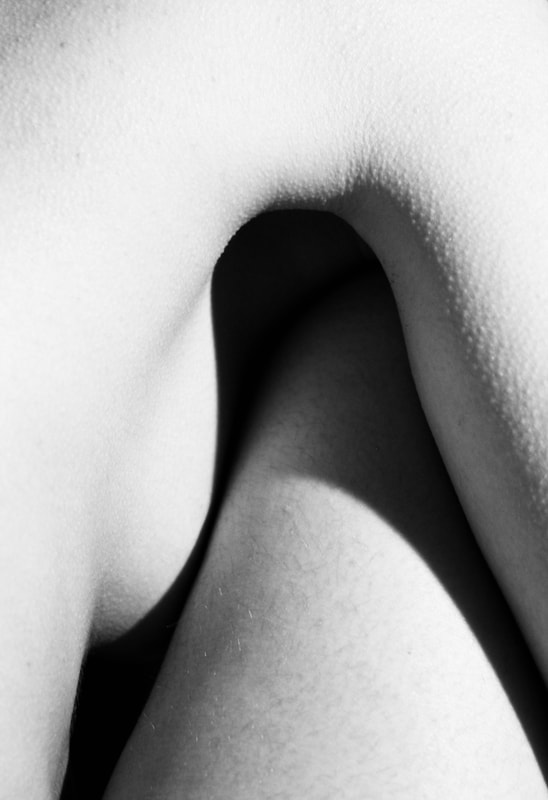
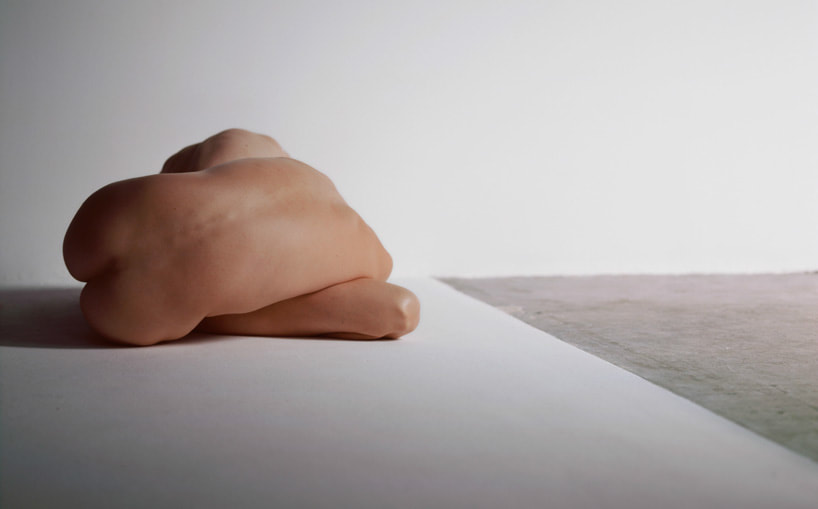
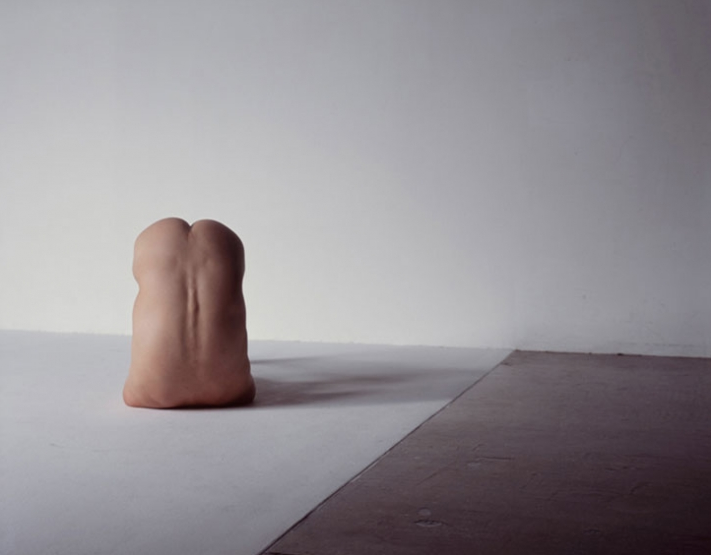
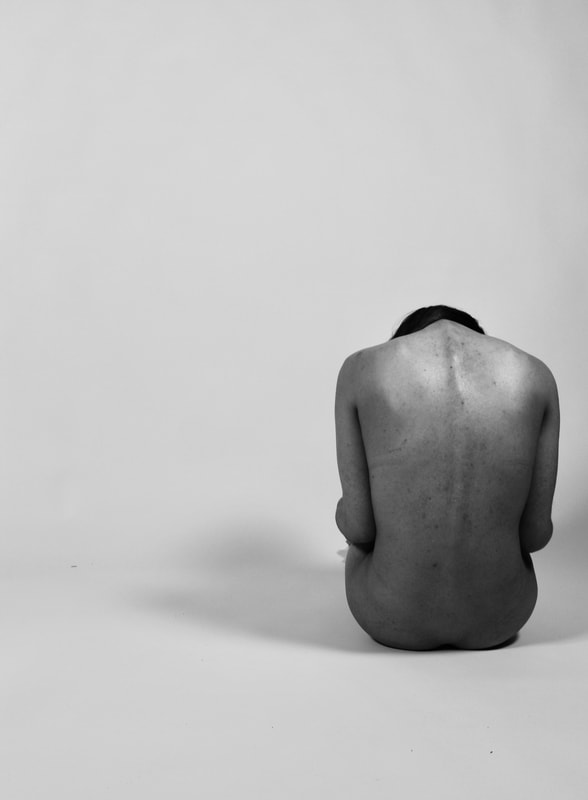
I have decided to experiment with the broader idea of sculptures by looking at the human body at a closer perspective and the different shapes and forms the body creates. Therefore, I have begun to look into Bill Brandt's work. He was a German born photographer and photojournalist. In 1933, he immigrated to the UK and adopted Britain as his home. His influence on the photography world began in the 1960s. He is known for his series of nudes which were taken both in the studio and outdoors on the Sussex and Normandy coast. For this series, he used a wide-angle lens, capturing distorted foregrounds. This wide-angle camera he used allowed him to capture anatomical images and shapes which were only visible through the lens. His use of strong geometrical structure in his photographs almost creates abstract shapes. These images below are a clear representation of how he would transform female bodies through the angle and frame of the camera lens.
For my response, I am going to photograph my model's body parts indoors against a white background. I am going to position my model's body in a way that will create abstract shapes. I will also have a strong light against the body to create dark shadows, which can be seen in some of Brandt's images below. After I photograph I will turn my images into black-and-white in order to create strong contrasts.
For my response, I am going to photograph my model's body parts indoors against a white background. I am going to position my model's body in a way that will create abstract shapes. I will also have a strong light against the body to create dark shadows, which can be seen in some of Brandt's images below. After I photograph I will turn my images into black-and-white in order to create strong contrasts.

My Response
Contact Sheets
|
|
|
|
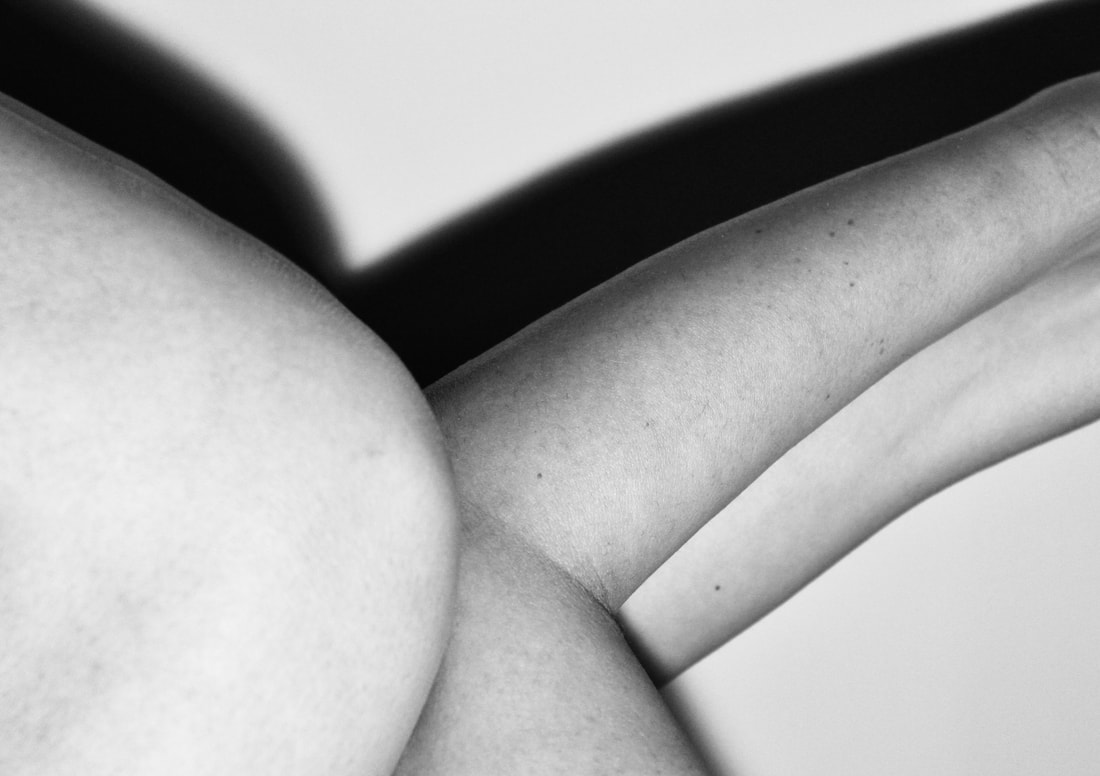
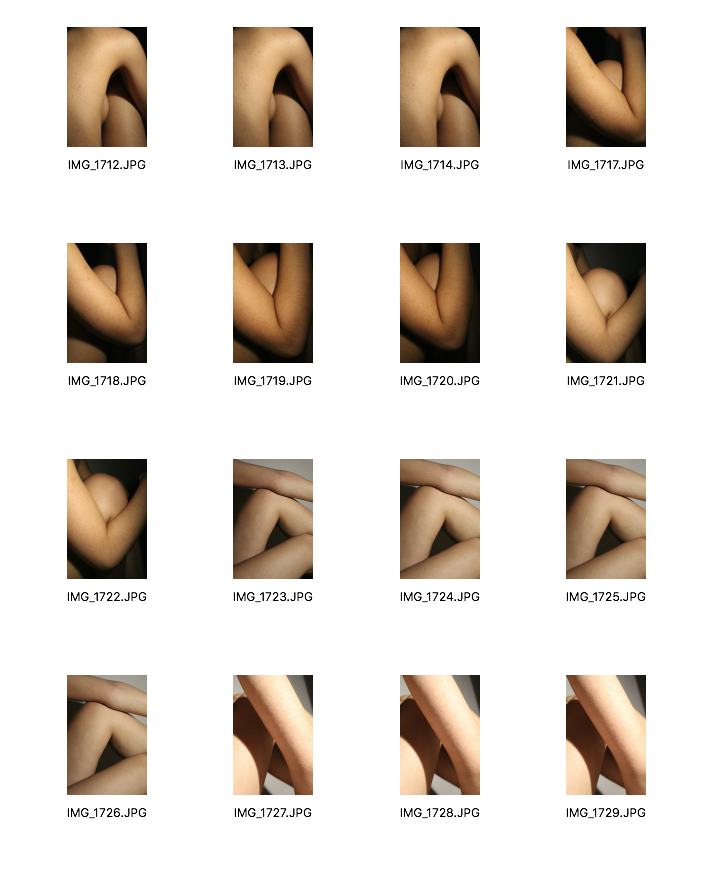
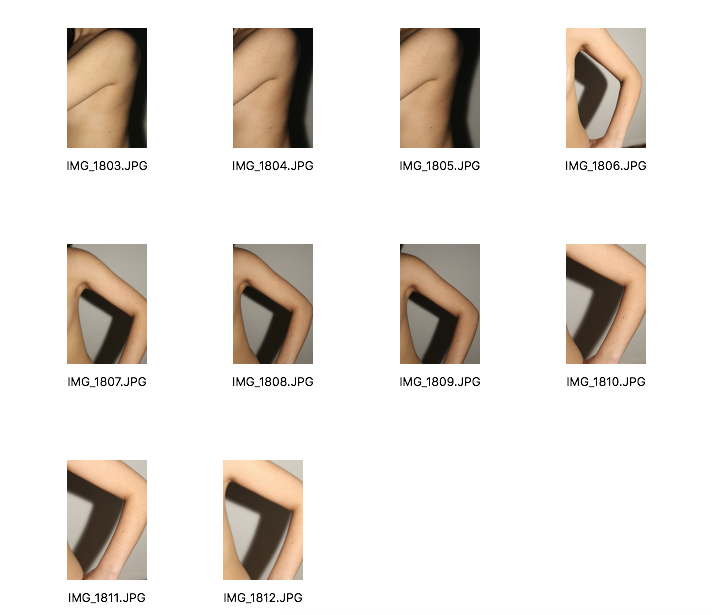
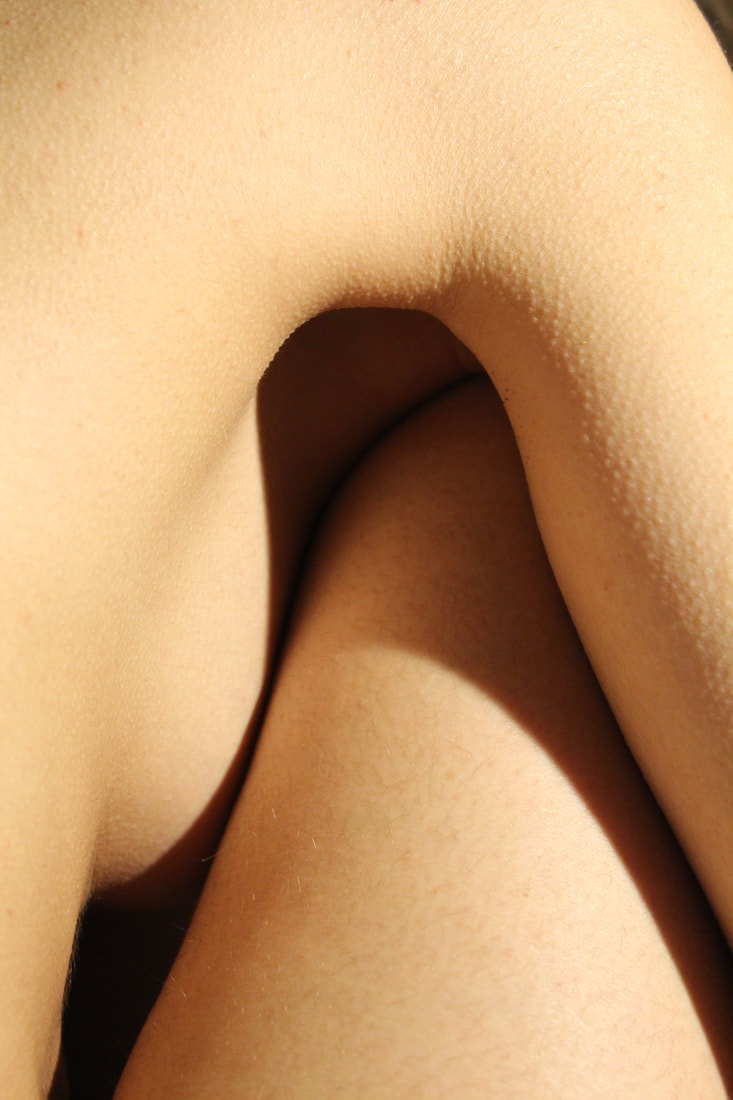
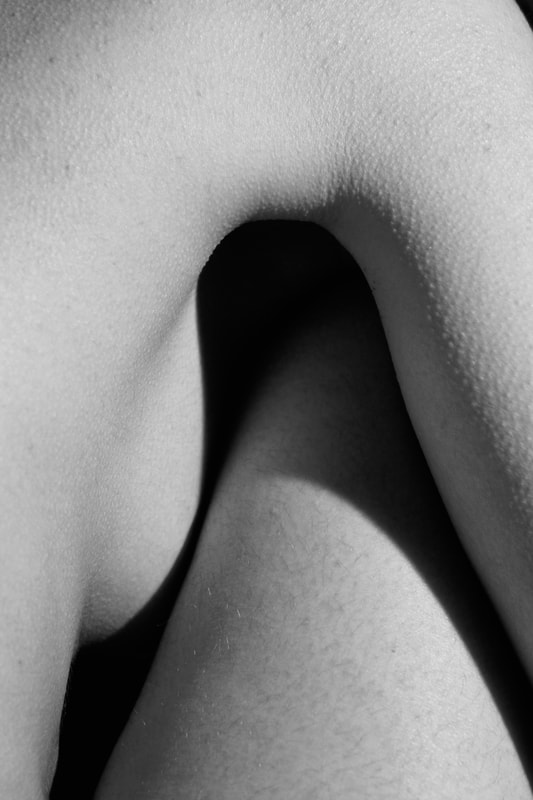
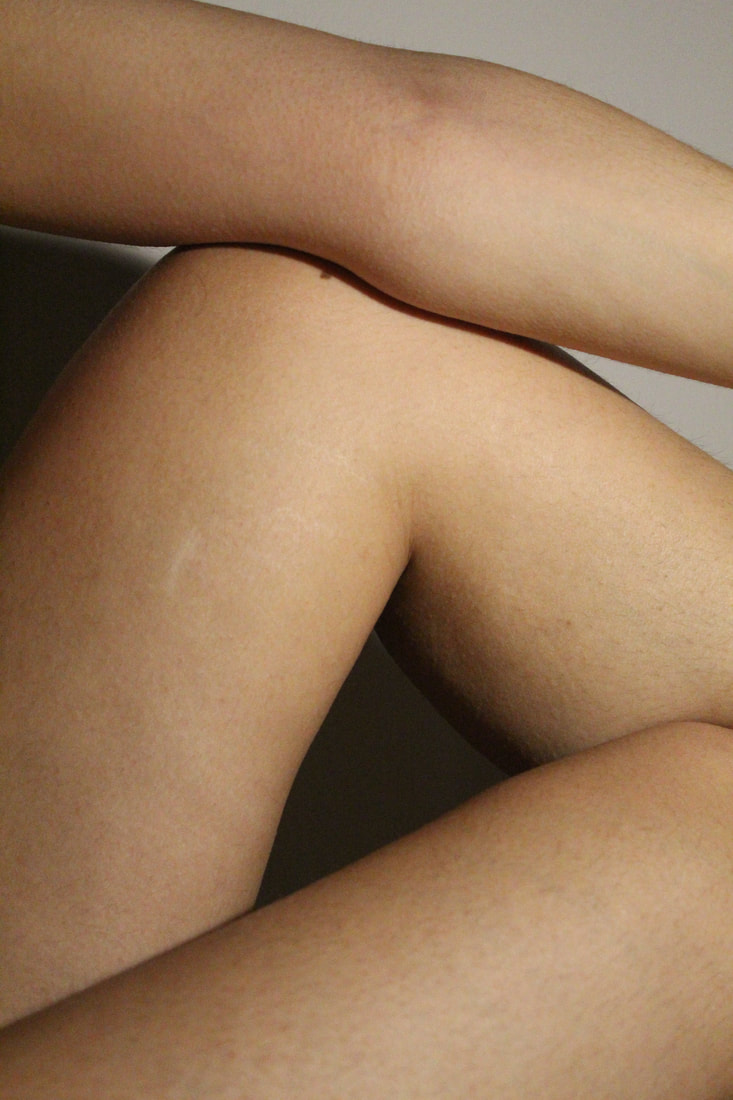
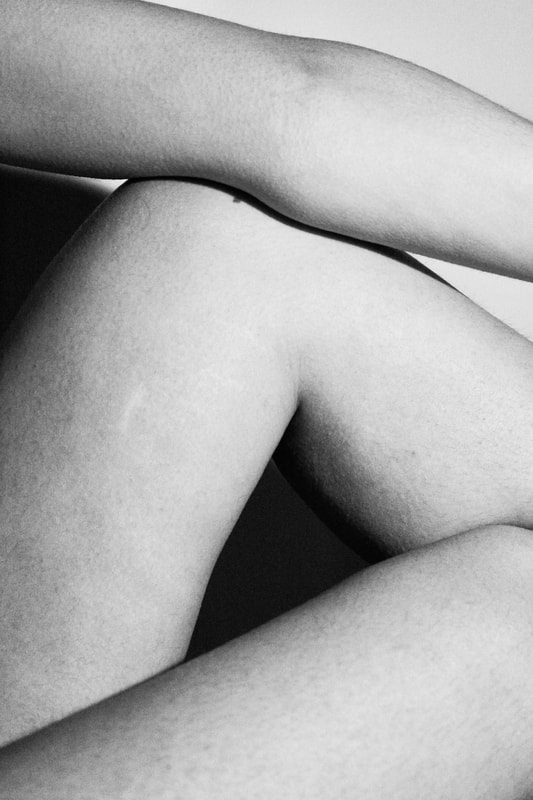
This shoot was successful as I was able to create similar images to Bill Brandt. I zoomed in to my model's body against the white background, almost isolating each body part. I wanted my model to be positioned in different ways in order to get various shots of different parts of her body. For the third image above, I rotated it to further abstract it, with the intention of making the viewer question what body part they are looking at. I will carry on photographing close-ups of the body but consider ways in which I can even further abstract the images.
Exhibition Visit
Richard Avedon: Portfolios
Richard Avedon: Portfolios
I visited Hamilton's Gallery which exhibited Richard Avedon's Portfolios. Avedon is one of the most important portrait photographers of the 20th century. He has photographed some of the most important icons, celebrities and artists. This gallery had some of his most well-known photographs, including 'Dovima with Elephants'. The exhibition had two rooms and in room two, it displayed vintage, original engravers prints. These prints were used by Harper's Bazaar for its fall issues between 1955-1959. The set of 27 unique prints were presented in full for the first time.
Andre Kertesz
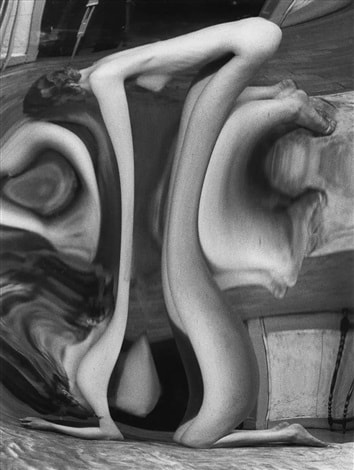
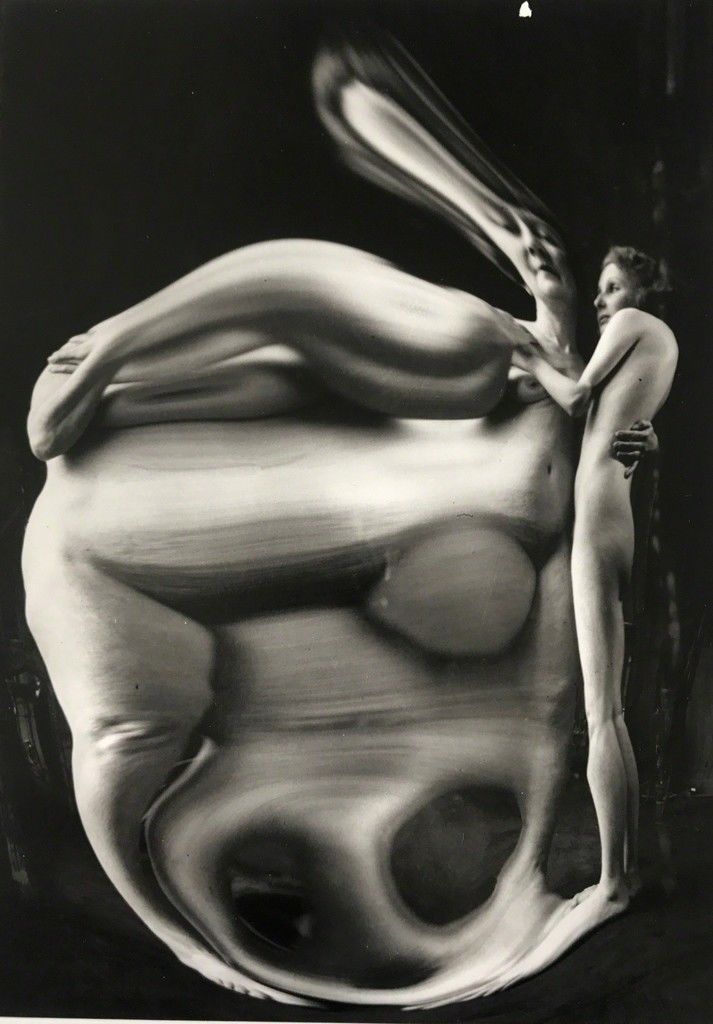
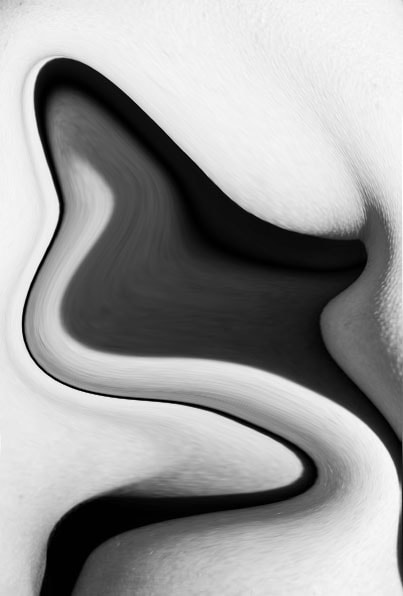
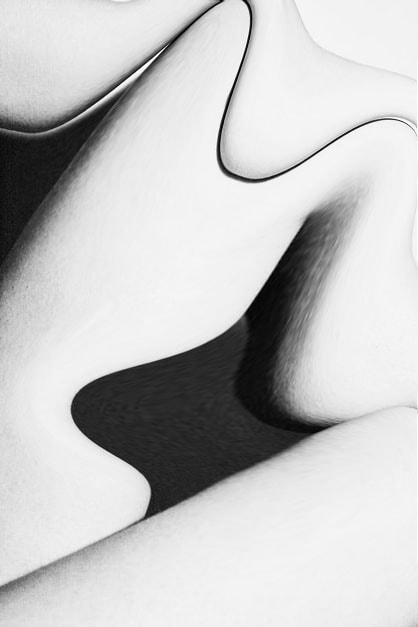
For my next development, I have decided that I want to carry on responding to Bill Brandt's 'Nude series' but incorporate other techniques in order to create more abstract images of bodily shapes. I am going to look at the work of Hungarian born photographer, Andre Kertesz. He was born in 1894 and it was not until 1933 when he started to investigate mirrors and reflections as a way of distorting the human figure. He created a series called 'Distortions' in which he used a funhouse mirror from a Parisian amusement park to stretch and elongate his nude models, making them look quite ghastly. His use of mirrors was a way of creating a sense of unreality rather than just using them to reflect the subjects. Kertesz preferred photographing outdoors in parks and streets, but for this series he worked in a studio. For my response, I will be photographing my model's body again up-close and then uploading them onto Photoshop. I will experiment with different tools in order to abstract my images, considering Kertesz's work.
|
|
Contact Sheet
|
|
|
|
|
|
Best Images
|
Original
|
Edited
|
|
|
Using photoshop to distort my images
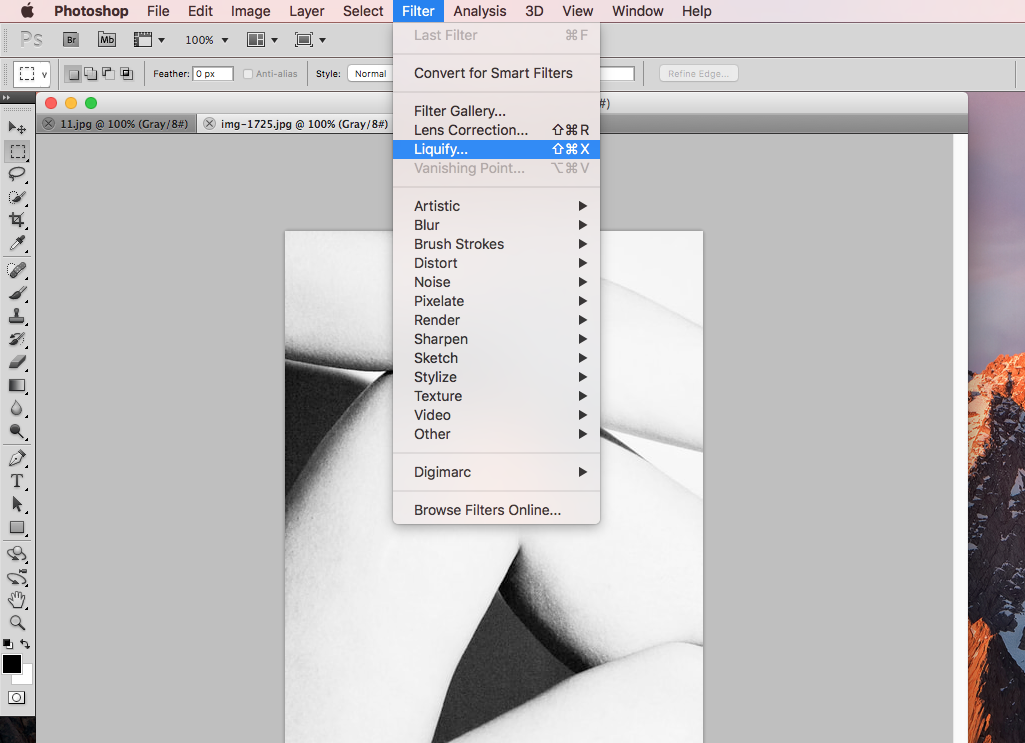
To achieve the distorted, abstract effect that Kertesz created in his images, I used the Liquify tool on photoshop.
1. Firstly, I opened my chosen image onto photoshop.
2. Then I went to Filter > Liquify.
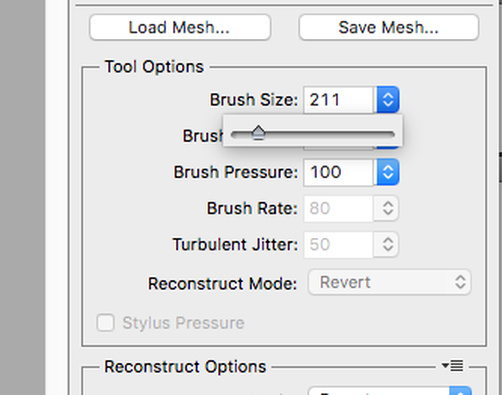
3. I increased the brush size so that bigger strokes were created.
1. Firstly, I opened my chosen image onto photoshop.
2. Then I went to Filter > Liquify.
3. I increased the brush size so that bigger strokes were created.
|
|
|
Without distorted effect
|
To achieve the distorted, abstract effect that Kertesz created in his images, I used the Liquify tool on photoshop. Firstly, I opened my chosen image onto photoshop. Then I went to Filter > Liquify. I increased the brush size so that bigger strokes were created. Even though Kertesz used a funhouse mirror, I was still able to create similar effect using photoshop. The outcome is very abstract to the point where it could look a bit too abstract as it is not very clear what it is I photographed. 
|
With distorted effect
|
|
|
Similarly, this image which I edited using the same techniques like the previous image, could be too abstract. It is hard to understand what is being shown. That is why, I am going to try editing these images again but this time I will not use the Liquify tool as much as I did for these images.
|
|
Mind map
I have decided to create this mind map in order to refine my ideas and really make it clear what my next steps will be. I have included ideas for developments that I could possibly do next and I have also included two sculptors (Henry Moore and Barbara Hepworth) which will help me get inspiration from their work and also understand where their influences came from for their work. I think it is important for me to consider actual sculptors and do some research on them and their work to get a better understanding of how they created their sculptures.
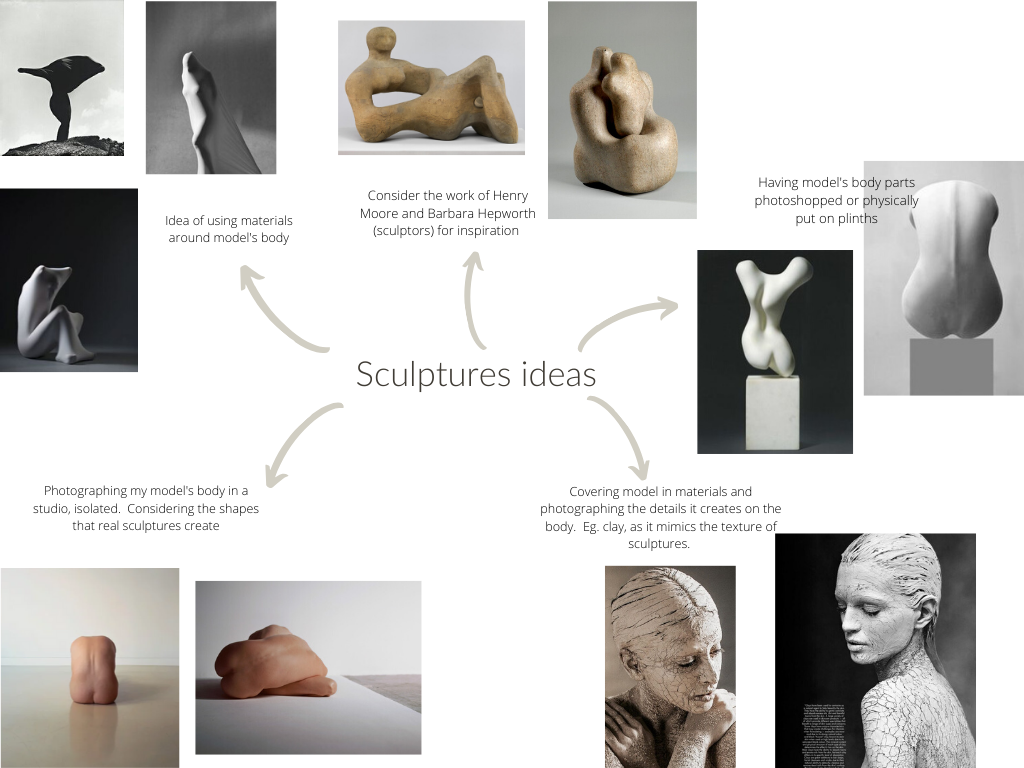
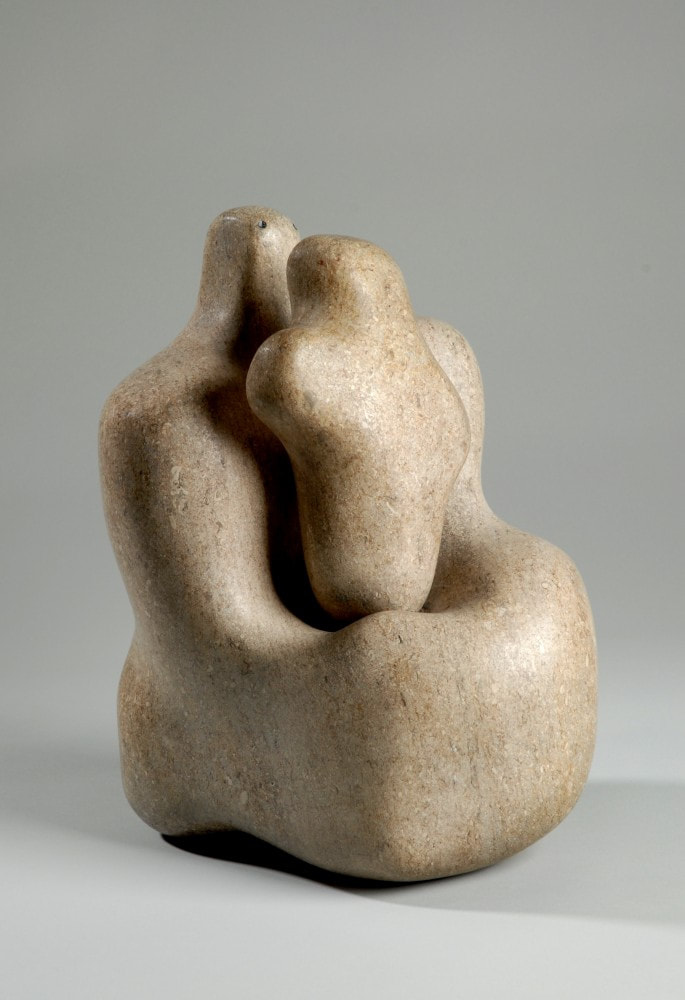
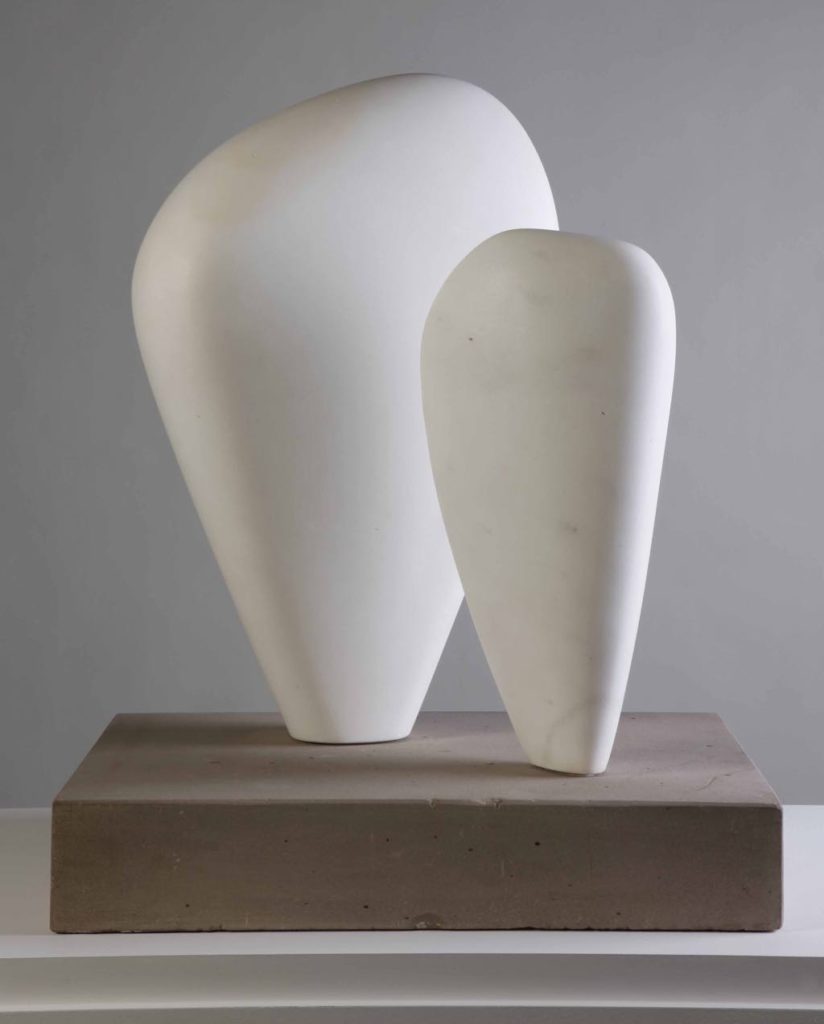
Sculptors: Barbara Hepworth and Henry Moore
As I am now focusing more on the human body, I want to explore the way in which the human body is depicted through sculptures. Both Henry Moore and Barbara Hepworth are regarded as the most important sculptors in Modern British art. Their pieces of work share very similarities as they both tended to create very abstract figures and shapes.
Barbara Hepworth
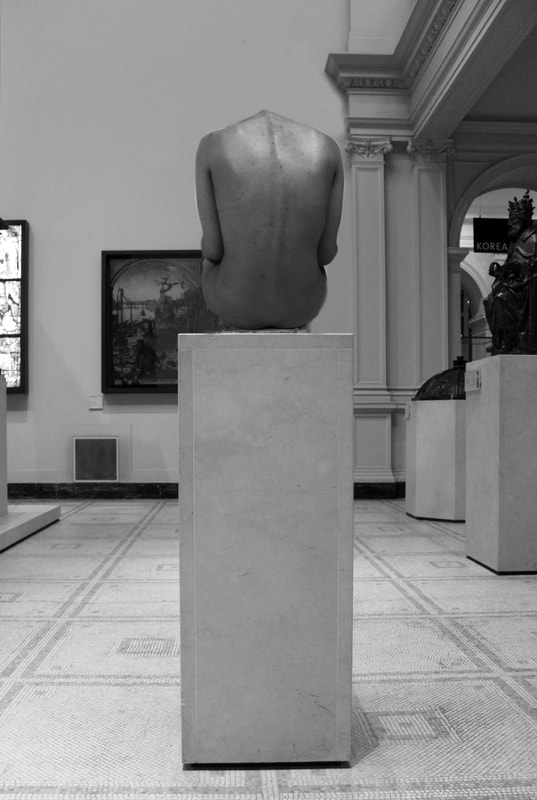
Barbara Hepworth is at the centre of modern British sculpture, she was an extraordinary artist and her use of shape, material and form was really unparalleled but what makes her extremely significant, is the way she was so interested in other things that were going on around her. She was really involved in different artistic movements happening in Europe and the UK, she was interested in maths, science, arts and music and all these things come into her work, making her an extraordinary sculptural practice. Hepworth repeatedly created sculptures linked to the idea of mother and child. Many other artists were also interested in this theme, for example, Henry Moore and Jacob Epstein were making sculptures that depicted a mother and a child. This motif of a mother and a child recurs frequently in her work during the late 1920s and early 1930s. This may have reflected the changes there were occurring in Hepworth's own life at the time, as in 1929, she gave birth to her first son and in 1934, she became the mother of triplets. The sculpture on the bottom right is called 'Mother and Child', the two smooth pebbles that make up this sculpture have been carved from the same block of pink ancaster stone, however, Hepworth decided to separate the mother and child which emphasises this idea that the mother and child are of one flesh and, at the same time, each is an independent individual. This was also one of Hepworth's most significant sculpture, as instead of carving the mother and child from the same block of stone and keeping them together, she carved the child away. Hepworth's work had a dramatic change after the birth of her triplets. Her work before the birth of her triplets was really figurative, as you are able to clearly see the figure of a mother and a child. However, later on when she had the triplets, her work shifted from the figurative to the abstract.
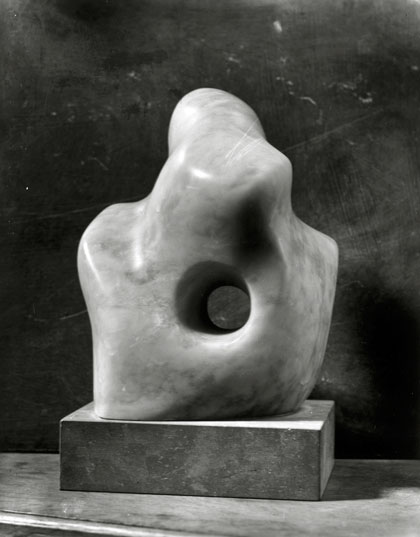
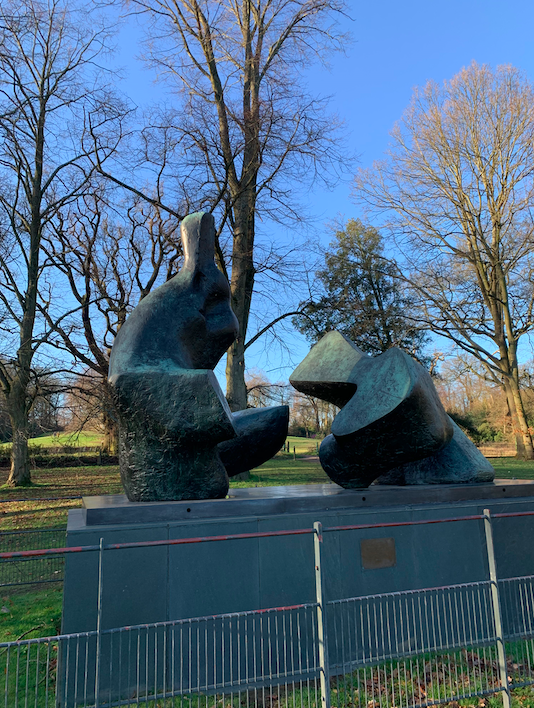
Henry Moore
I decided to go and see Moore's 'Two Piece Reclining Figure' situated in Kenwood House. Divided into two parts, this sculpture represents two females and illustrates Moore's interest in the human figure and the relationship between the two different forms which appear to change when the sculpture is viewed from different angles. Moore consciously sculpted the forms to be viewed in the round. Below, I have uploaded two photographs which I took when visiting the sculpture. I photographed the sculpture from two different angles. The relationship between the human body and landscapes, inspired many of Moore's forms. Many of his ideas were influenced by objects such as shells, pebbles and bones, and the way he used these influences within his work, encouraged viewers to view humanity as a powerful natural force as he combined the human figure with the natural world. The upright piece of Moore's 'Two Piece Reclining Figure' represents the head and torso, while the lower piece represents the legs of the figure. Moore's figures always created sculptors which represented females, as he believed women were associated with survival and endurance.
|
|
Joakim Heltne
My last development of abstracting my model's body on photoshop was not as successful as I was hoping for, so I have decided to go back to the idea of sculptures and explore different ways in which I can include the theme of sculptures, rather than just focusing on the abstract shapes of the body. I want to combine what I have done from my previous shoot into my next developments. I have began to look at the work of Joakim Heltne. He is a Norwegian photographer. He works mainly within fashion and portraiture photography, illustration and retouch, and is constantly fascinated by architecture. For example, this photographer used a plinth to put his model's body on top, resembling a statue. I also like the idea of using various types of materials on the model, which can be seen in the image below on the right.
|
|
Bill Durgin
Another photographer that I discovered is Bill Durgin who is most well known for his unique work with the human figure. He began his photography career as an intern at the International Centre of Photography in 1986. His series 'Figure Studies' and 'Segmented' focuses on the sculptural possibilities of limbs and torsos. When creating these series, Durgin worked with his own body as well as with dancers and performers as they were able to take distortion to the extreme. His images only show a small portion of skin and muscles. The models' limbs are exposed, leaving the viewer to interpret which part of the body they are looking at. When talking about his 'Figure Studies' he says, "I want the bodies to be recognised as bodies, but also to be detached from common perceptions of the figure."
Contact sheet
|
|
|
|
|
|
|
|
|
|
|
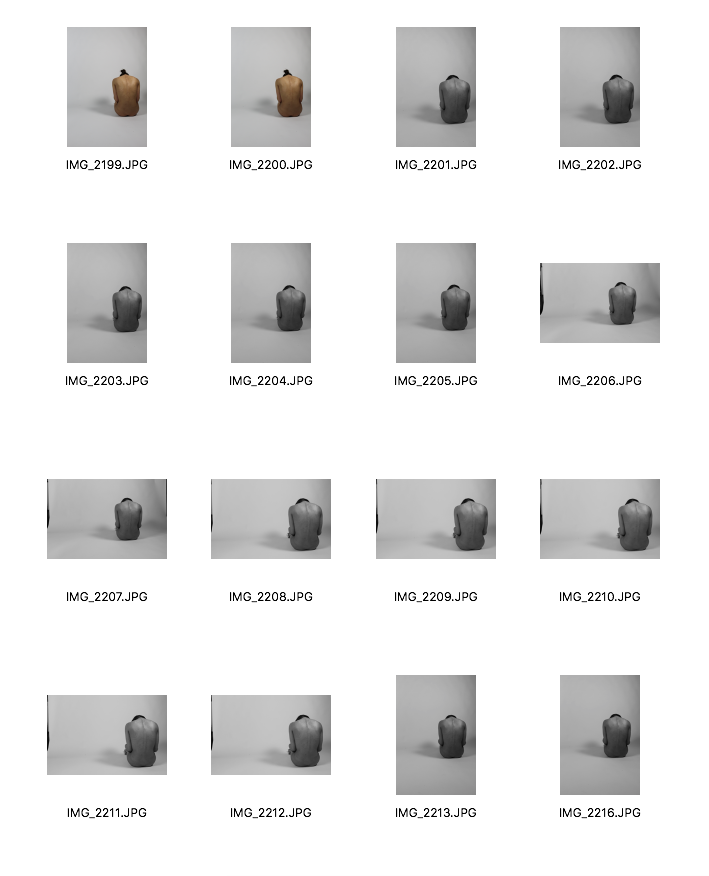
|
|
|
|
|
|
|
|
|
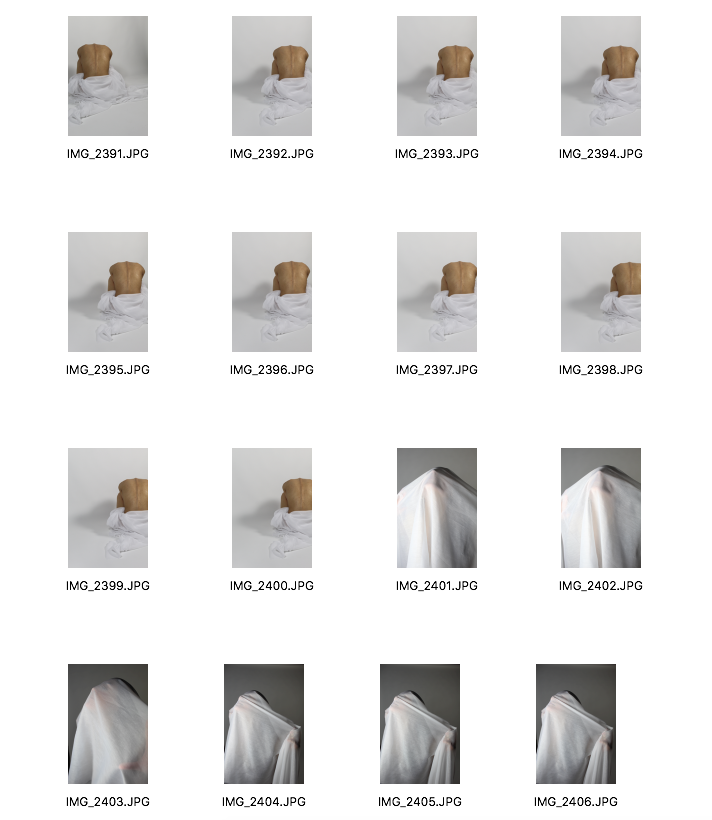
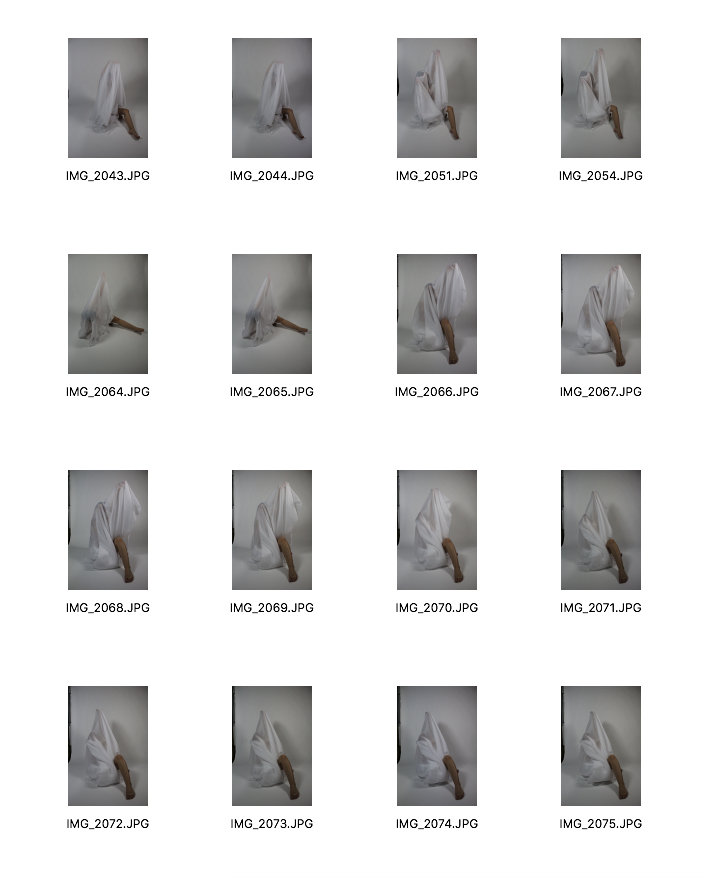
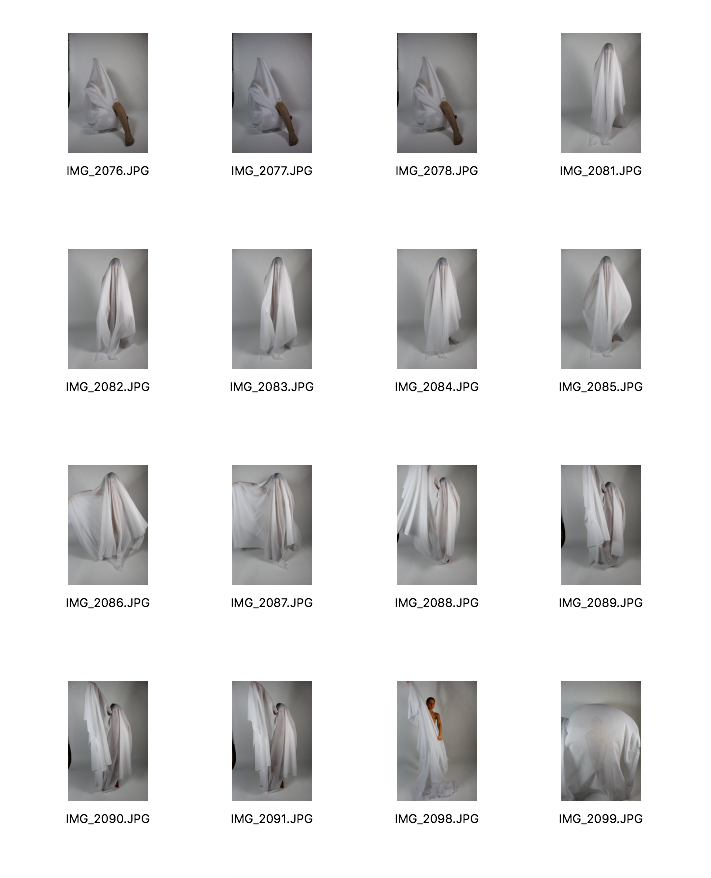
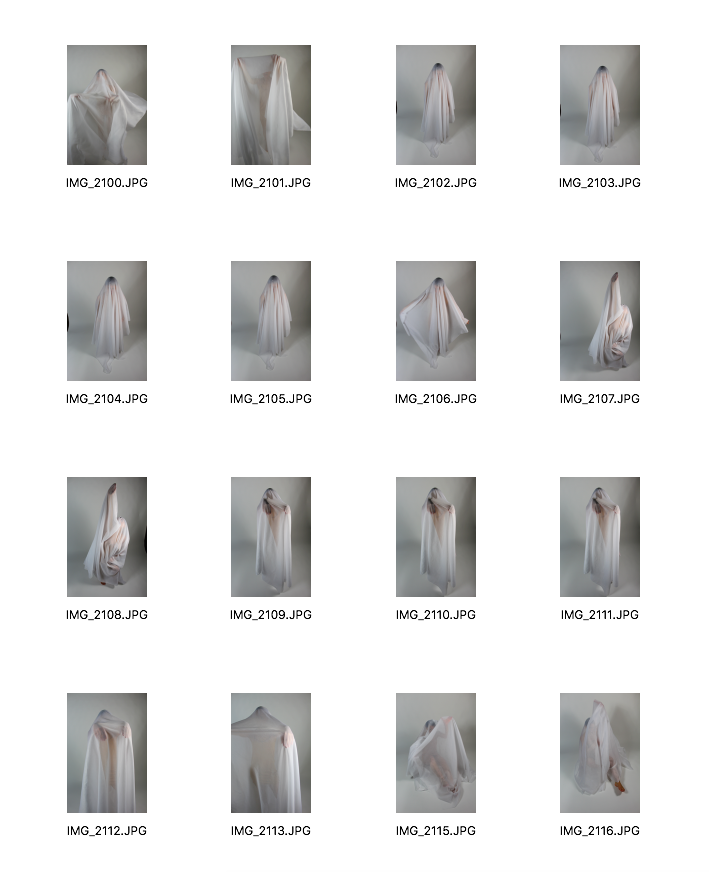
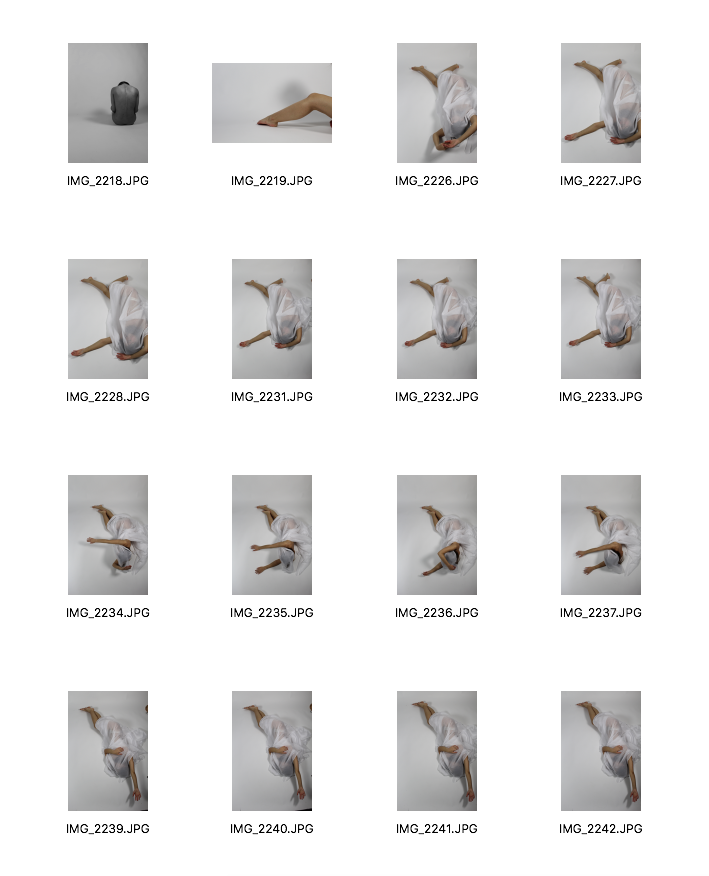
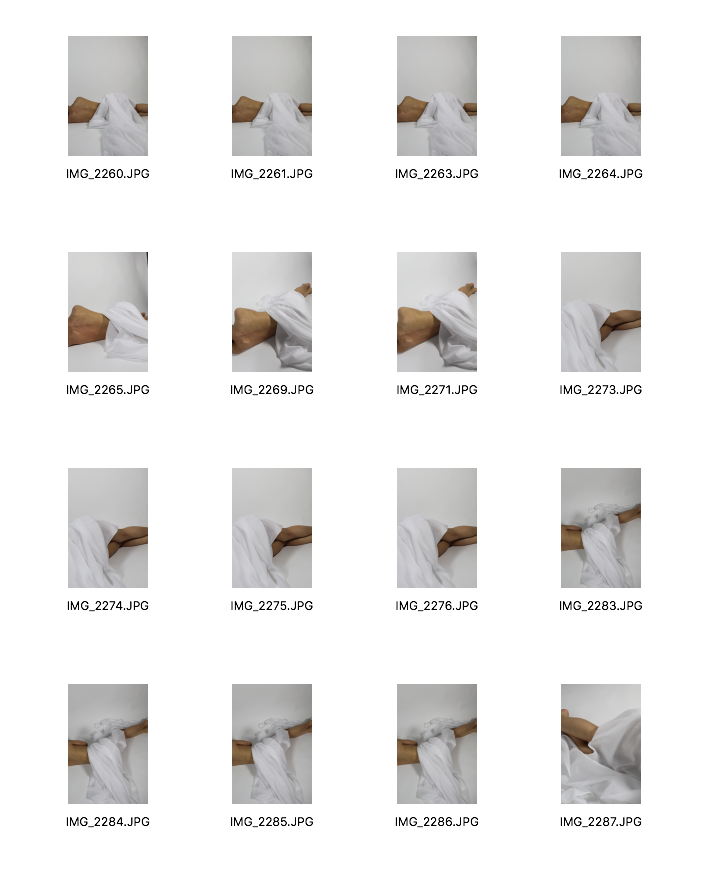
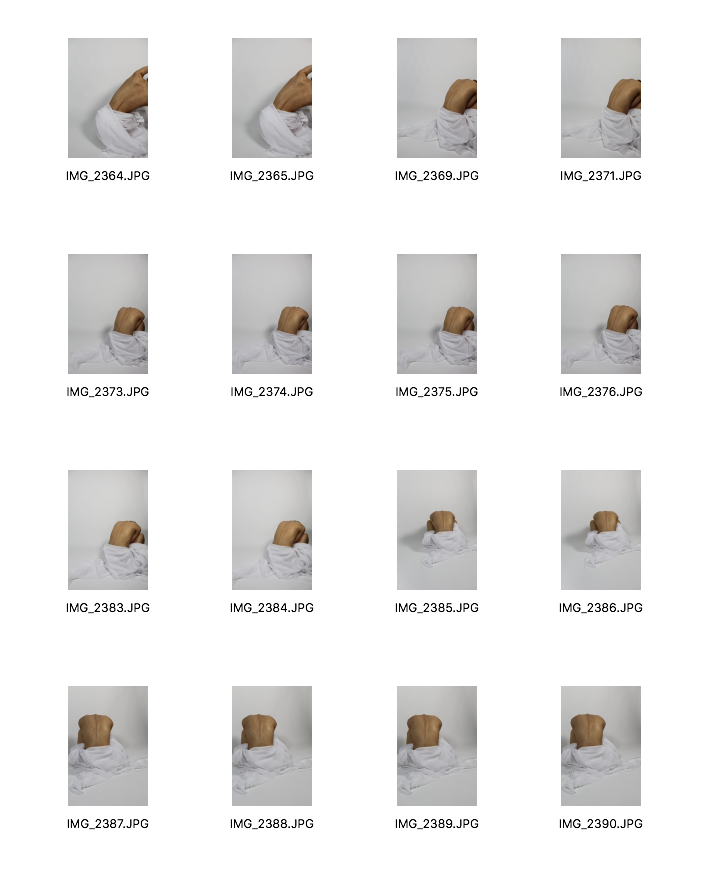
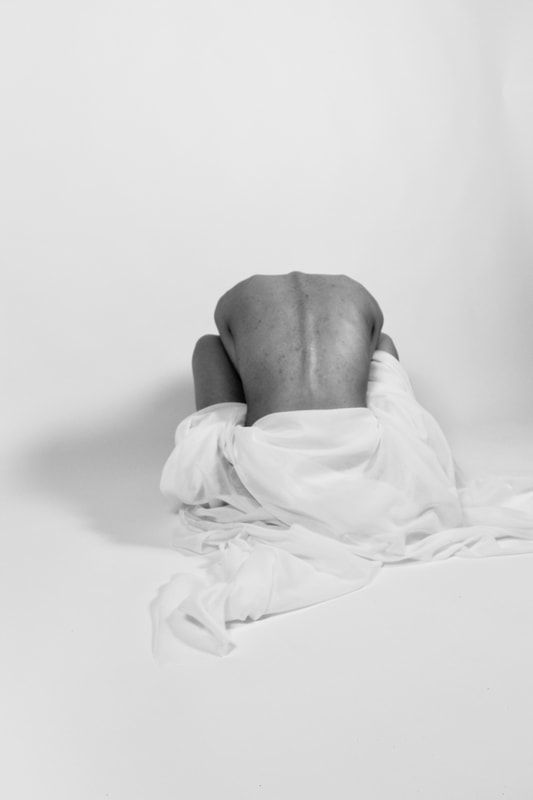
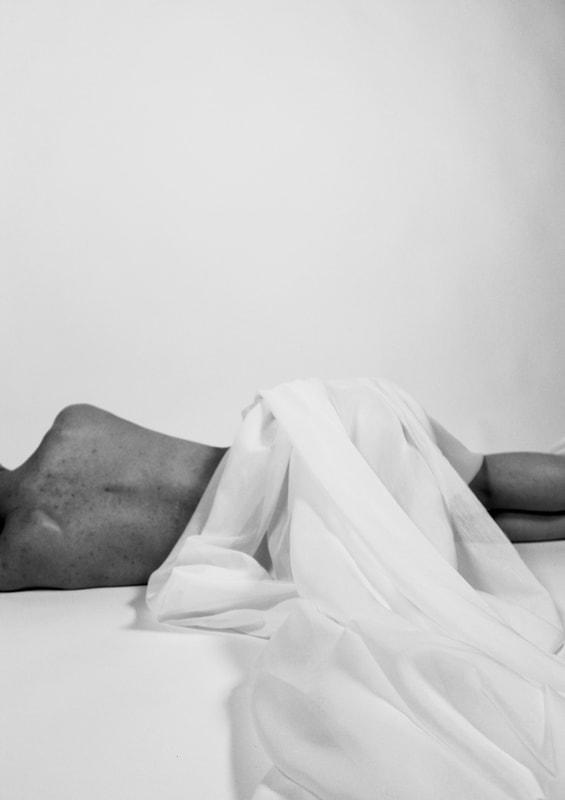
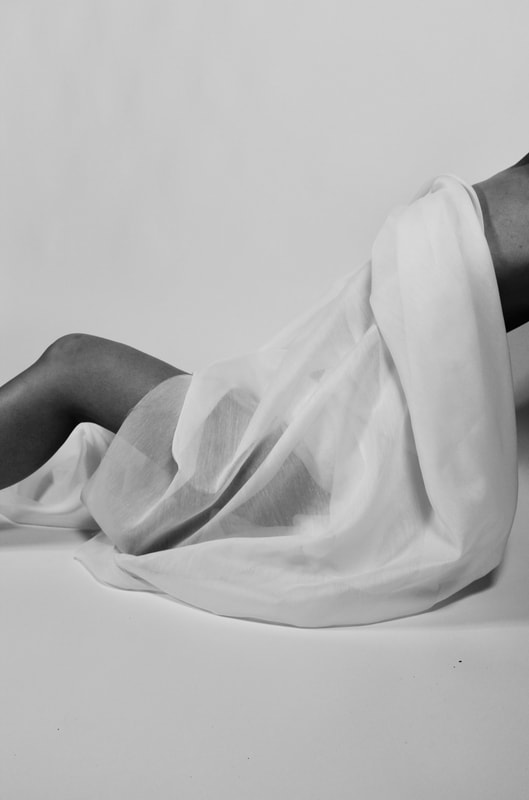
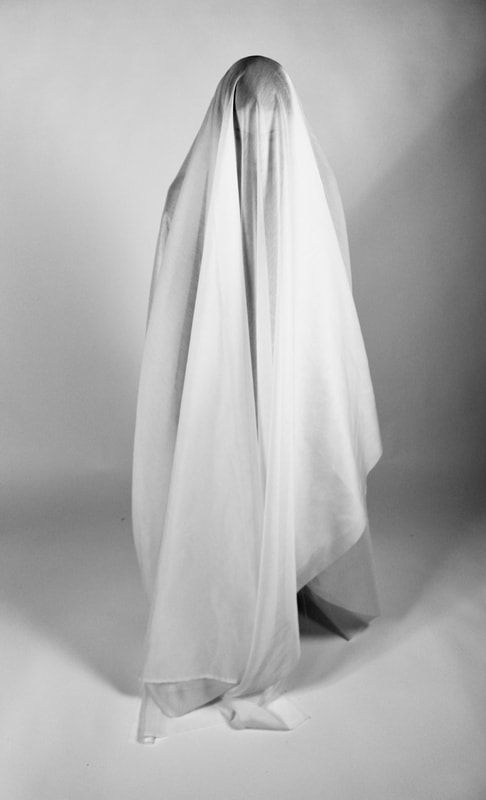
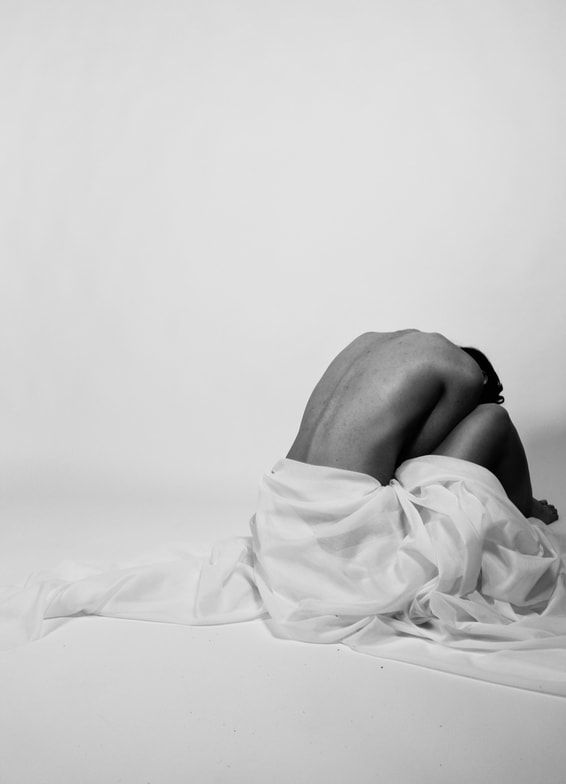
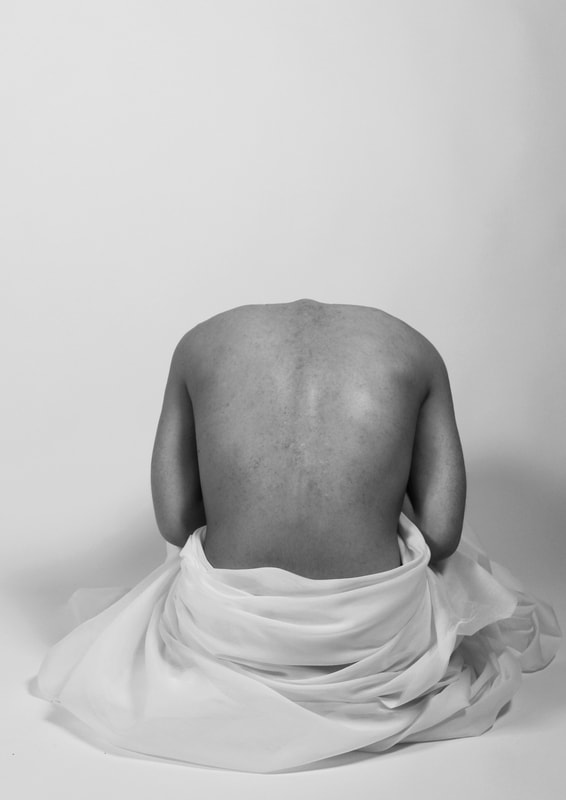
My research on the influences for this shoot really helped me have a clearer image and understanding of what I wanted to capture in this shoot. I am pleased with the outcome of this shoot as I was able to distort my model's body. I shot these images in a studio with the intention of isolating my model's body, allowing the viewer to only focus on the distorted body. I experimented with voile which is a soft, sheer fabric. I quite liked the idea of just seeing the outline of the body under the material. Also, by shooting in the studio with flood lights, the material appeared more transparent, allowing the model's body to be more visible. I tried using the material in many different ways, not just by covering my model. For example, I used it to fragment the body by making my model lie down on the floor with her limbs stretched whilst having the fabric covering parts of her body. This just left her legs and upper body on show, further abstracting the image. When photographing, I also wanted to experiment with shooting in black and white. I did this by selecting 'Menu' and selecting the 'Picture style' option and set it to 'Monochrome'.
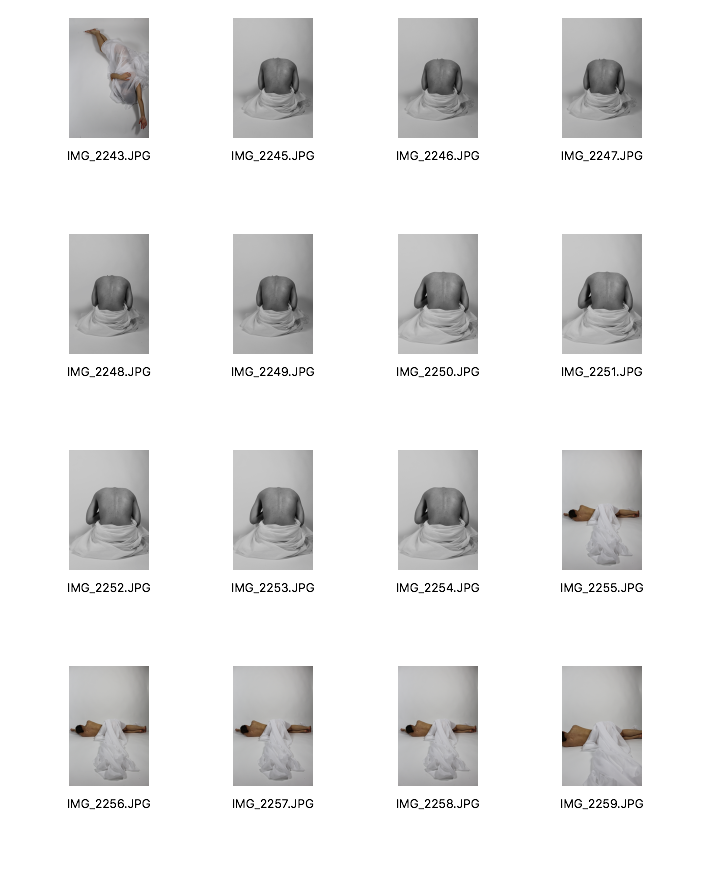
Best Images: Edited
|
|
|
|

|
|
|
|
|
|
|
|
IMPROVEMENTS
Photoshopping some of my best images further
I decided to make some improvements on some of my images. For example, I edited out sections of my images where my model's hair showed, with the intention of further abstracting her body. Additionally, whilst editing my images I was considering the work of one of my link artist: Bill Durgin, and how in his photographs, all you can see is fragmented body parts. You can not see the model's face or hair which I find particularly interesting as it also makes the viewer question what part of the body they are exactly looking at.
In order to photoshop my best images, I went through these steps:
1. I opened up the image I wanted to photoshop
2. I then cropped it to get rid of any sections of the image that weren't meant to be there
3. Then I went to Image > Adjustments > Brightness/Contrast to increase the brightness and decrease the contrast a bit
4. I then selected the 'clone stamp tool' in order to get rid of the part where my model's head was showing
5. I repeated these steps for all my final pieces
|
|
|
|
Next Shoot
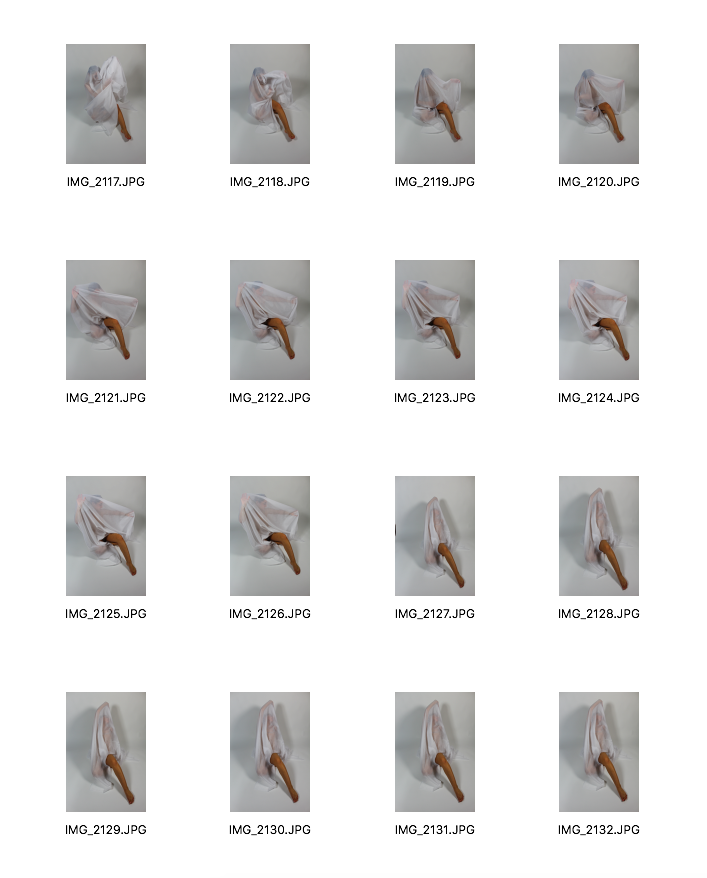
I decided to go to the Victoria & Albert (V&A) museum to photograph the plinths where sculptures are placed on. By doing this, I will then be able to photoshop the plinths into my previous images and create my own sculpture using my model's body. My decision to do this was based on the work of Joakim Heltne (which I have included further above). In one of his images, he had a model's back on top of a plinth which made it look like a real life sculpture. When photographing the plinths, I was looking for plain, minimal squared plinths as my previous images were shot in a studio so not much is going on in the background. This shoot was successful as the V&A had a section dedicated to sculptures meaning I had a range of plinths to photograph. I chose to photograph wider plinths, longer plinths and narrower plinths in order to have a few options when photoshopping them into my previous images.
Contact Sheet
|
|
|
Photoshop Steps
1. I first opened the image of the plinth I wanted to use
2. I then copied the image of my model onto the plinth image
3. Then, using the erase tool with the opacity on 100%, I erased the studio background so that only her body was left
4. I also wanted to erase the statue that was originally on the plinth, so I used the 'clone stamp tool' to clone the background of the image onto the statue so that I was just left with the plinth alone
5. I then pressed 'Command' 'T' to free transform the image of my model onto the plinth
6. After that, I selected the background layer and went to Image > Adjustments > Black&White
7. I then selected 'layer 1' and went to Image > Adjustments > Brightness/Contrast to brighten the image of my model
8. I cropped the image by selecting the parts of the image I wanted to keep and then went to Image > Crop, so that the plinth was right in the middle
|
Original Image

|
Edited Image
|
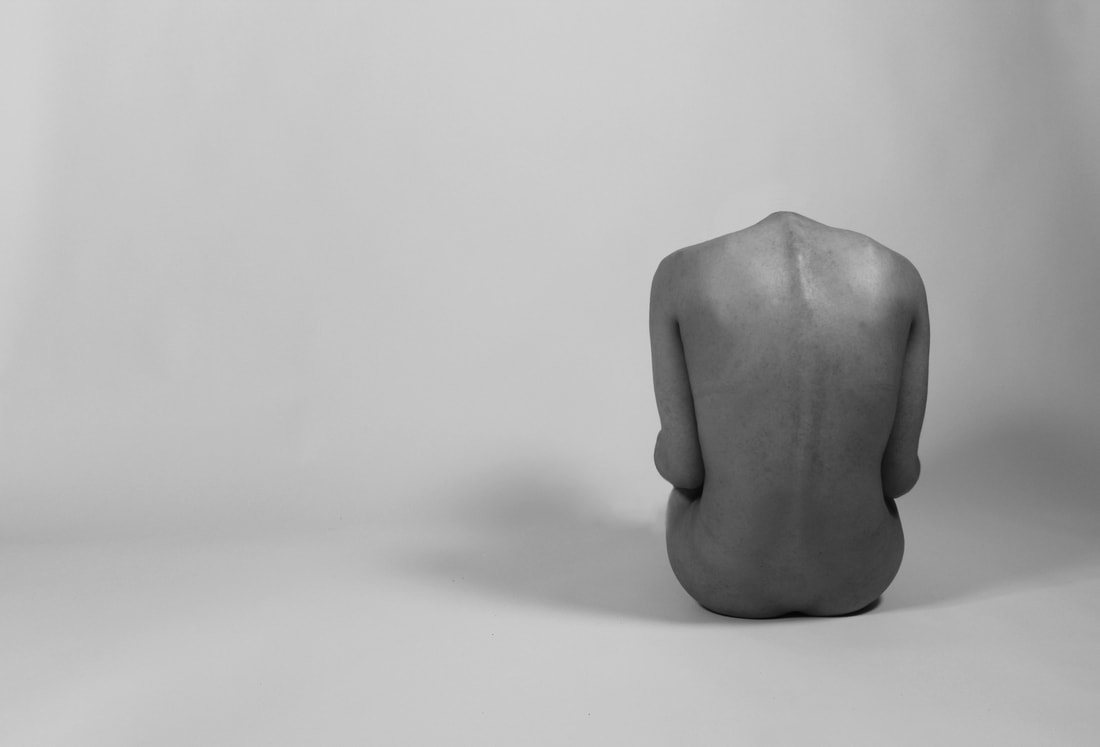
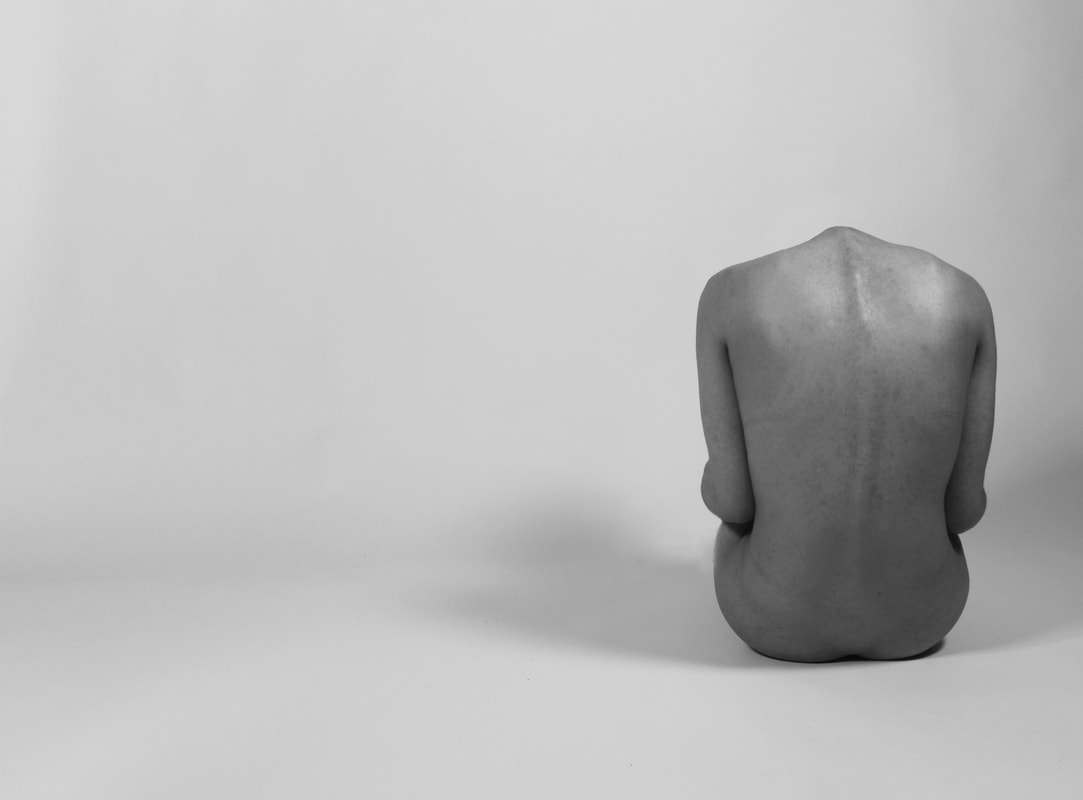
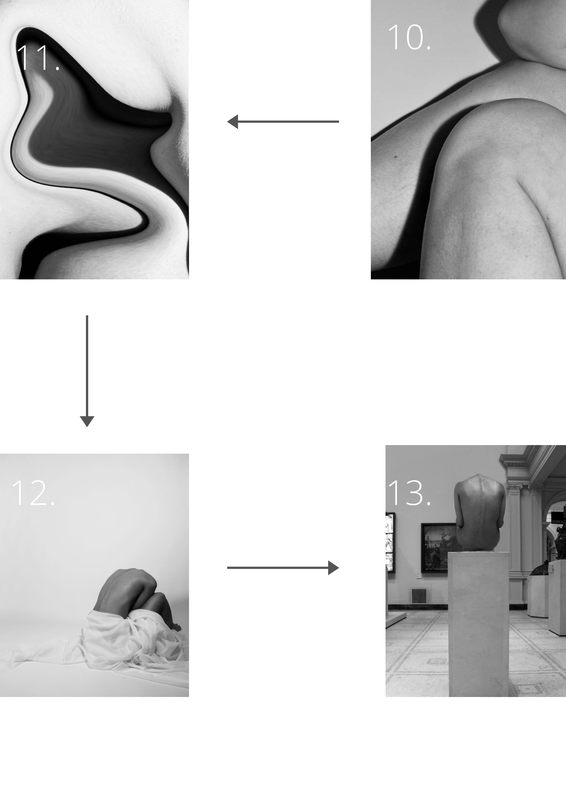
I was originally planning to photoshop my plinth images onto the images of my model in the studio, but after attempting to do this it didn't look that realistic as there were no shadows. So I decided to photoshop my model's body onto the plinth in the museum. Even though I was not initially planning to do this, I was able to successfully use photoshop to edit my image of my model onto the plinth. Even though my outcome was quite successful, the outline of my model seems to still have parts of the background which I erased. If I were to try this again, I would make sure that when erasing the layer of my model, I would be more precise by zooming into the image even further to make sure all that is left is my model's body. This is quite similar to one of my last developments where I used Jacquline Hayden as my link artist. However, this time I just used the back of my model making it look more abstract. Also, the shape of her back and the abstract shape her body makes, reminds me of Henry Moore and Barbara Hepworth's sculptures.
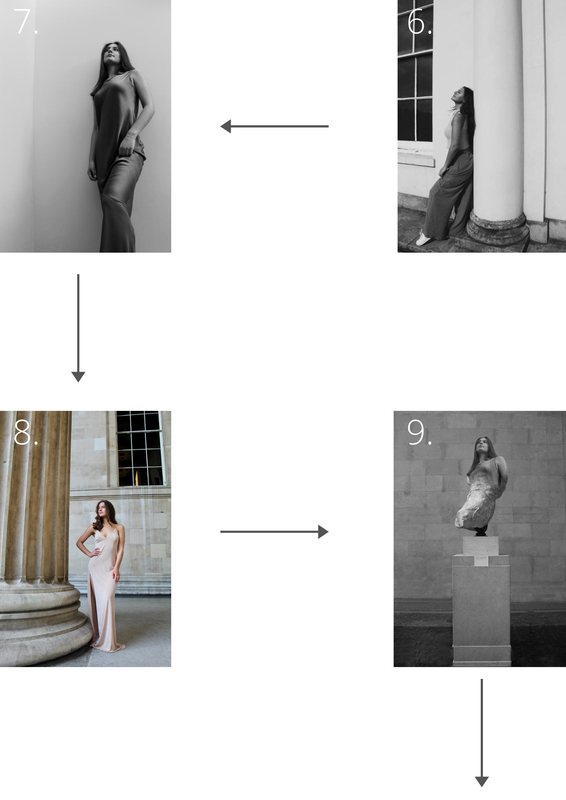
FLOW DIAGRAM ILLUSTRATING MY DEVELOPMENTS SO FAR
I have created this flow diagram to demonstrate my developments and thought processes throughout this project. I firstly started researching into the topic of fast fashion, as I was interested in the idea of communicating social issues through photography. My first shoot (1) was focused on photographing my own clothes which I had previously bought from fast fashion shops. This then led me to visit actual fast fashion stores in Central London to photograph the amounts of clothes in each shop (2). I then wanted to exaggerate the masses of clothes that are seen in fast fashion shops, so I used Photoshop to multiply one image many times to create one big image (3). Photographing fast fashion clothes and researching this topic was very interesting and it really made me become aware of the dark side of the fashion industry and how us, consumers, tend to only focus on the glamorous side.
As my curatorship was about Fashion Photography, I wanted to keep an open-mind at the beginning of this topic and consider different aspects of Fashion Photography. Therefore, I decided to change my initial brief. I wanted to experiment with the techniques I learnt from the photographers in my curatorship. Lighting played a huge role in many of the photographer's work that I researched so I decided to experiment with light and contrasts (4). This then led me to look at lighting outdoors and ways I can photograph my model in an outdoor setting with effective lighting (5). Next, I started to consider the background of my images and I got inspiration from George Hoyningen-Huene's reoccurring themes of classicism and Greek architecture to place my model against large columns, inspired by Greek architecture (6). This then made me look more into the theme of Greek statuary and columns so I wanted to try and photograph my model in a way that mimicked a statue (7). Having done this, I wanted to carry on photographing my model in statuesque ways in much more extravagant locations (8) like the British Museum and Victoria & Albert museum where they had many statues and columns, imitating Greek architecture. After looking into this idea of Greek architecture, statues and sculptures, I decided to look into ways in which I could develop my ideas further and create unordinary images. I decided to photoshop my model onto sculptures that I found at the British Museum (9). As I began to focus more on sculptures and the human figure, I wanted to look closer at the body and how it creates abstract shapes, resembling to sculptures. I started to look at Bill Brandt's 'Nude' series (10) which focused on transforming human bodies into abstract shapes and forms. Therefore, I photographed the human body zoomed in to create abstract shapes. After that, I carried on photographing models' body up close, really focusing on the human figure. Whilst doing this, I also wanted to use Photoshop to further abstract the body (11). This then led me to incorporate the link between sculptures and the human figure. I photographed my model in a studio, nude, resembling a sculpture (12). I then decided to photoshop this onto a plinth which I had photographed at the Victoria & Albert museum (13).
As my curatorship was about Fashion Photography, I wanted to keep an open-mind at the beginning of this topic and consider different aspects of Fashion Photography. Therefore, I decided to change my initial brief. I wanted to experiment with the techniques I learnt from the photographers in my curatorship. Lighting played a huge role in many of the photographer's work that I researched so I decided to experiment with light and contrasts (4). This then led me to look at lighting outdoors and ways I can photograph my model in an outdoor setting with effective lighting (5). Next, I started to consider the background of my images and I got inspiration from George Hoyningen-Huene's reoccurring themes of classicism and Greek architecture to place my model against large columns, inspired by Greek architecture (6). This then made me look more into the theme of Greek statuary and columns so I wanted to try and photograph my model in a way that mimicked a statue (7). Having done this, I wanted to carry on photographing my model in statuesque ways in much more extravagant locations (8) like the British Museum and Victoria & Albert museum where they had many statues and columns, imitating Greek architecture. After looking into this idea of Greek architecture, statues and sculptures, I decided to look into ways in which I could develop my ideas further and create unordinary images. I decided to photoshop my model onto sculptures that I found at the British Museum (9). As I began to focus more on sculptures and the human figure, I wanted to look closer at the body and how it creates abstract shapes, resembling to sculptures. I started to look at Bill Brandt's 'Nude' series (10) which focused on transforming human bodies into abstract shapes and forms. Therefore, I photographed the human body zoomed in to create abstract shapes. After that, I carried on photographing models' body up close, really focusing on the human figure. Whilst doing this, I also wanted to use Photoshop to further abstract the body (11). This then led me to incorporate the link between sculptures and the human figure. I photographed my model in a studio, nude, resembling a sculpture (12). I then decided to photoshop this onto a plinth which I had photographed at the Victoria & Albert museum (13).

Next Development: Final Piece
My previous shoot in the studio was successful and after looking at my images and editing them, I preferred the images where I used the fabric around my model's body. I am therefore considering buying a different type of fabric and experimenting with that. Below, I have included my two favourite images using fabric from my previous shoot and then a selection of images I found off pinterest that use different fabrics to cover the body and create interesting shapes. By doing my previous shoot, it has helped me to refine my ideas and has therefore led me to start creating my final piece.
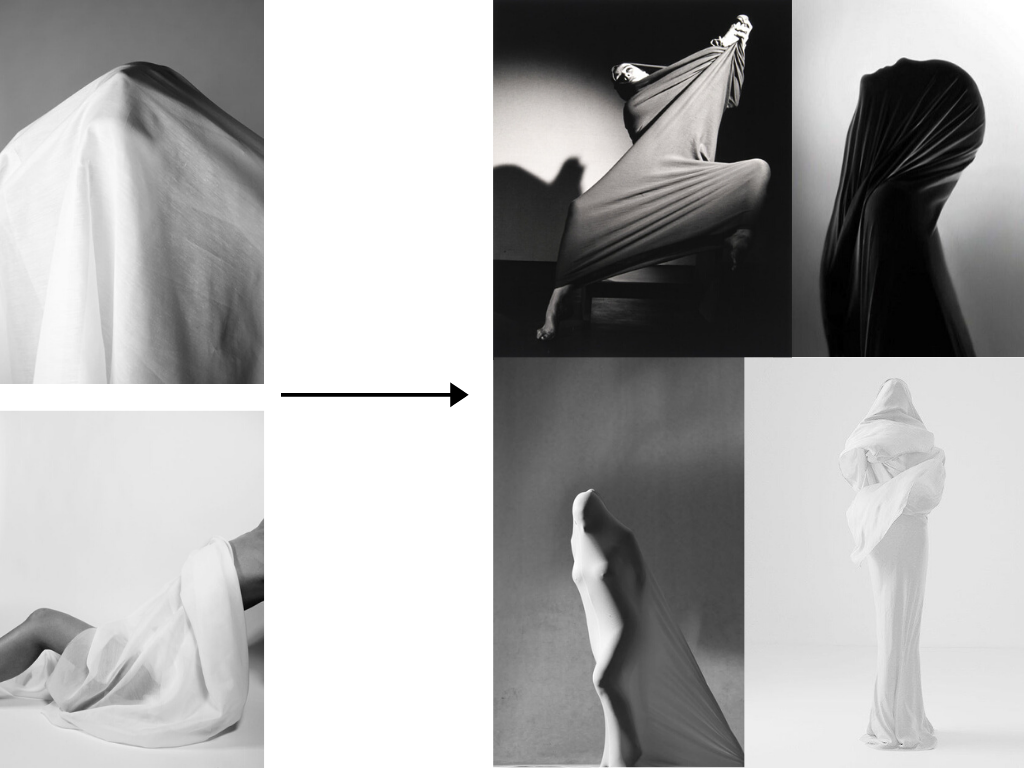
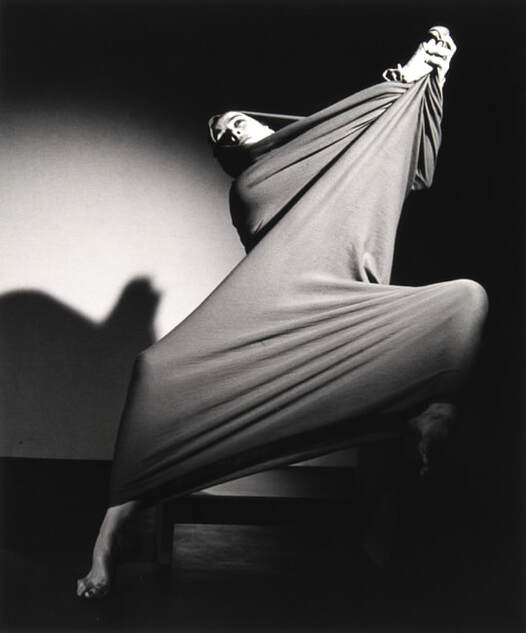
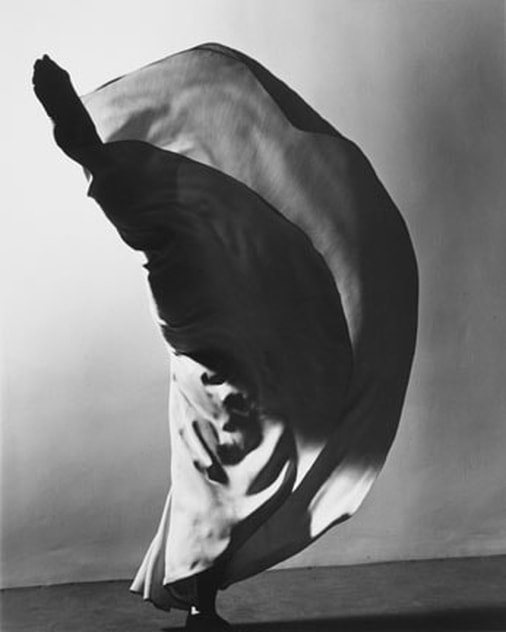
Barbara Morgan
Barbara Morgan was best known for capturing images of professional dancers during their performances. Morgan began photographing dancer Martha Graham in 1935 in a studio, with the intention of capturing "the most profound and most crucial moment" of Graham's dances. Morgan and Graham collaborated from 1935 to 1941 which led to Morgan publishing her first book, 'Martha Graham: Sixteen Dances in Photographs.' Before capturing the extraordinary gestures of Graham, Morgan would 'absorb the dance' first, watch many rehearsals and talk with Graham. After printing the images she would take, the dancer and Morgan would agree on which images best expressed what they were after. Her stunning images were also educational as they introduced people across the United States and abroad to modern dance, then a relatively unknown art form.
|
|
Plan for final shoot
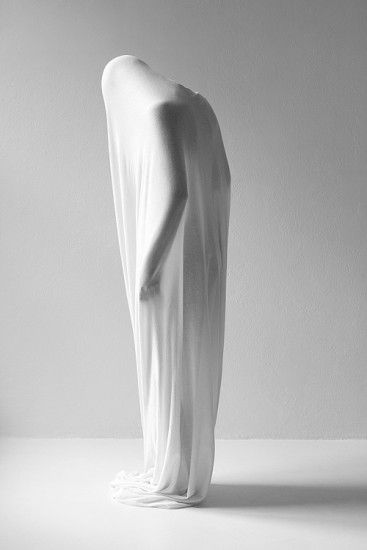
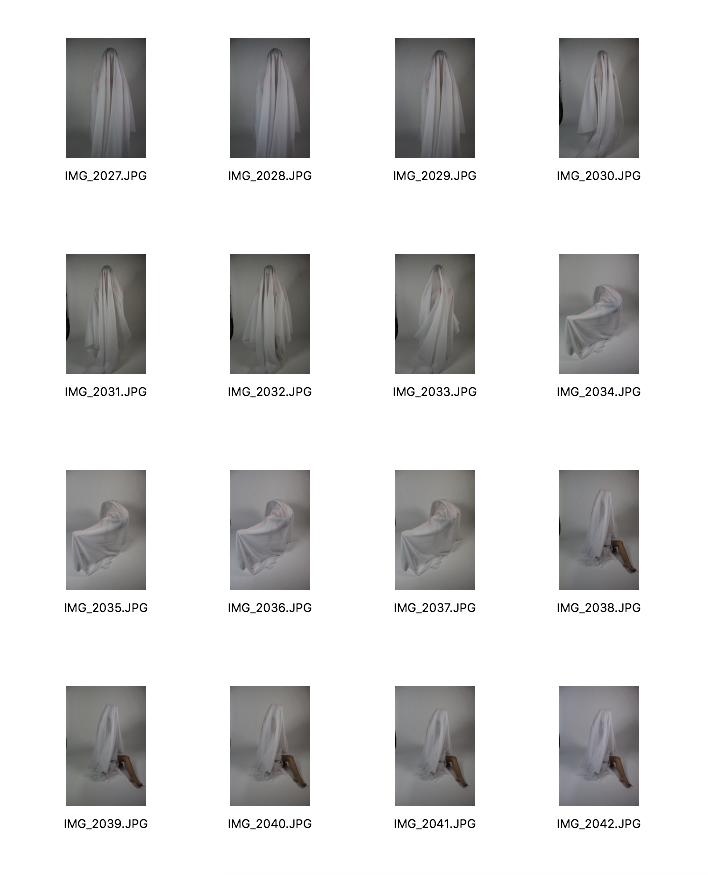
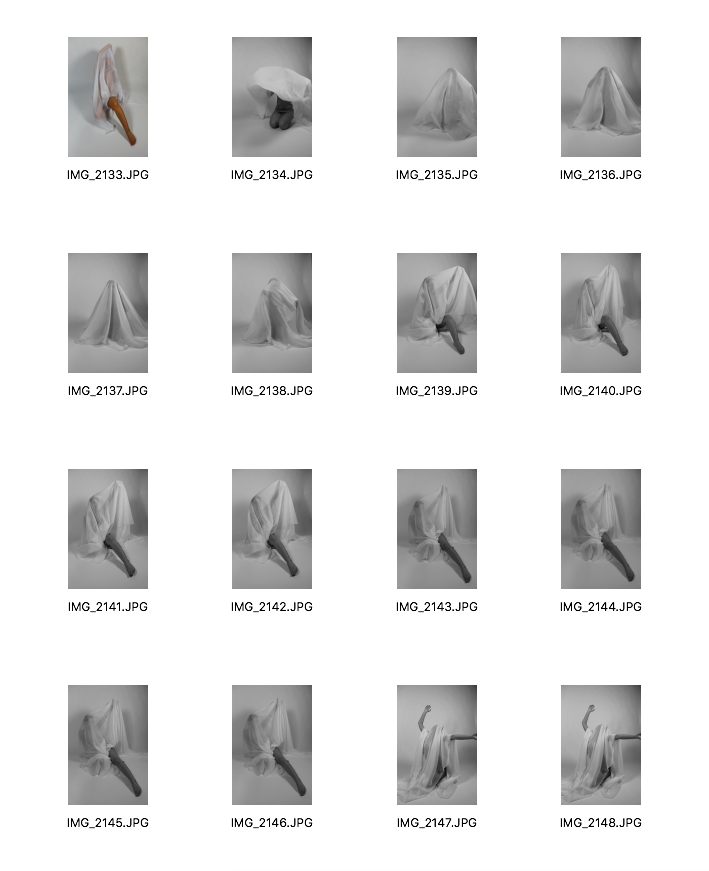
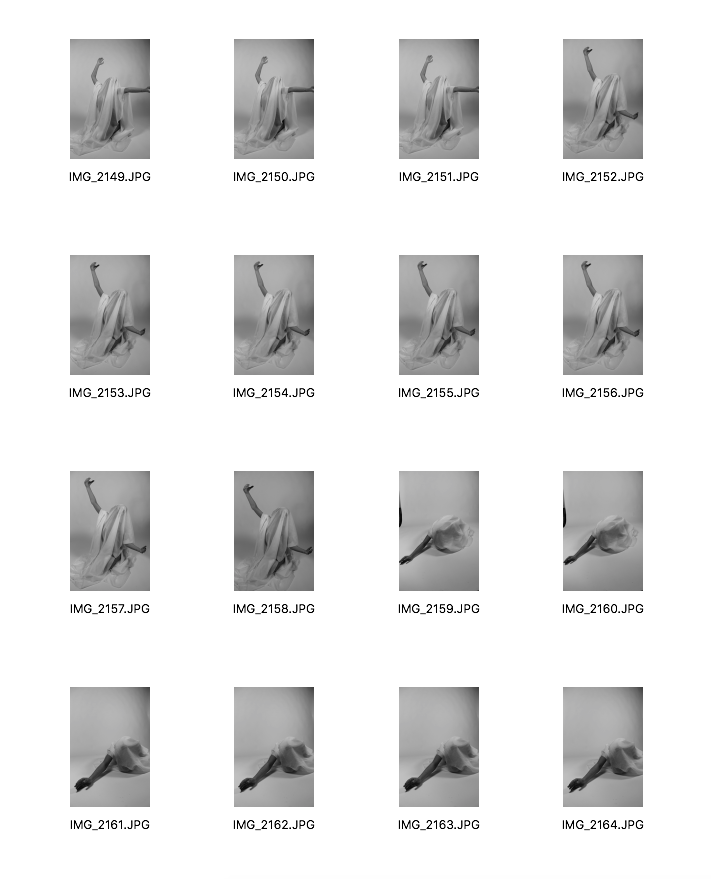
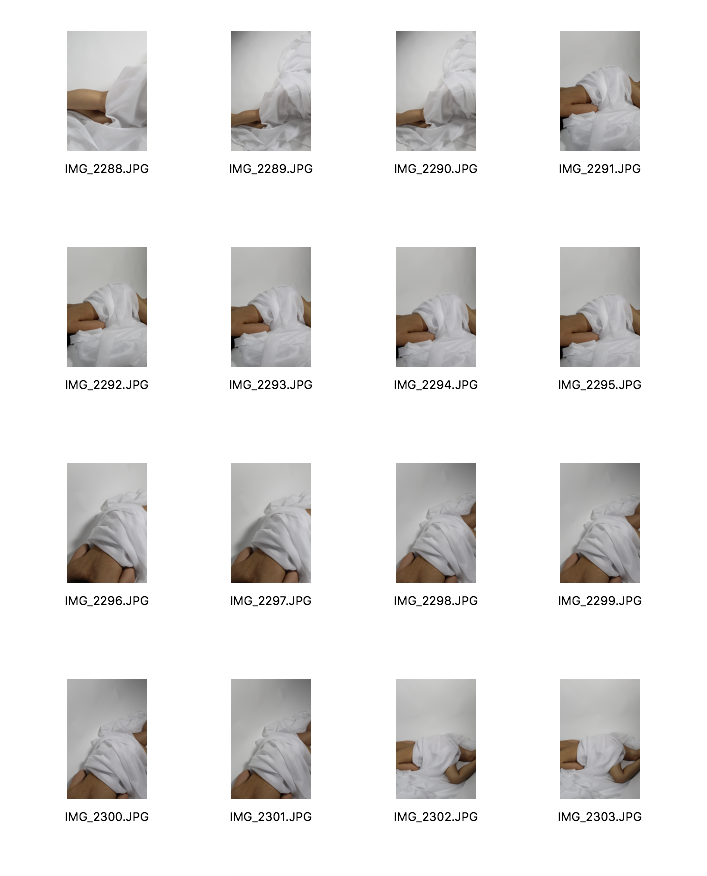
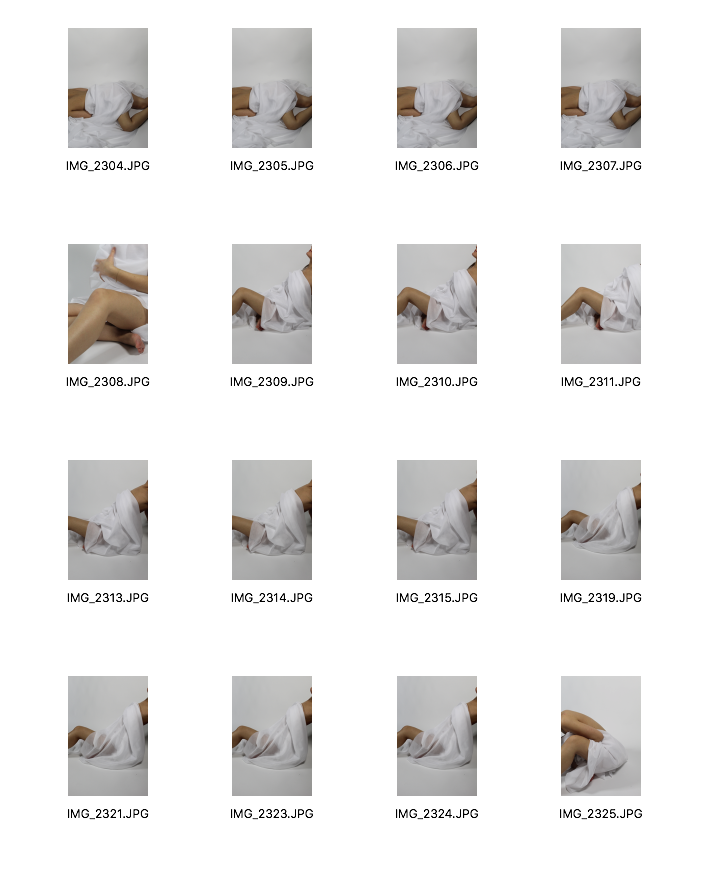
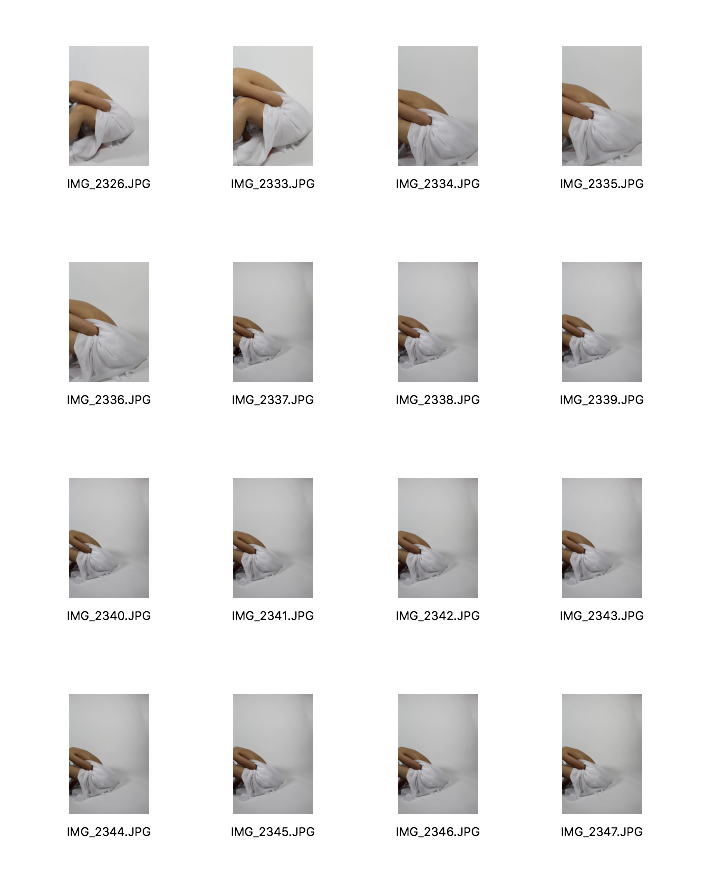
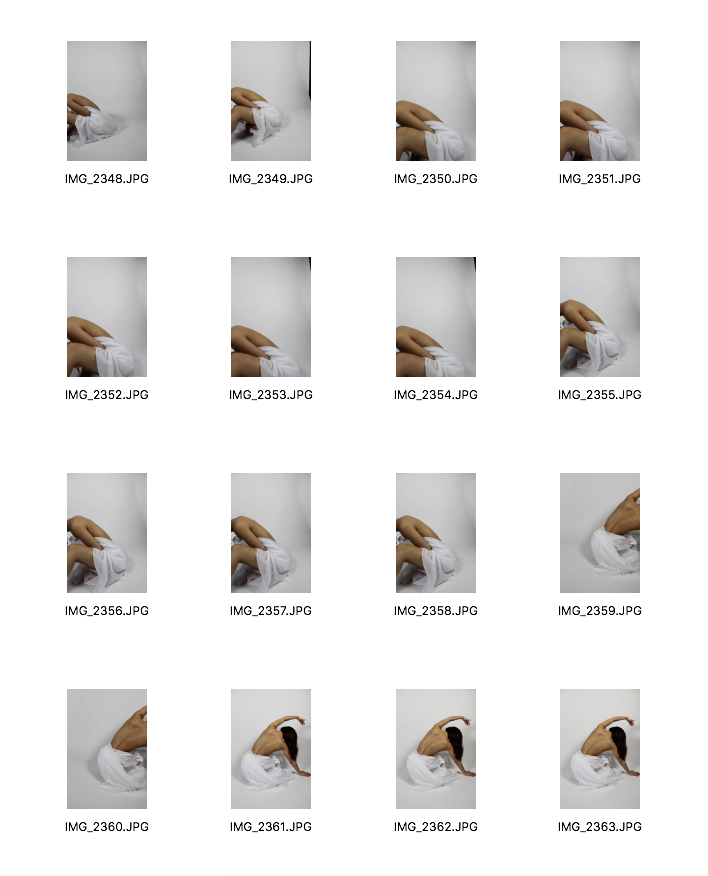
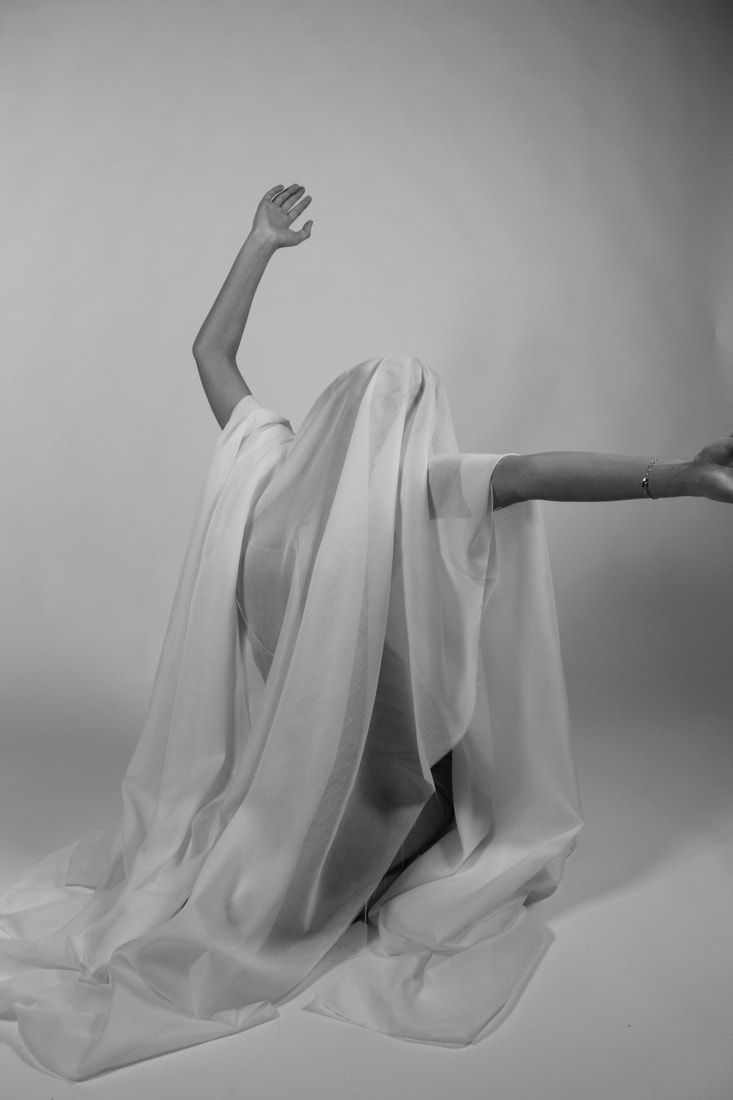
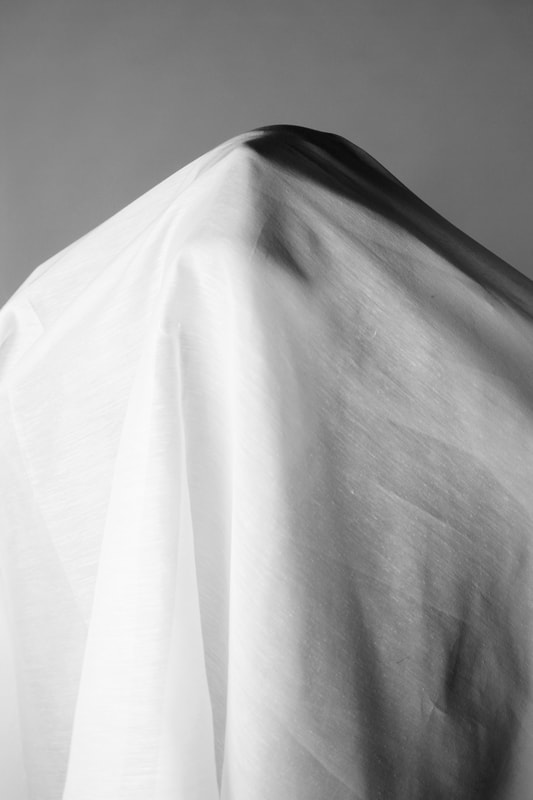
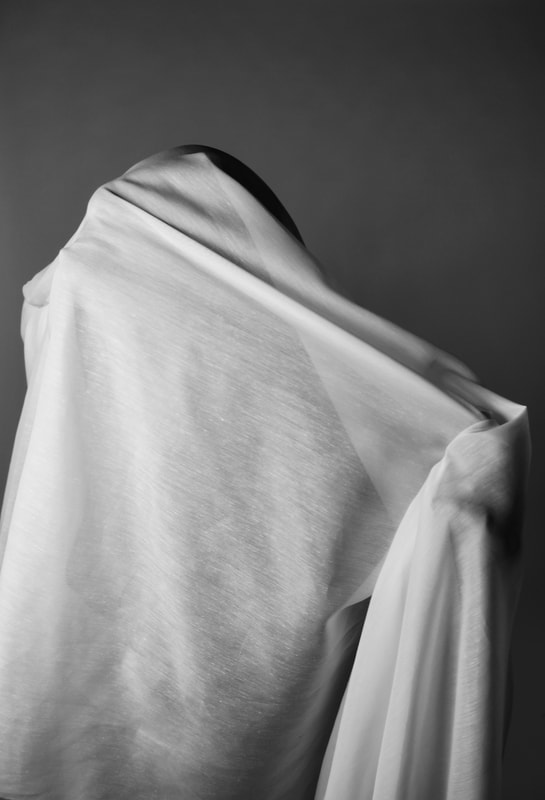
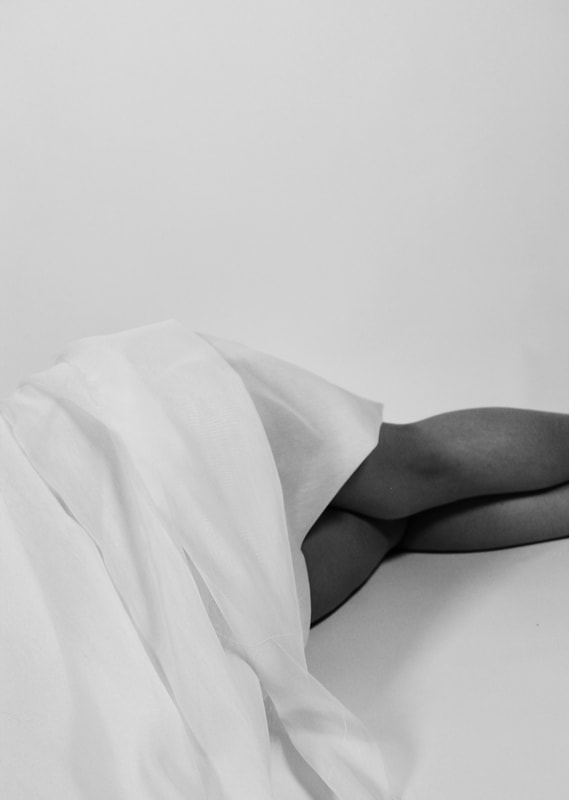
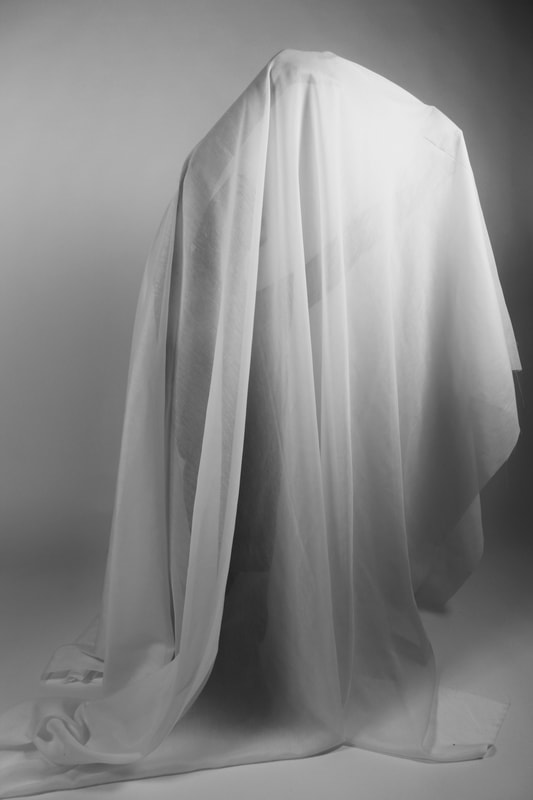
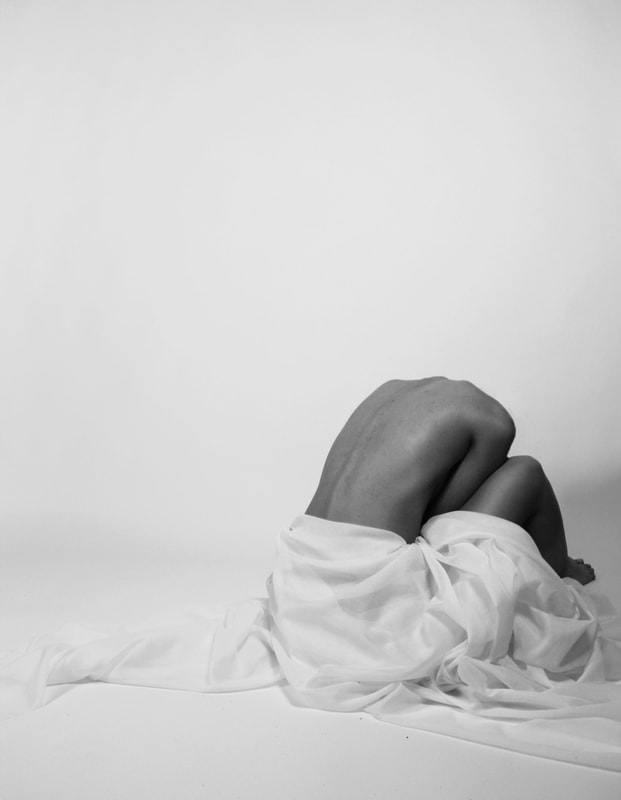
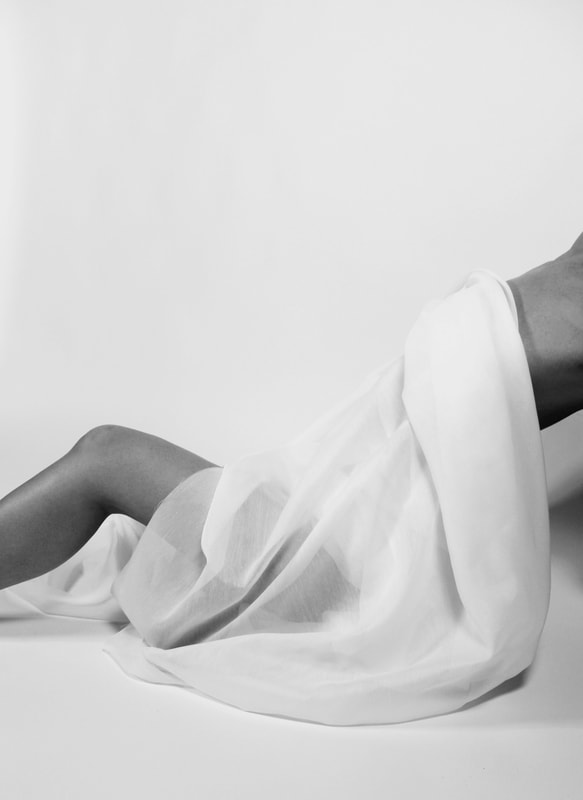
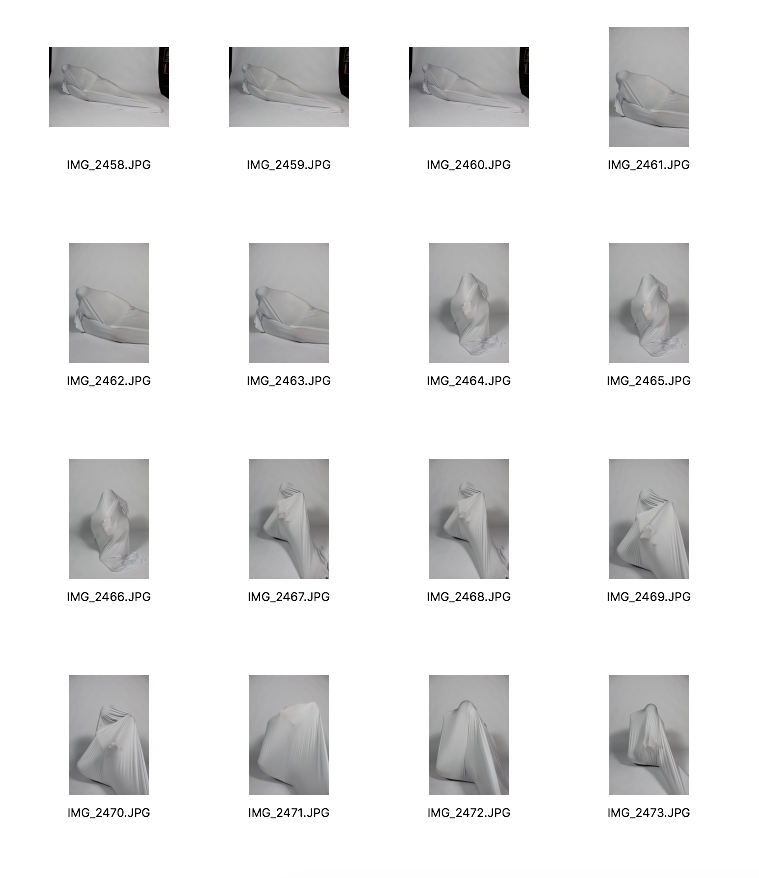
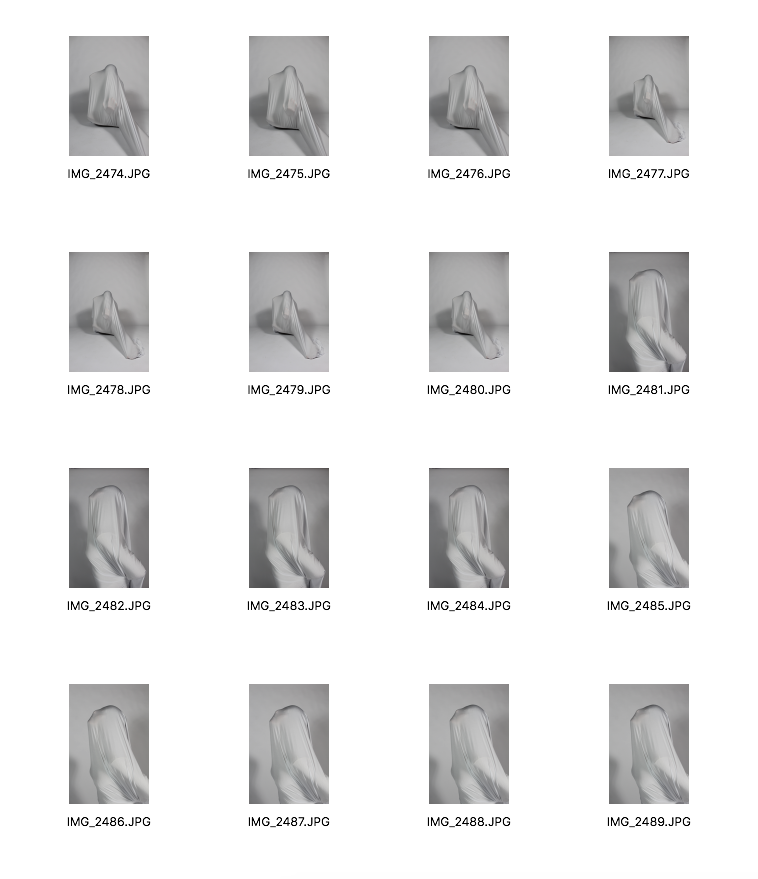
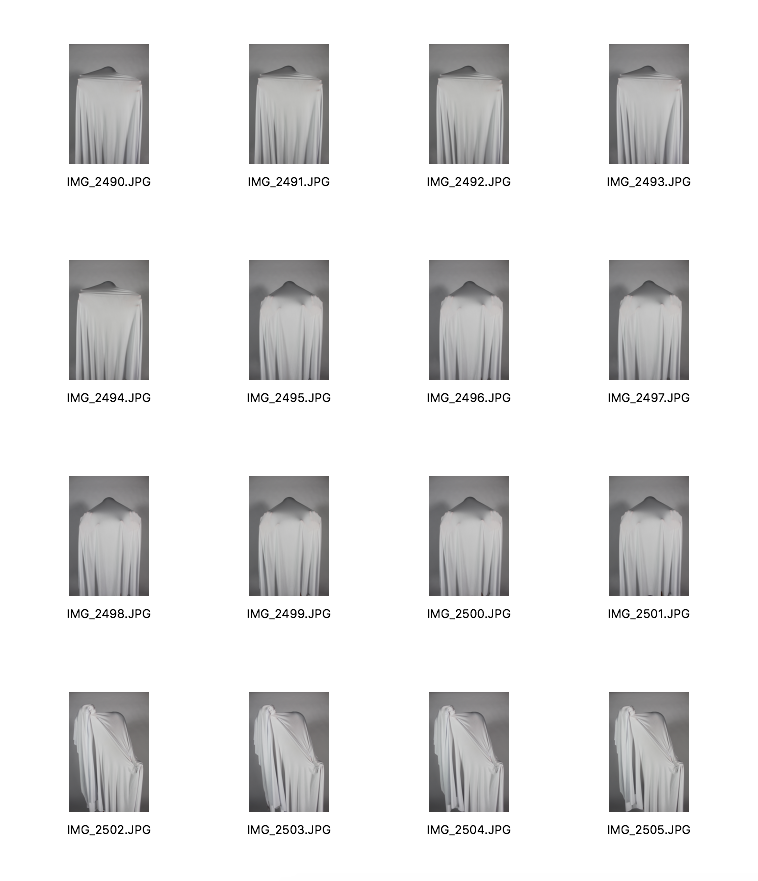
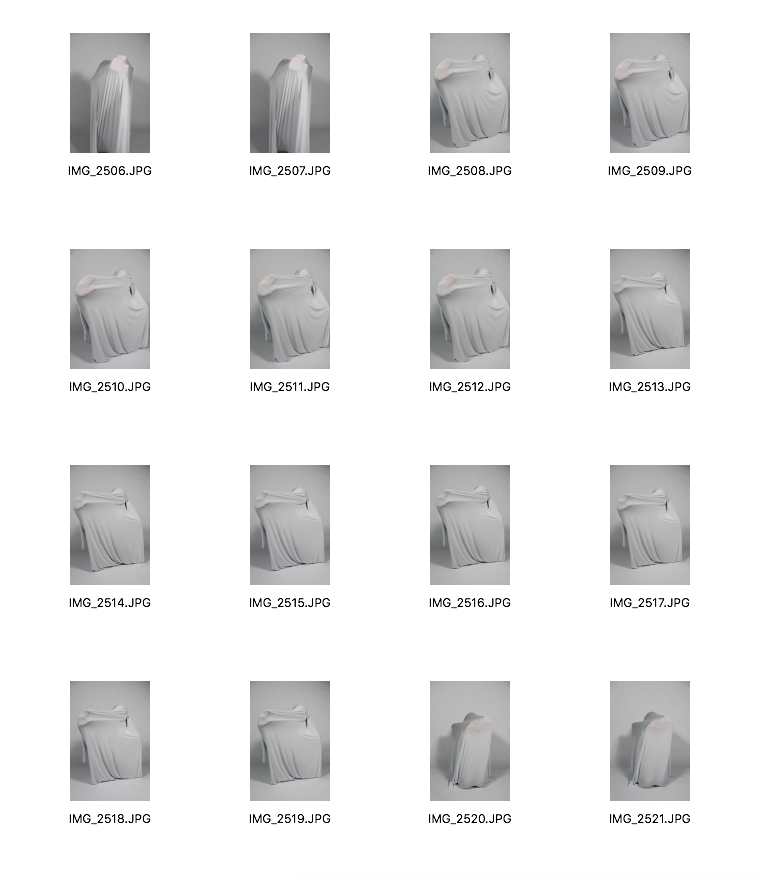
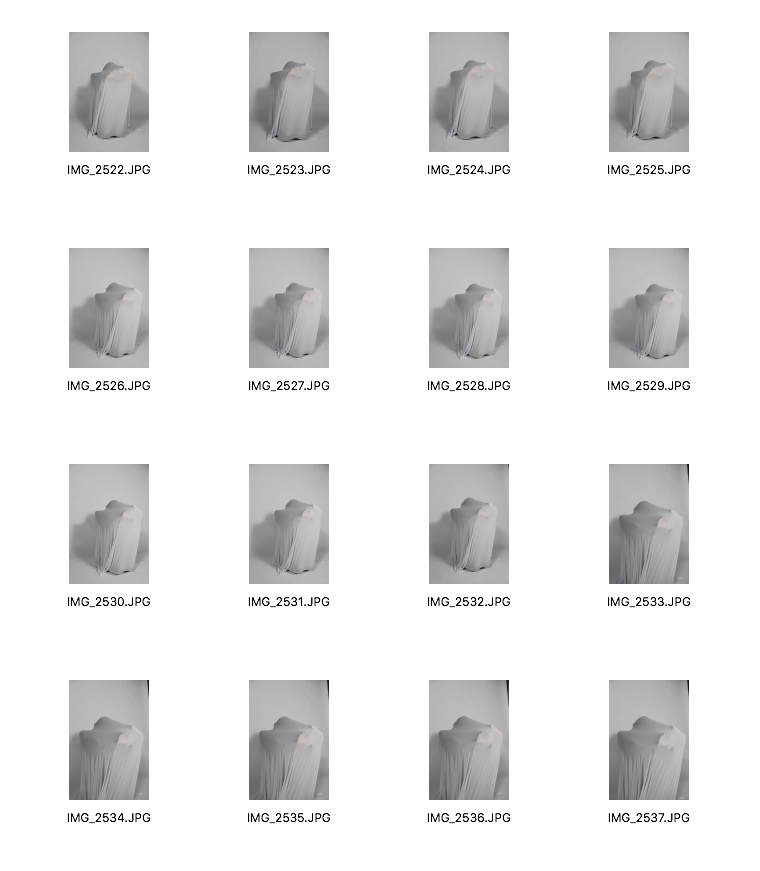
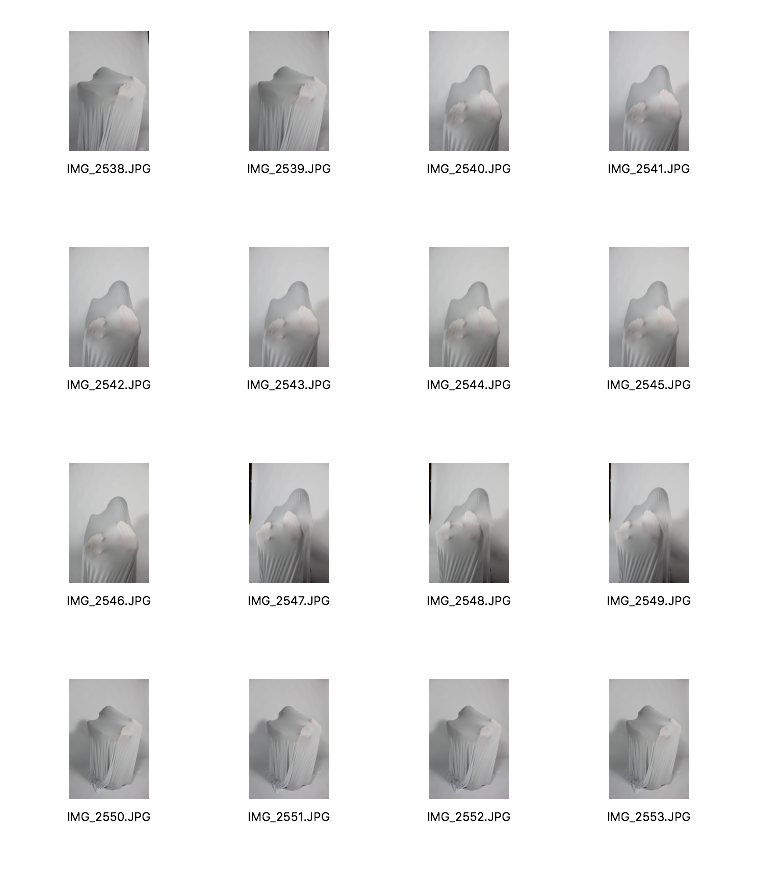
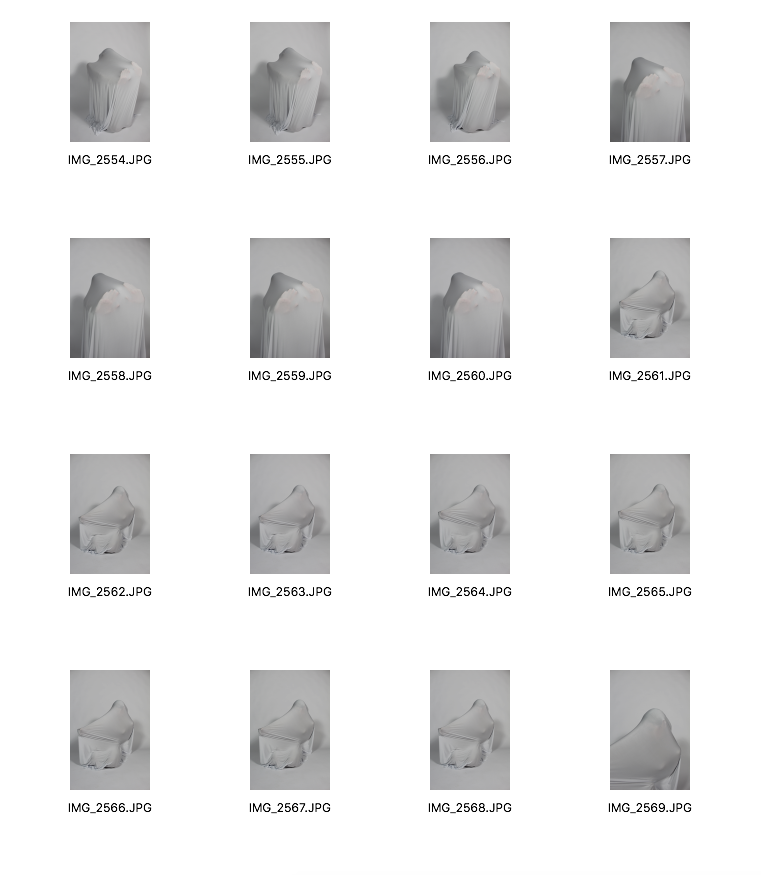
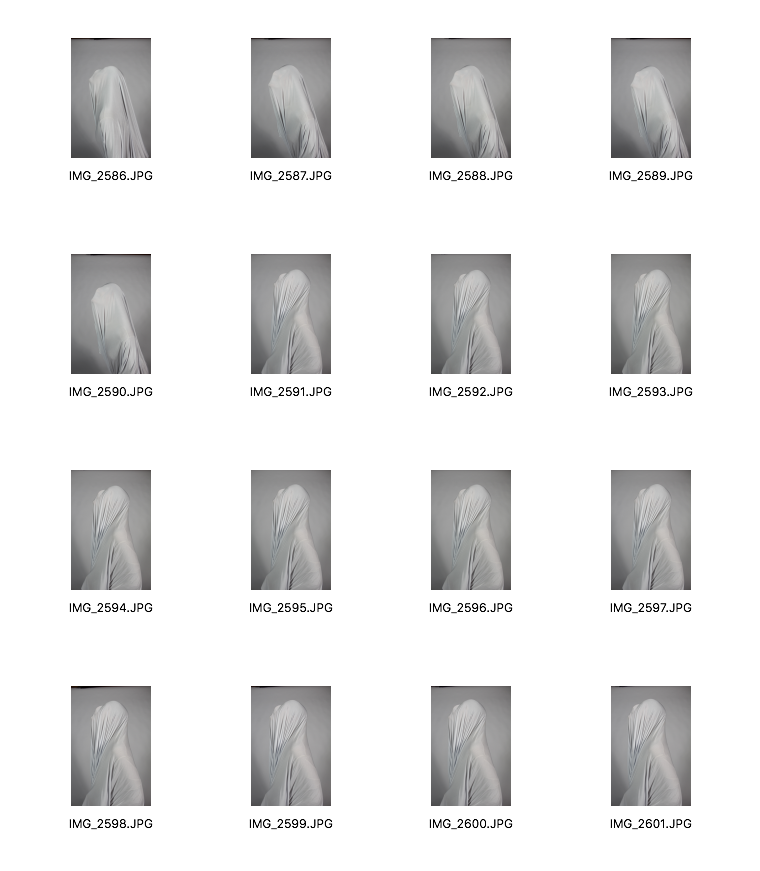
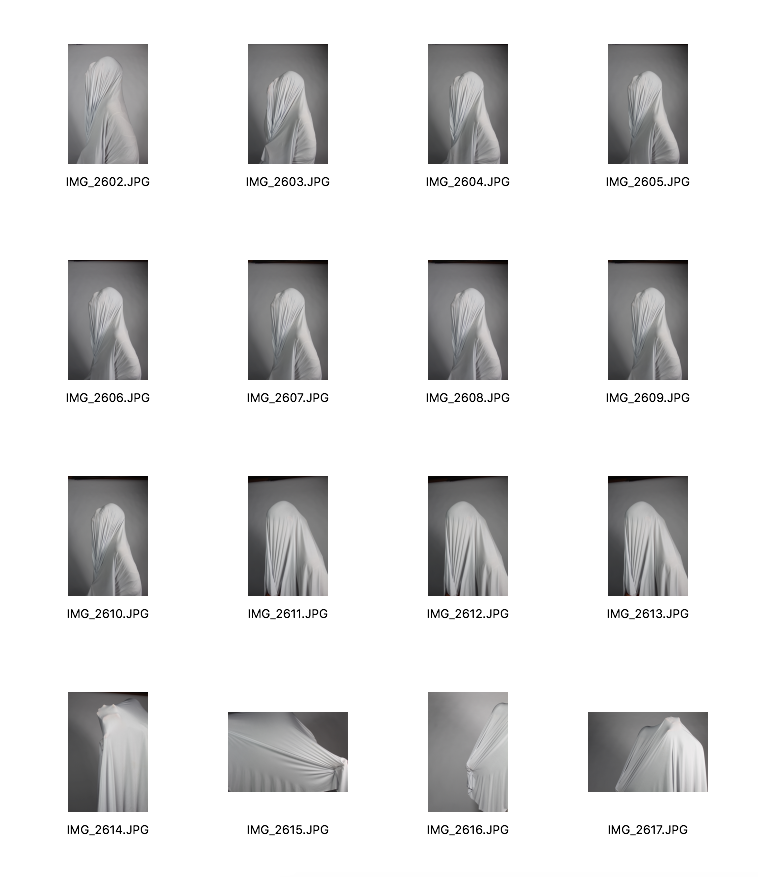
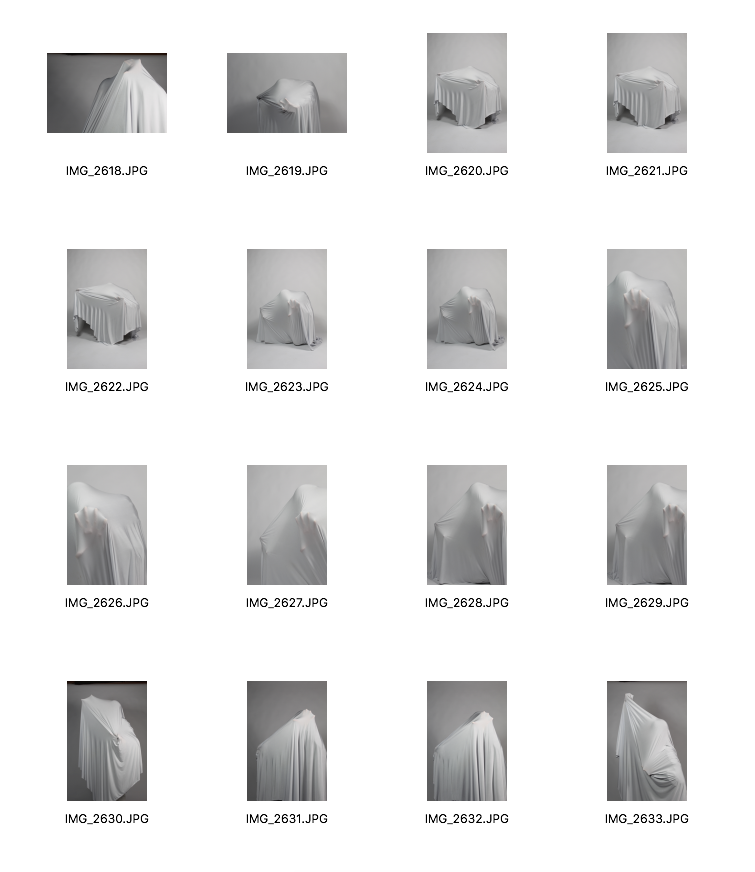
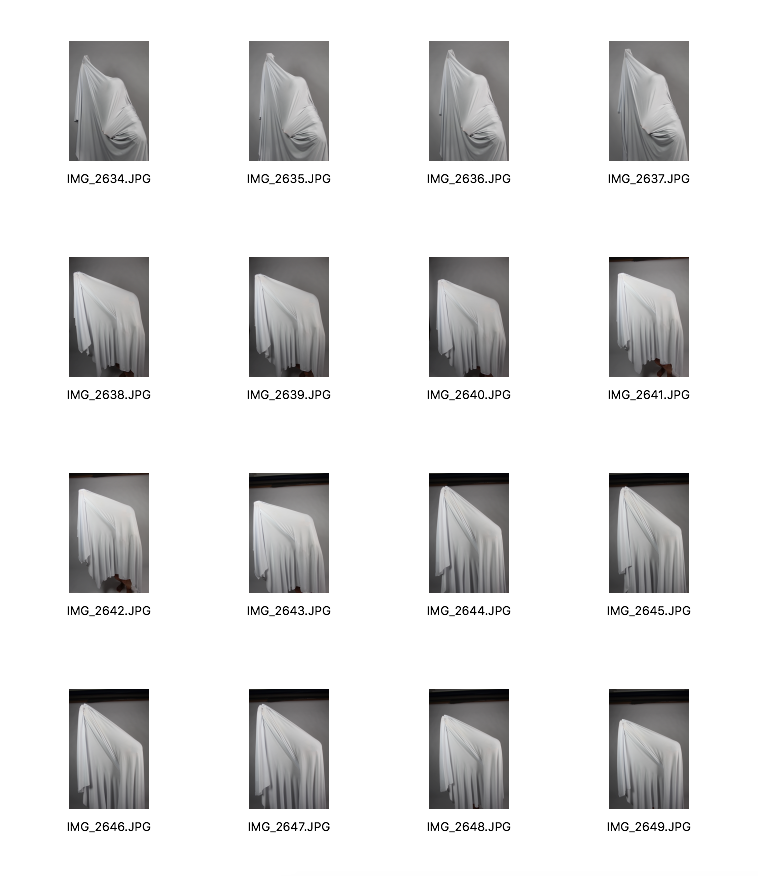
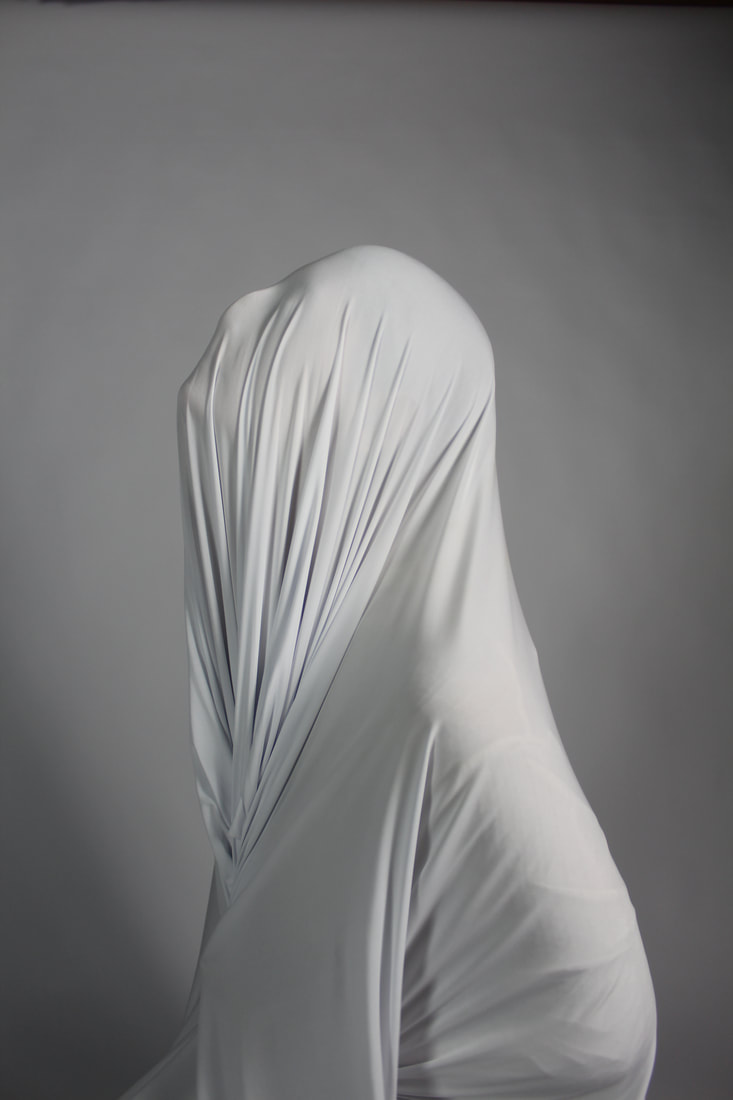
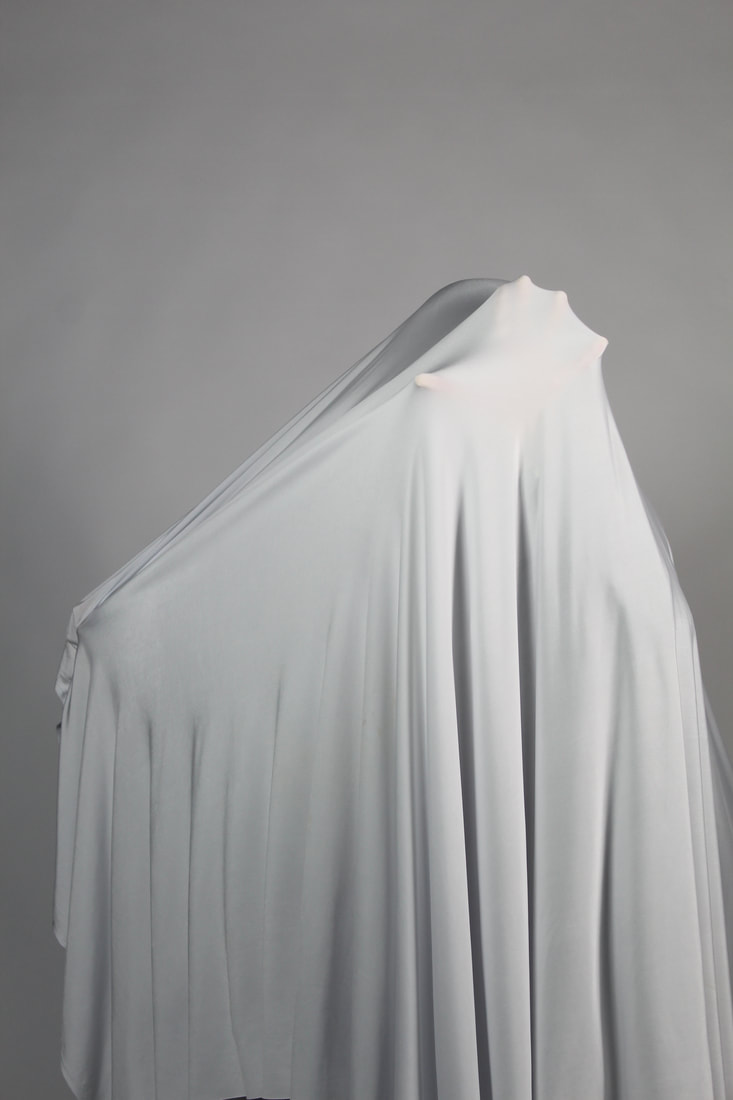
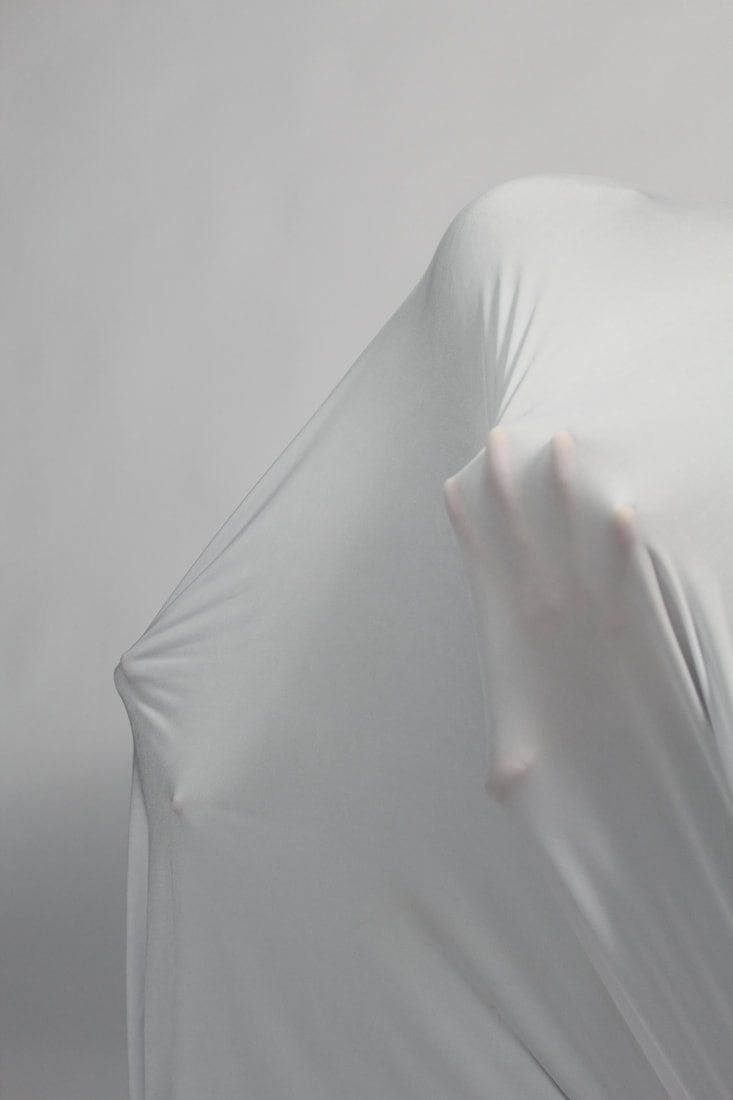
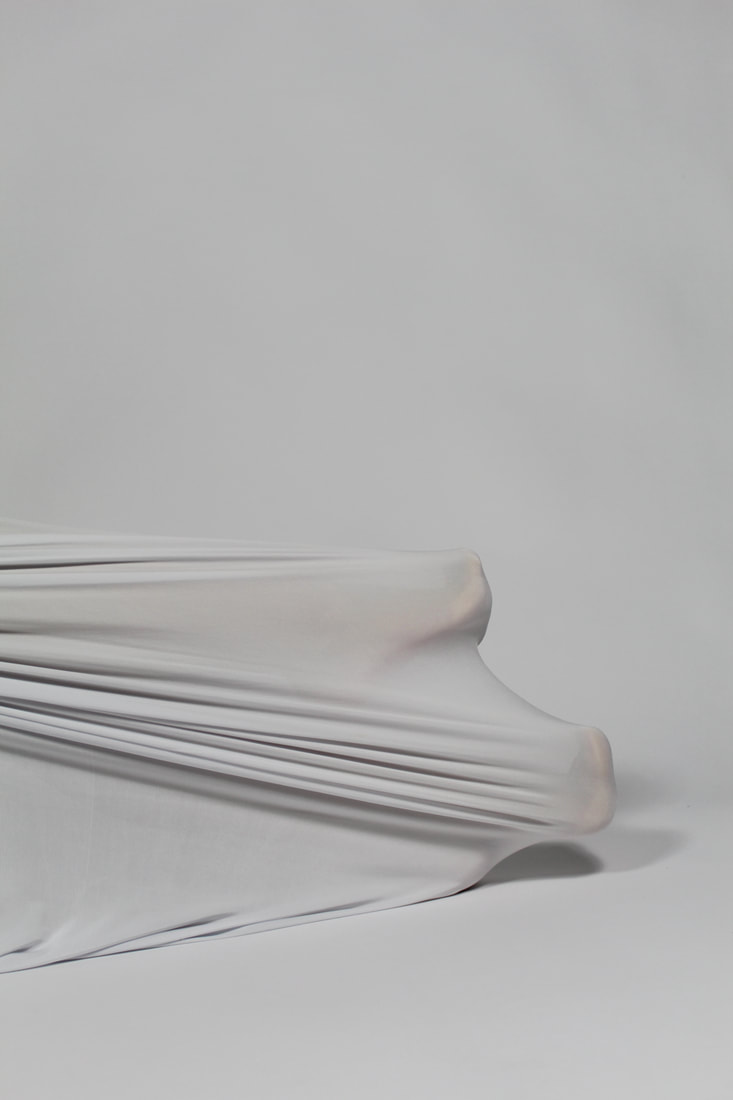
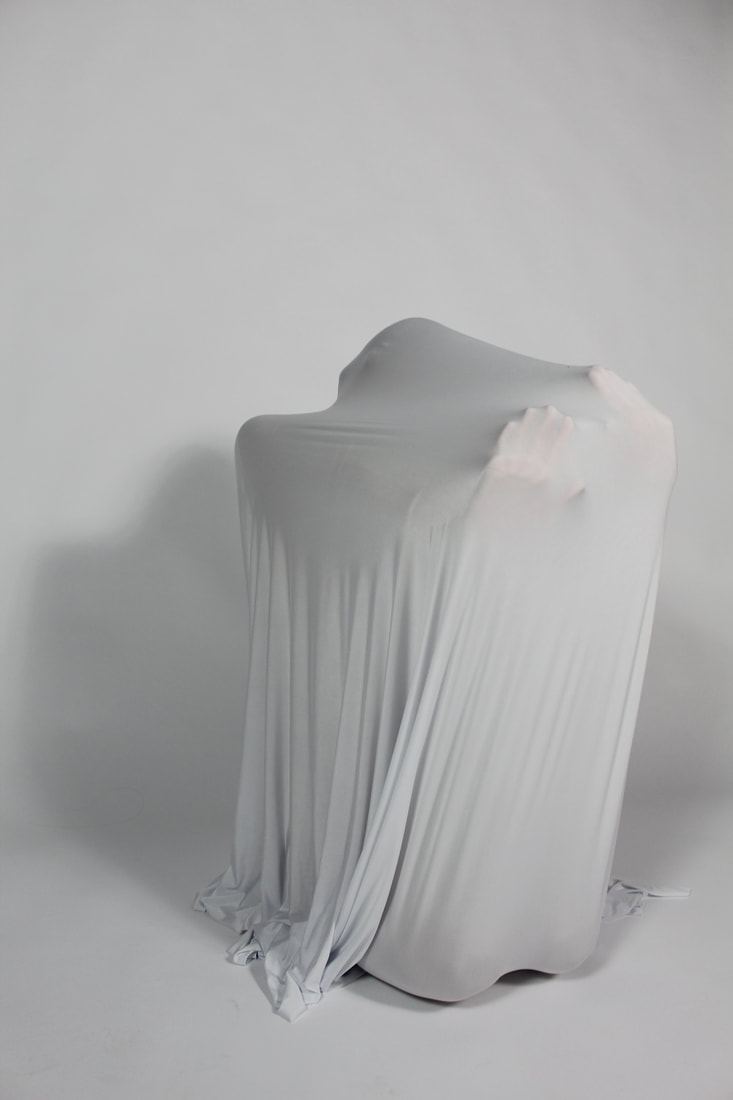
What interests me most about Morgan's work, is the use of material she uses around the dancers. As I already experimented with voile material around my model in my previous shoot, I want my final piece to feature a different type of material. In the image above on the left, Morgan used a stretchy material which I really like the effect of. I am therefore planning to buy lycra material which is a very stretchy, elastic material. I have decided to use lycra as it's elasticity and strength will be most suitable for my shoot as I want my model to be able to move underneath the material and create interesting shapes with her body. I am going to cover my whole model's body and face with the lycra material as I like the idea of my model being anonymous. This idea of anonymity can be seen in my recent shoots as I have been mostly focusing on the body and not having my model's face in the image, so I want to carry this theme on in my final piece.
I am going to make a list of the key things I need for this shoot:
1. Order lycra material
2. Get nude colour dress for my model to wear underneath material
3. Studio with floodlights
I am going to make a list of the key things I need for this shoot:
1. Order lycra material
2. Get nude colour dress for my model to wear underneath material
3. Studio with floodlights
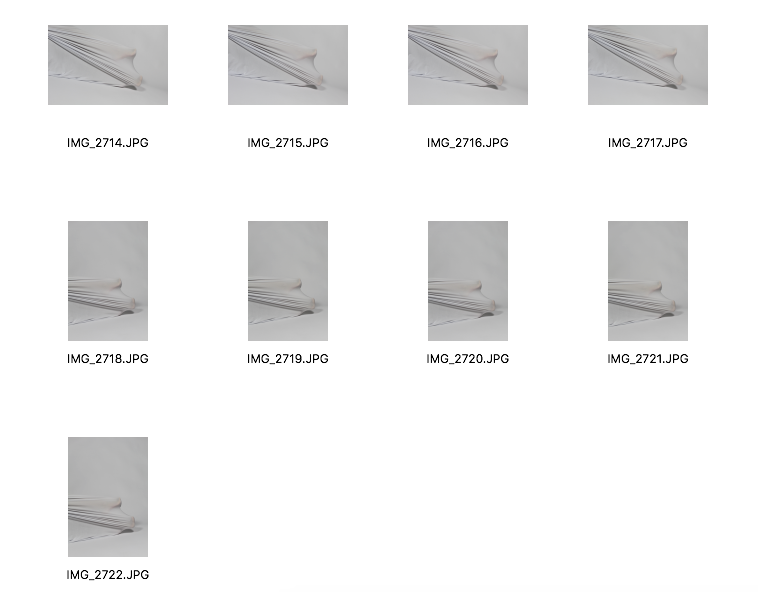
Contact Sheet
|
|
|
|
|
|
|
|
|
|
|
|
|
|
|
|
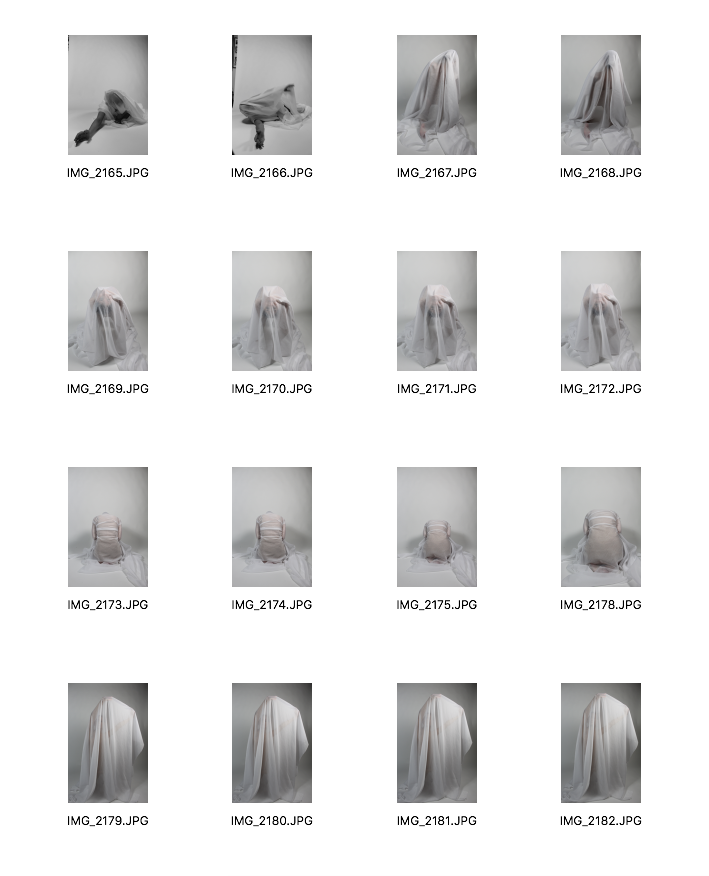
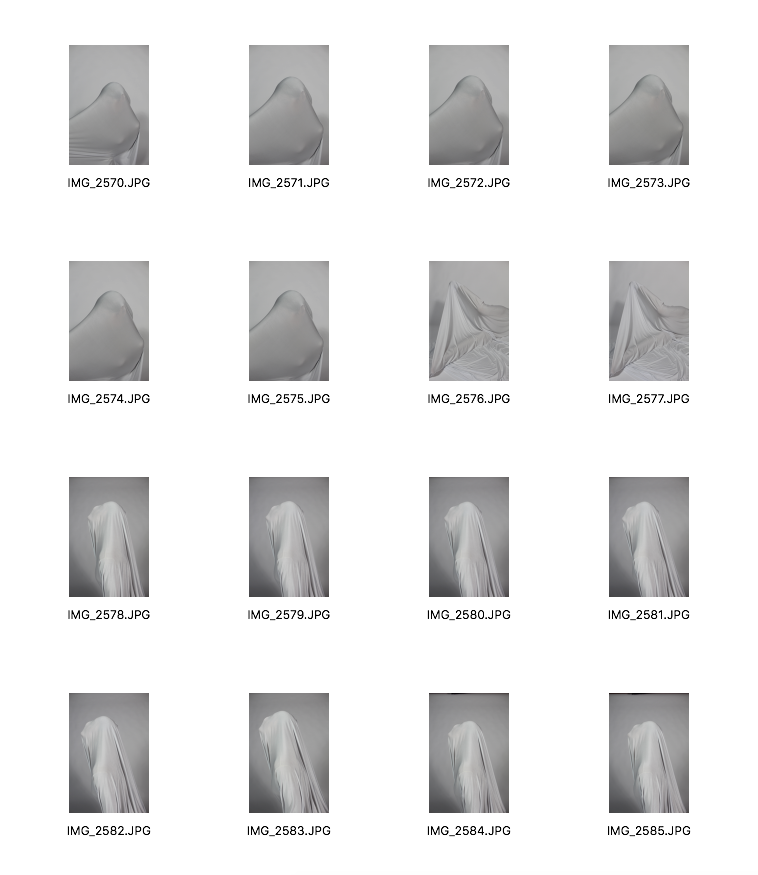
Best Images: Unedited
|
|
|
|
Editing my images on Photoshop
I wanted to edit my images into black and white as the original images didn't have much contrast to them. I opened up each image onto Photoshop and then went to Image > Adjustments > Black & White. I then wanted to increase the contrast so I went to Image > Adjustments > Brightness/Contrast. I also went to Levels using the same process to create further contrast and also to adjust the lighting. Lastly, I cropped some of my images. As you can see below, I cropped this one specifically as I wanted the image to be slightly closer up. I repeated these steps for each image I opened up on Photoshop. Also, as I was using a white backdrop in a photography studio, there were some dirt marks on the background which I edited out using the 'Clone Stamp' tool which can be found on the left side bar of Photoshop.
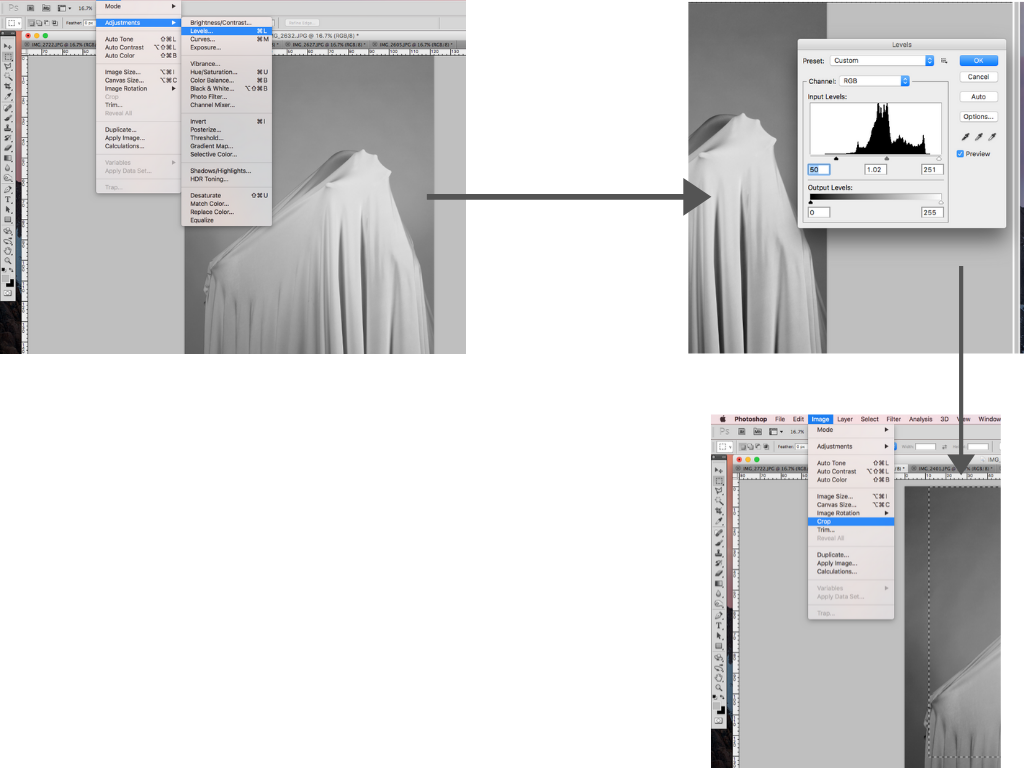
FINAL PIECES
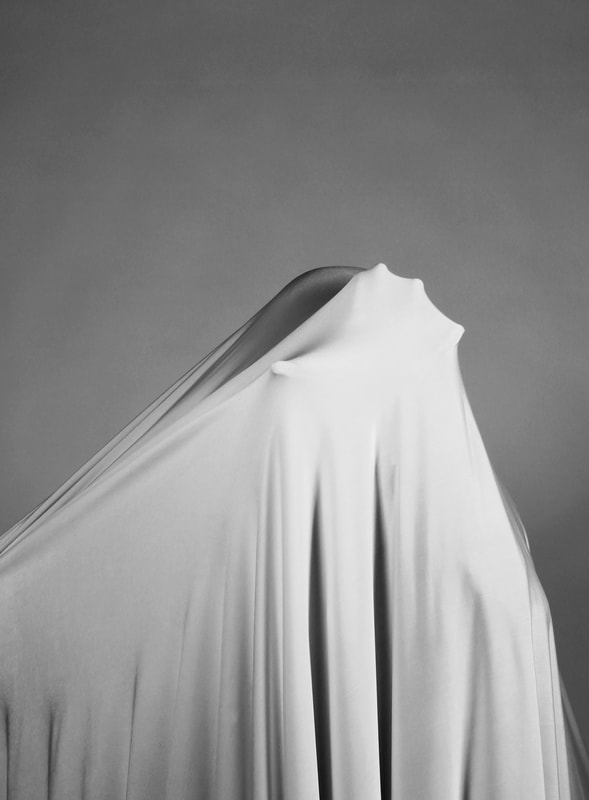
|
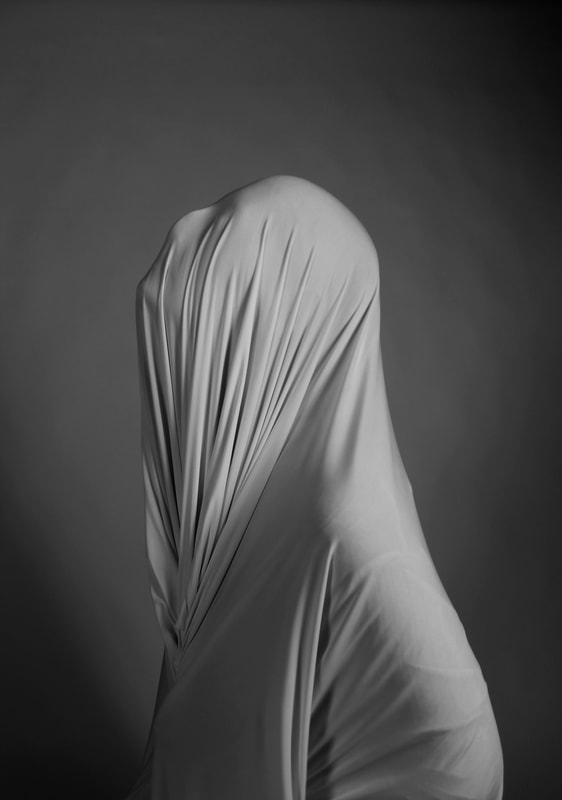
|

|
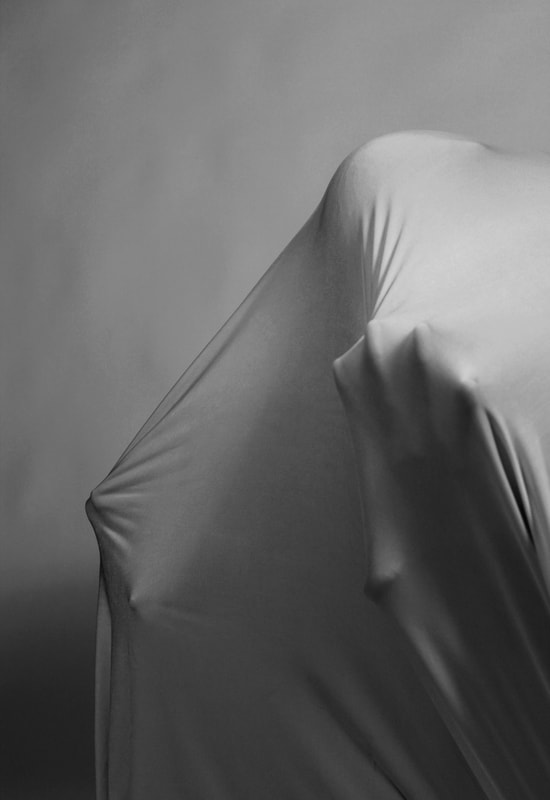
|
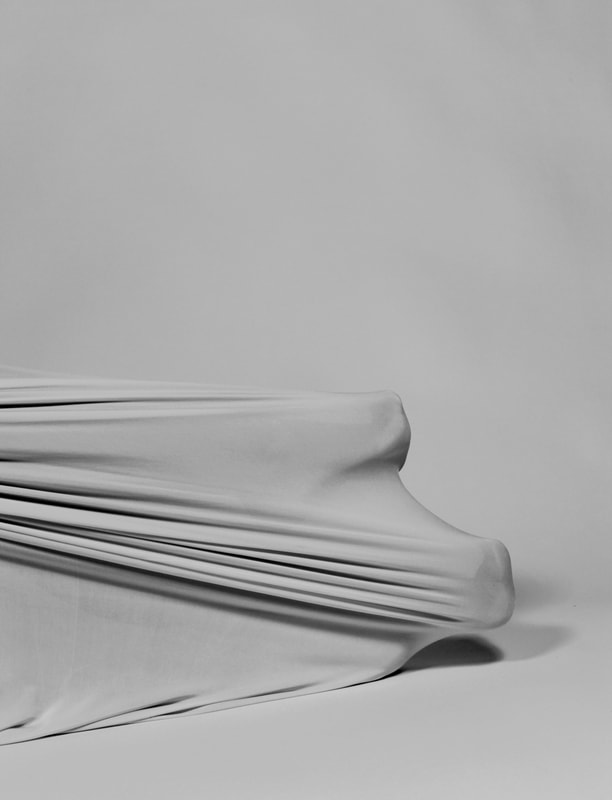
|
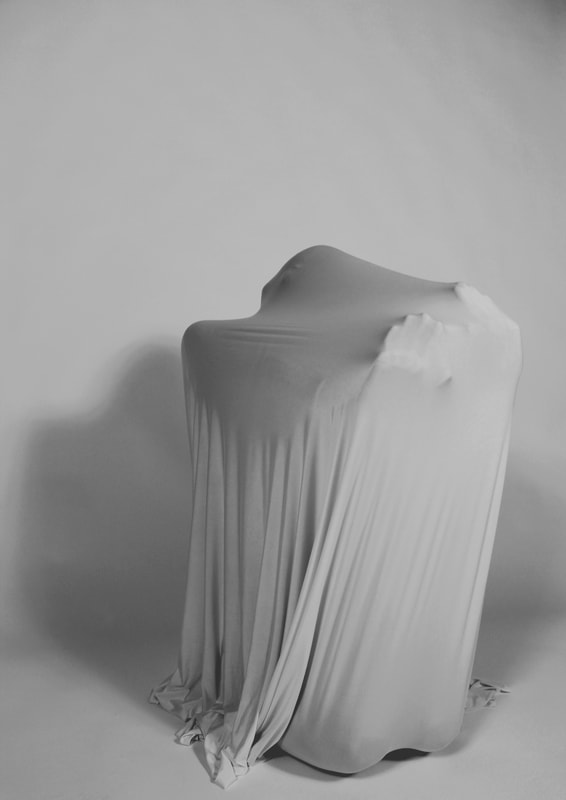
|
I am very pleased with my final pieces as I feel like each of my developments throughout this project has helped me create my final outcome. For example, my experimentation with lighting and contrast at the beginning of this project, encouraged me to consider and keep in mind various ways of using lighting effectively for my final pieces. When looking at these images, they are very minimalistic and also do not feature the model's face. This anonymity reminds me of some of Henry Moore's and Barbara Hepworth's sculptures, where identity is never shown. I like how some shots are more close-up and some are further away. The third image I have used as my final piece is actually from my shoot before my final one. I decided to use it, as it is one of my strongest images and really demonstrates my use of contrasts. Also, what I like about this particular image is the way you can slightly see the structure of the model's face but at the same time, still not being able to recognise her. Her facial structure is almost blurred by the material draped over her and again imitates an abstract sculpture.
